About 72 hours ago I decided that I was going to start publishing blog posts directly from TextMate instead of writing in TextMate and posting with MarsEdit (more on this in a bit). ((Don’t worry I still love MarsEdit.)) This did present a problem for me though, it would be nearly impossible to post linked list items (which are far more frequent and fast paced). Justin Blanton ((That magnificent man.)) posted a new plug-in yesterday that completely changed how I blog. He created a way to post linked list items by enabling custom field support using his ‘[cf]’ syntax in the body of your post.
This changes things in a big way — you see now you can actually use the WordPress iOS app to create a blog post with a custom slug and a linked list url embedded. I can do this all inside the iOS app for the first time ever. Before I invoked a custom ‘Press This’ plugin, then saved that as a draft, then opened up the post in the WordPress backend in Safari — then I could finally edit and so on. It was a pain in the ass, still is if you don’t have Justin’s plugins.
I was pretty happy with having just that tool at my disposal (especially since I have been posting more from my iPad of late), but then I realized that I could use the same trick to post linked list items from TextMate on my Mac. Oh boy.
The immediate problem though is that it is not as convenient to post a linked list item in TextMate, as it is with MarsEdit and the great bookmarklet that it comes with. I decided that even that experience could be improved upon and took it upon myself to write a Keyboard Maestro macro that will create a linked list post in TextMate — with even greater ease than the MarsEdit bookmarklet can.
End Result
Here’s the end result of what this macro outputs when you select text you want to quote in Safari/Webkit:
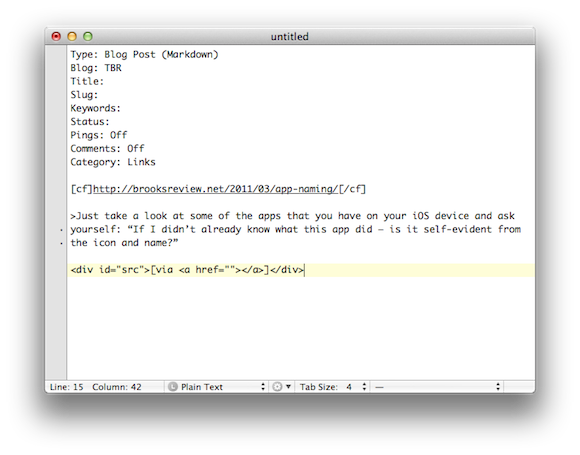
What you end up with is the basic headers needed to send a post to your WordPress blog with TextMate, the category is automatically set to ‘Links’. I also set the custom field (which in my case reports to the linked_list_url custom field) to the current URL, then I grab the selected text (even though we didn’t copy it to the clipboard) and paste it as a Markdown blockquote item.
All I need to add at that point is the Author’s name ((I wish there was a standard way to grab this automatically, but I have yet to devise a decent solution for that.)) and my comments. Perhaps a ‘via’ link if needed.
Why
A lot of you may wonder why I would want to blog with a text editor rather than use something dedicated like MarsEdit. The answer is actually pretty simple: text backups. I like the fact that I have a copy of every article I have posted to TBR stored in Dropbox as a plain text file. What I don’t like is that I don’t have the same for Quote posts or link posts. Using TextMate I can blog faster than I can with MarsEdit and I get to save the published file as a text file in Dropbox. It’s just one more little back up and reference bit for my own paranoid-self-satisfaction.
The Macro
The entire macro is incredibly simple to setup, with the exception of grabbing the URL from Safari — this is why I was asking for an AppleScript on Twitter yesterday. What I was reminded of thanks to Ian Hines was that the simple shortcut CMD+L highlights the URL bar — bingo.
Here’s the entire macro:
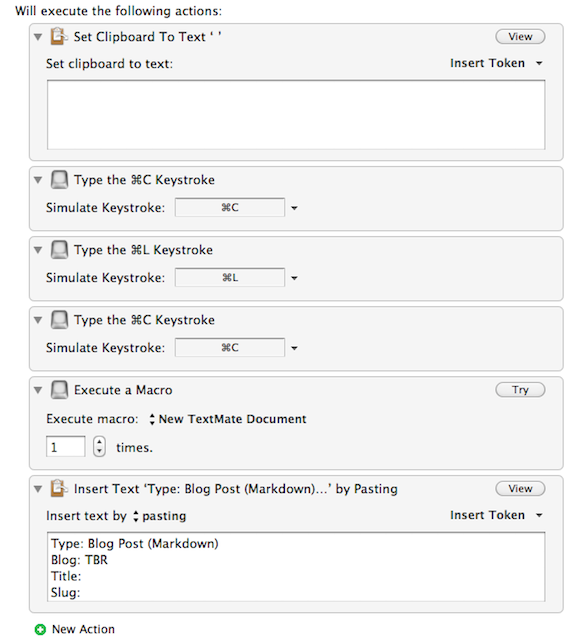
So I find that while showing people this macro allows you to duplicate it, it doesn’t do much to explain the actions that I took, that’s why I want to step through them.
- I first set the clipboard text to a blank space. The reason I do this is because later on when we go to grab the blockquote material you won’t get this odd double pasting error that I was getting. This was a result of instances when you don’t select any text to blockquote, adding this solves that problem.
- Now we enter into the bare bones stuff. First we hit
CMD+Cto copy the selected text to the clipboard so that we can blockquote it later. - We highlight the URL in the address bar by pressing
CMD+L. - A simple
CMD+Cto copy that URL. - Now we are calling upon another macro I have set in Keyboard Maestro that opens a new, blank, TextMate document. You achieve the same result by telling Keyboard Maestro to switch to TextMate and press
CMD+N— that’s basically all that macro is doing. - I apologize that you can’t see everything in this last box, but here is what is in that box:
Type: Blog Post (Markdown)

Blog: TBR

Title:

Slug:

Keywords:

Status:

Pings: Off

Comments: Off

Category: Links
["cf"]%CurrentClipboard%["/cf"]
>%PastClipboard%2%
I had to add quotes to the ‘[cf]’ tag to get it to show.
Basically I am pasting in all the header information and filling in two fields with the information we stowed on the clipboard earlier. Inside the [cf] tags I am pasting the most recent clipboard item, which in this case will be the URL we grabbed from the browser. Lastly using the Markdown > syntax for blockquotes I am pasting the clipboard item that is two items back, instead of the typical one, this allows me to paste in the material we want to blockquote (the stuff that was highlighted when you invoked the macro).
That’s it. I have this macro set to run when I press ⌘+1, but only when I do so inside Safari or the Webkit nightly builds. Thus, overriding the MarsEdit bookmark that would normally launch when I press this shortcut. ((You can limit which applications this works in by creating macro groups and setting that group to only work in certainly applications — which is exactly what I have done.))
To-Do List
This macro is far from perfect and there are somethings that I want to add to it that I don’t quite know how to do just yet. Among those things are:
- Grabbing the title from Safari and pasting it in the ‘Title’ field. I am sure this can be done with a little AppleScript, I just haven’t gotten around to it yet.
- I would love to be able to run a script that scans the article content for keyboards and drops those (comma separated) into the ‘Keywords’ field. I am not going to lie — I don’t even know where to start on that one.
- Lastly I would love to add a script or action of some sort that would analyze and clean the URL. This way when I have URLs that contain tracking (such as
?utm-sourceand that crap) it would strip off the unneeded bit and keep Feedburner from freaking out on me every other day.
If anyone figures those things out please send it over to me with a link so I can share it. Also if you have any other unique way you are blogging I would love to hear about it.
I hope this helps at least a couple other Keyboard Maestro + TextMate junkies.
Bonus Tip on Clipboard Usage in Keyboard Maestro
One thing that a lot of people miss (gloss over) when they are setting up macros in Keyboard Maestro is that you can input dynamic content and rather than memorize the calls for that content there is a handy ‘Insert Token’ menu. As you can see here:
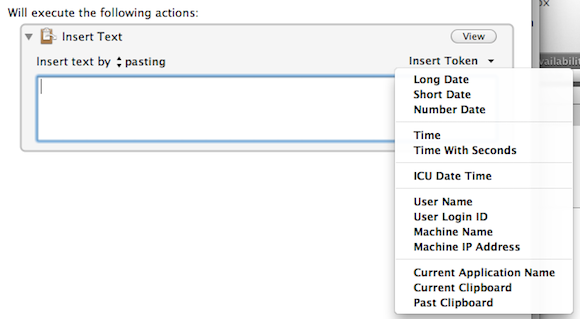
This can also come in handy if you want to run shell scripts based on variables.
Quote Posts
I have a similar macro mapped to OPT+CMD+1 that does a similar trick, but marks it up as needed for the ‘Quote of the Day’ posts that I do.