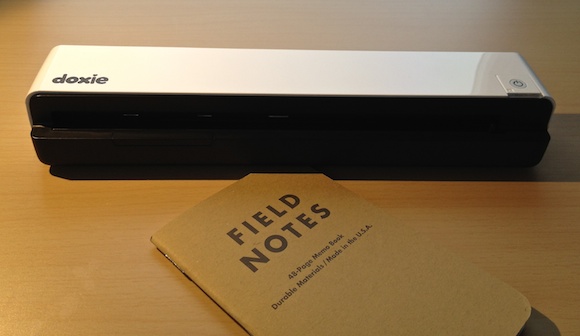
A while back a long time sponsor reached out to me and asked if they could book a couple of weeks for the planned launch of their new product. That new product is Doxie Go: a fully mobile scanner.
[ ](https://f3a98a5aca88d28ed629-2f664c0697d743fb9a738111ab4002bd.ssl.cf1.rackcdn.com/doxie-go-1.jpg)
I have always been intrigued by the products that Doxie makes because they always look great and are priced right — I just hadn’t purchased one. Doxie is all about scanners, but I have a trusty [Scansnap](http://www.amazon.com/gp/product/B003990GMQ/ref=as_li_qf_sp_asin_tl?ie=UTF8&tag=produchacks-20&linkCode=as2&camp=217145&creative=399369&creativeASIN=B003990GMQ) at my office that works well. I kept threatening my wife that I was going to buy a scanner for our house, but laziness gets the better of me (that and not knowing what to get that is cheaper than a Scansnap).
When I found out what Doxie Go was I asked Doxie if I could buy a unit and get it earlier — before they started shipping.
[ ](https://f3a98a5aca88d28ed629-2f664c0697d743fb9a738111ab4002bd.ssl.cf1.rackcdn.com/doxie-go-5.jpg)
They did me one better and gave me a Doxie Go. ((Full disclosure, they are both a sponsor of this blog and have given me a free unit.)) This is a very interesting product so I thought that in addition to the normal sponsor links I would take the time to do a full review of the product.
### Go
One of the most important things to understand when you are looking at the Doxie Go is that it is a computer-less, sheet fed, single page scanner. That’s kind of confusing.
Here’s the low-down:
1. You don’t need a computer or power source attached to the scanner in order to scan something.
2. It scans one page at a time, and each page is its own file (more on this in a bit).
What this means is that the Go is a completely stand alone device and I think that is pretty cool. More importantly it means that you have a scanner that is small enough to be tucked away, yet dead simple to pull out and start scanning with. I for one don’t want to keep a scanner on my desk all the time — especially not one the size of a Scansnap.
This almost feels like the magical moment you set your printer up for wireless printing — finally no more USB and *finally* you can tuck that hideous printer out of sight. The Go is kind of like that except that it is pretty nice looking.
### File Transfers
[ ](https://f3a98a5aca88d28ed629-2f664c0697d743fb9a738111ab4002bd.ssl.cf1.rackcdn.com/doxie-go-6.jpg)
There are four ways that you can get your scans off of the Go and onto your Mac:
1. There is an SD card slot in the back of the scanner and when an SD card is present all scans go on to that card — no need to reconfigure the device at all. Pop out the SD card and place it in your Mac and pull the scans off of it. This plays nicely with the camera connection kit for getting the scans directly onto your iPad too since they are scanned and stored as JPG files.
2. There is a USB port on the back of the scanner that accepts a USB flash drive. Like the SD card, once a flash drive is present all scans go to that drive (drive must be formatted FAT-32). In practice this works really well and if you have a really small flash drive ([like this one](http://www.amazon.com/gp/product/B004BLIMOU/ref=as_li_qf_sp_asin_tl?ie=UTF8&tag=produchacks-20&linkCode=as2&camp=217145&creative=399369&creativeASIN=B004BLIMOU)) you can hardly tell that something is plugged into the back of the scanner. Alas the flash drive I mentioned above doesn’t work with the camera connection kit (you get a too much power needed warning).
3. You can also plug the scanner into your Mac with a mini-USB cable. There is some internal storage on the scanner and you can pull the scans off the internal storage (the Go’s internal memory will store 600 pages). It is important to note that you cannot scan directly to a computer when the Go is plugged into the computer, so there is a need to always know which storage you want to use. Though, as I said, the Go requires no setting changes to switch between the storage methods.
4. The most interesting option involves the WiFi enabled SD cards like the Eye-Fi. I don’t have one of these cards to play with, but my understanding is that you use a WiFi network to shoot the scans straight to your Mac or iOS device (using the Eye-Fi app). I think this is a pretty neat option, but without testing it I don’t know how well it would work.
That in a nutshell is how the Go works. Whereas most scanners scan directly to a device the Go scans directly to a storage device allowing you to later transfer those scans where ever you would like.
If you think of the Go as a digital camera for your documents then you pretty much get a good sense of what the device is and how it works.
### Scanning
I am approaching how well the Doxie Go scans from the standpoint of someone who has spent far too many days using flatbed scanners to digitize old photos and someone who has used a Fujitsu Scansnap every work day for the past 5 years.
The Go leaves a bit to be desired when compared with the Scansnap and is magical feeling compared to a flatbed scanner. For most people I think the flatbed scanner is a waste of money, too cumbersome to use and often over priced. Likewise a Scansnap is usually overkill because it is meant for scanning a lot of pages at once directly to a PDF. The Go (and most of Doxie’s products) fits right in the middle — something for the average person.
When scanning with the Go I have run into two things that I haven’t seen with my Scansnap:
1. Because the feeding deck is shallow it is not uncommon to send a sheet of paper through at an angle. I haven’t run into a situation where it makes the scan look unreadable, or jams the scanner, but being a bit more careful when feeding paper is required to get perfectly straight scans (you can rotate scans with the software on your Mac). Even the “calibration” sheet that it came with went through crooked — though it was my first try using the scanner.
2. If the paper is at all ripped, or badly bent along the edge, it will make for a very challenging time feeding the paper. Simply turning the paper around usually solves this and I imagine getting more familiar with the device will help too. I should say that this is a problem I have never encountered with a scanner before so whether it is just a tradeoff of this scanner, or user error I don’t know.
The Go has two settings, by default it scans at 300dpi and with a simple tap of a button you can flip that to 600dpi. I would say the latter is over kill for anything that’s not a photograph and 300dpi is a great default setting — maybe even too high.
Speaking of photographs, the Go comes with a sleeve that you can slide a photograph into for better, easier, scanning. That’s a nice touch, but this isn’t the scanner you will ever want to use to digitize your photo album with — it’s just not fast enough, but it would be faster than most flatbed scanners.
For a “normal” black and white text page that I scan, the speed feels much slower than my Scansnap, but then again the device is about 1/5th of the size… (When in 300dpi mode the scanner takes 8 seconds per page.)
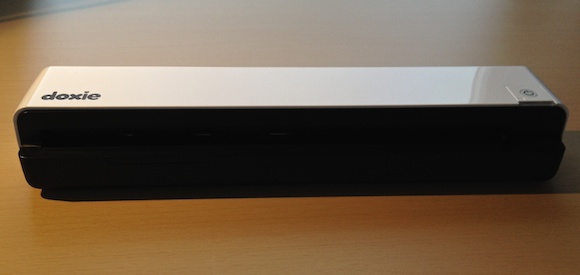
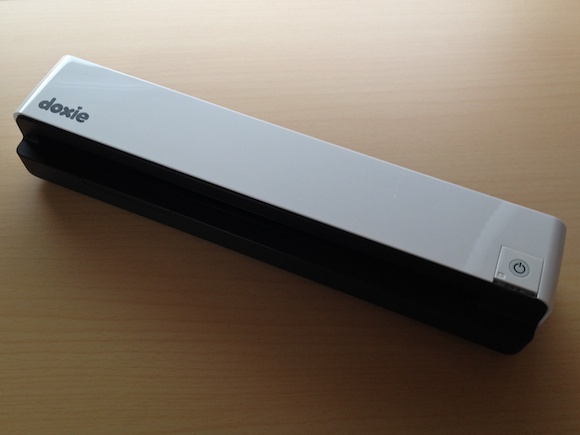
### Hardware
The device itself is really well made and I am a huge fan of it. It has ample rubber feet on the bottom so that it sticks well to the desk — never feeling like something that would slide off. The scanner is all plastic so it is lightweight, but not so much so that it would easily be carried about in your daily bag — though not too heavy to carry if needed.
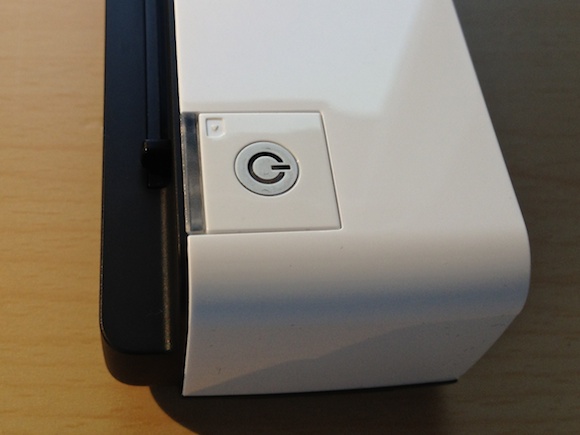
There is just one button on the device. A press and hold will turn the Go on and off, and a quick tap will switch between 300dpi and 600dpi modes (denoted by the change of the LED light from green to amber). All in all: dead simple operation.
The Go charges off of a mini USB cable making it easy to add in with your normal allotment of USB chargers — or charging off your computer. Doxie says that you will get 100 scans off of the battery and it will only take 2 hours to fully recharge. That sounds like a pretty good balance, I can’t imagine a typical user will find 100 pages too limiting.
There are two really interesting things about the hardware I want to note and one massively annoying thing:
1. Both the logo and the power button are coated with a rubbery coating. So the logo itself feels rubberized like the back of a Kindle Fire, just a touch rougher. The power button has the same coating in the center, but is white instead of black. I am not sure of the goal here, but it does give a nice flat look to the logo that I like. Though I don’t think it gives the same nice look to the power button as the white rubber does’t match the white of the plastic on the device.
2. The white plastic seems to be a magnet for black specks of dust from the cover that the Go comes with — a little black, velvety, carrying case. I highly recommend that you just toss that case to the side, don’t put your Go in it, because it seems to just make your device more dusty.
3. The most annoying thing about unpacking the Go was all the protective film on it. Unlike with an Apple device where you can easily remove the plastic, I had to scratch at corners all over the device to get the very tightly adhered film off of the Go. It’s not a deal breaker, and this is more of an OCD complaint, but I find the harder it is to remove such film the more people tend to just leave it on their devices until they are forced to remove it for one reason or another.
[ ](https://f3a98a5aca88d28ed629-2f664c0697d743fb9a738111ab4002bd.ssl.cf1.rackcdn.com/doxie-go-4.jpg)
[ ](https://f3a98a5aca88d28ed629-2f664c0697d743fb9a738111ab4002bd.ssl.cf1.rackcdn.com/doxie-go-3.jpg)
All in all I think the Go is a handsomely made device that will travel well on infrequent trips, but will likely need to be protected while traveling with it (to keep it scratch free and dust out of it).
### Software
As with any device the Doxie comes with its own [scanning software](http://www.getdoxie.com/product/doxie-go/software.html) for the Mac. The basic features of which are:
– Import scans from the three media types accepted.
– “Staple” pages together. The Go scans each page as it’s own file, the software makes it easy to combine these pages into one file (select the pages and click one button, it’s actually pretty nice). ((The usage of the term “staple” I think is also a much better way to present the task of combining pages — much more user friendly. Kudos there.))
– Save the file. By default everything is scanned as a JPG (this is why it plays well with iOS), but you can save out the scans as either a JPG, PDF, or PNG.
– You can directly send the file to one of many other pieces of software you have installed. (For me that list is: Acrobat Pro, Illustrator, Photoshop, Evernote, Preview, iPhoto, and Yojimbo.) This is a nice little touch if you mainly are scanning to immediately archive into something like Yojimbo.
– You can make various contrast, crop, and rotation adjustments.
– There is also a free Doxie Cloud service that you can upload your scans to and share the files with a URL. I think this is a mildly useful tool, but an iOS app counterpart could make this really killer. However if you have a really large file this could be a great way to share it.
– The Doxie documentation says that OCR support will be a free update that is due out in December 2011. The addition of which would be very welcomed and a greatly useful.
Overall I find the Doxie software simple and powerful.
Something I have noticed with the software is that double clicking the file will open the adjustments panel — not the expected outcome of such an action. In order to preview the file you use Quick Look by hitting the spacebar, but each time I tried this I noticed quite a bit of lag — enough that it really bugged me. Other than this quibble the software works as expected for a bit of software to pull in scans. Any more than that and you will want to work with something else.
(I am bothered by the pink heart icon though. But it is the Doxie corporate identity.)
### iPhone / iPad
Doxie says there will be an iPhone/iPad connection kit for $39 that syncs scans directly to your camera roll. I know nothing about this right now but really would love to see how this works.
This could be the magical component to this setup.
### Examples
So let’s test out this scanner and see what it looks like. [Here is the file we will be working with](https://f3a98a5aca88d28ed629-2f664c0697d743fb9a738111ab4002bd.ssl.cf1.rackcdn.com/doxie-test.pdf) as printed directly to a PDF from Pages. The pages was then printed with a laser printer.
[Here’s the first scan](https://f3a98a5aca88d28ed629-2f664c0697d743fb9a738111ab4002bd.ssl.cf1.rackcdn.com/doxie-300dpi.jpg) as it comes out of the scanner in JPG format.
Here is the [same scan converted to PDF](https://f3a98a5aca88d28ed629-2f664c0697d743fb9a738111ab4002bd.ssl.cf1.rackcdn.com/doxie-300dpi.pdf).
[Here is a scan](https://f3a98a5aca88d28ed629-2f664c0697d743fb9a738111ab4002bd.ssl.cf1.rackcdn.com/doxie-600dpi.jpg) as it comes out of the scanner at 600dpi.
Obviously these are not has high-quality as the natively made PDF, but they are readable and with the future addition of OCR should be pretty great.
### Where The Go Fits In, Or Why You May Want One
[ ](https://f3a98a5aca88d28ed629-2f664c0697d743fb9a738111ab4002bd.ssl.cf1.rackcdn.com/doxie-go-2.jpg)
The Go isn’t as high quality as a flat bed and it’s not as fast and robust as a Scansnap. So I am guessing people may be wondering why they would want one.
I wouldn’t recommend the Go for anyone that thinks they will be scanning from the same computer, at the same desk, every day — or maybe even every few days — you will probably like a Scansnap a lot more. But if you are anything like me you don’t scan very often and most (if not all) or your computers are portable.
I like a clean desk and I only need to scan things at home a handful of times each month (at the most) and the same goes with my wife. That pretty much makes the Doxie the perfect scanner for us.
It can just sit neatly tucked in a drawer and we can scan things when we need to without fussing about with wires. The Go is $199 and I don’t think that is too high of a price to pay for something that does its job very well.
What is especially nice is if you really just want to take scans directly from a scanner to your iOS device — that’s not something I could do with a Scansnap without the aid of a computer.
Overall I think this is a great scanner for a mostly paperless family. I love this little thing.