In a recent Member Journal I posted about trying to use digital cameras I have around the house as webcams. Obviously, this cannot be done by using your iPad as your calling device, but rather you need a Mac or PC. I used a MacBook Pro 13” for this.
There’s a few things to note about webcams and setting up for good calls in general:
- MacBook Pro webcams are utter shit. They are likely the lowest quality devices you can use for video calls, and their mics are about the same as the webcams.
- iPad Pro front facing cameras are a really solid middle ground for quality, while being easy as hell to use. Their microphones are better, but the feedback because of the speaker proximity will drive your attendees insane.
- You can use your iPhone’s rear cameras as a webcam and those look pretty darn good, however the setup is really not good. It is cumbersome, and puts your iPhone out of action as you need to really put it in Airplane mode and leave it in a tripod facing you. Lame.
- You can tether most modern and some older digital cameras and use them as your webcam. This works pretty solid with many caveats, largely centering around the actual hardware you have. Also these are the nerdiest and finicky of setups you can possibly choose.
I have two cameras I could use, the first is an old Canon 5D mkII, and the second being my Fujifilm X100T. Now neither is officially supported by the manufacturers for this purpose, so I needed to buy an excellent piece of software called ‘Cascable Pro Webcam’ for $30.
And that, that is why we are here now.
With this software you can tether your camera, so here’s the result of tethering both of my camera options:
- Canon 5D mkII: this needs to be done with a mini-USB cable, and the tethering is pretty fast. The video quality is nothing short of amazing, I needed to use a lens shorter than 50mm to get it at the right focal length (seems like 35mm full frame equivalent is what you want on any webcam at most). The only down side is the setup is massive, and the battery in the camera only lasts for maybe an hour. I debated putting a battery grip on it so I could power off two batteries, but I didn’t have a tripod that would go low enough to support this.
- Fujifilm X100T: I actually missed that this would work with the software. When I tried it via the cable, it did not work. However, you can connect to it over WiFi (thank you dear reader of mine). There are a few issues with this. The first being that you then need to use Ethernet for your internet on the MacBook Pro, like it’s 2004 all over again. But the bigger issue being that the frame rate captured on the Mac is shit, and the video quality is degraded. I hear the newer X100 models look way better, but this older model does not support this setup well at all.
All of this meant that I now had a really robust solution (Canon 5D mkII), which would bring very high quality video. And when paired with a good lighting setup, and a nice microphone — well you can get something far better than most of the quarantine episodes that SNL ‘produced’.
So the big question is: what to do going forward?
The hard part about this is that there is no really easy setup, unless you get really expensive hardware. You’ll be manually adjusting lights, charging, and fidgeting with connecting cameras. And on top of all of that, the setup will look messy. Honestly, I think if what you want is maximum video quality, you are needing a big r/battlestations type of setup. If what you want is simple and minimal you need to decide how much you are willing to give on the quality of all the things.
Since I am a big proponent of liking the way your workspace looks, and I could not stand the way these cameras looked when all rigged up, I dropped all thoughts of this being a permanent thing. (Not to mention that I needed to use a Mac to do it, gross.)
So after all this work, I settled on having two options:
- Pro-ish setup if there’s a big important call. That would be: the Canon 5D, my big microphone, Mac, AirPods for Audio, and all the lights I can squeeze in the left over space. This would basically have to be: me recording video to be broadcast to people outside of my office. Or something along those lines.
- Regular setup: which would be fast, easy, and minimal while still looking good. That would be AirPods Pro, iPad Pro camera, and lighting.
But that’s me, so I have tried to distill this down to others. Likely, that you have just your laptop and nothing else, so how do you get better video?
My Tips for Everyone
Here’s how, and what I think you should do:
- Use headphones.
- Raise up the camera, like a lot.
- Add light
I have three things I would recommend you not do as well:
- Forget big mics, they pick up a lot of extra sound around the house. They are super clunky to use, and unless you use them properly you are more likely to increase background noise, while producing uneven sound of your speech. Just, don’t waste the time here. Yes they produce substantially better audio quality, but your goal is not audio quality it is audio clarity. That is you want people to hear what you are saying more than you care about the tone of your voice.
- Forget big light setups. While it is easy to get sucked into the rabbit hole of high end lighting, as I will show you below, it’s pretty easy to do simple and cheap things to get good light.
- Forget insane cameras. Look I love the way the 5D made me look, and I really want to go drop $900 on a new camera. But for what? Most people have really shitty cameras they are using, with equally shitty lighting. And then, on top of that, most likely they are not even viewing your video at full screen. And if they are, the quality of your video will depend on your internet connection, the servers in between, and their internet connection. So it is one thing if you are recording locally for YouTube or something, and entirely different for streaming during a video call. In other words: even under the best case scenario, it is likely that your video is not being viewed in a large enough size and on a fast enough connection, to have much of an impact a better camera provides.
Basically, my top tip here is to keep it simple because while huge gains can be had, they are likely all for naught. And they add so much complexity that it’s just not worth it. That said, let us dive into my top tips (in order of importance).
Headphones
Just do not use the speakers on anything. The feedback risk is too great and will piss everyone off. Use headphones, and preferably headphones with a mic. I have read that AirPods crush the audio input and it’s not great, but I don’t agree.
My top advice then is to use AirPods (Pro or not). Two reasons:
- Good audio both in and out. Yes, not as good a microphone as a pro one, but in a normal house setup where there is a decent amount of background noise, where you want to be free to move around a bit: AirPods. The upgrade pick being AirPods Pro. I love them. (AirPods Pro give you substantially better audio than a large microphone because they are designed to isolate just your voice which is kind of the point of a call.)
- Bose QC35s. I have heard many people using gaming headsets, and they look absurd, and don’t sound ideal. But for some reason those people I have seen making calls with Bose QC35s on, you can tell right away. Solid mic on these, and no complaints from my end. The downside is that they are big, upside they are at least wireless, and also super comfortable if you need to wear something all day long. (Beats also seem to produce good audio from their microphones.)
After that, my advice is any wireless headset with a mic, is going to be better than the internal mic and speakers. This, if nothing else, is THE THING you should do. Flat out, no exceptions. And the reason for wireless is that we both know you cannot sit still, and we both know that wires are just ugly.
Raise the Camera
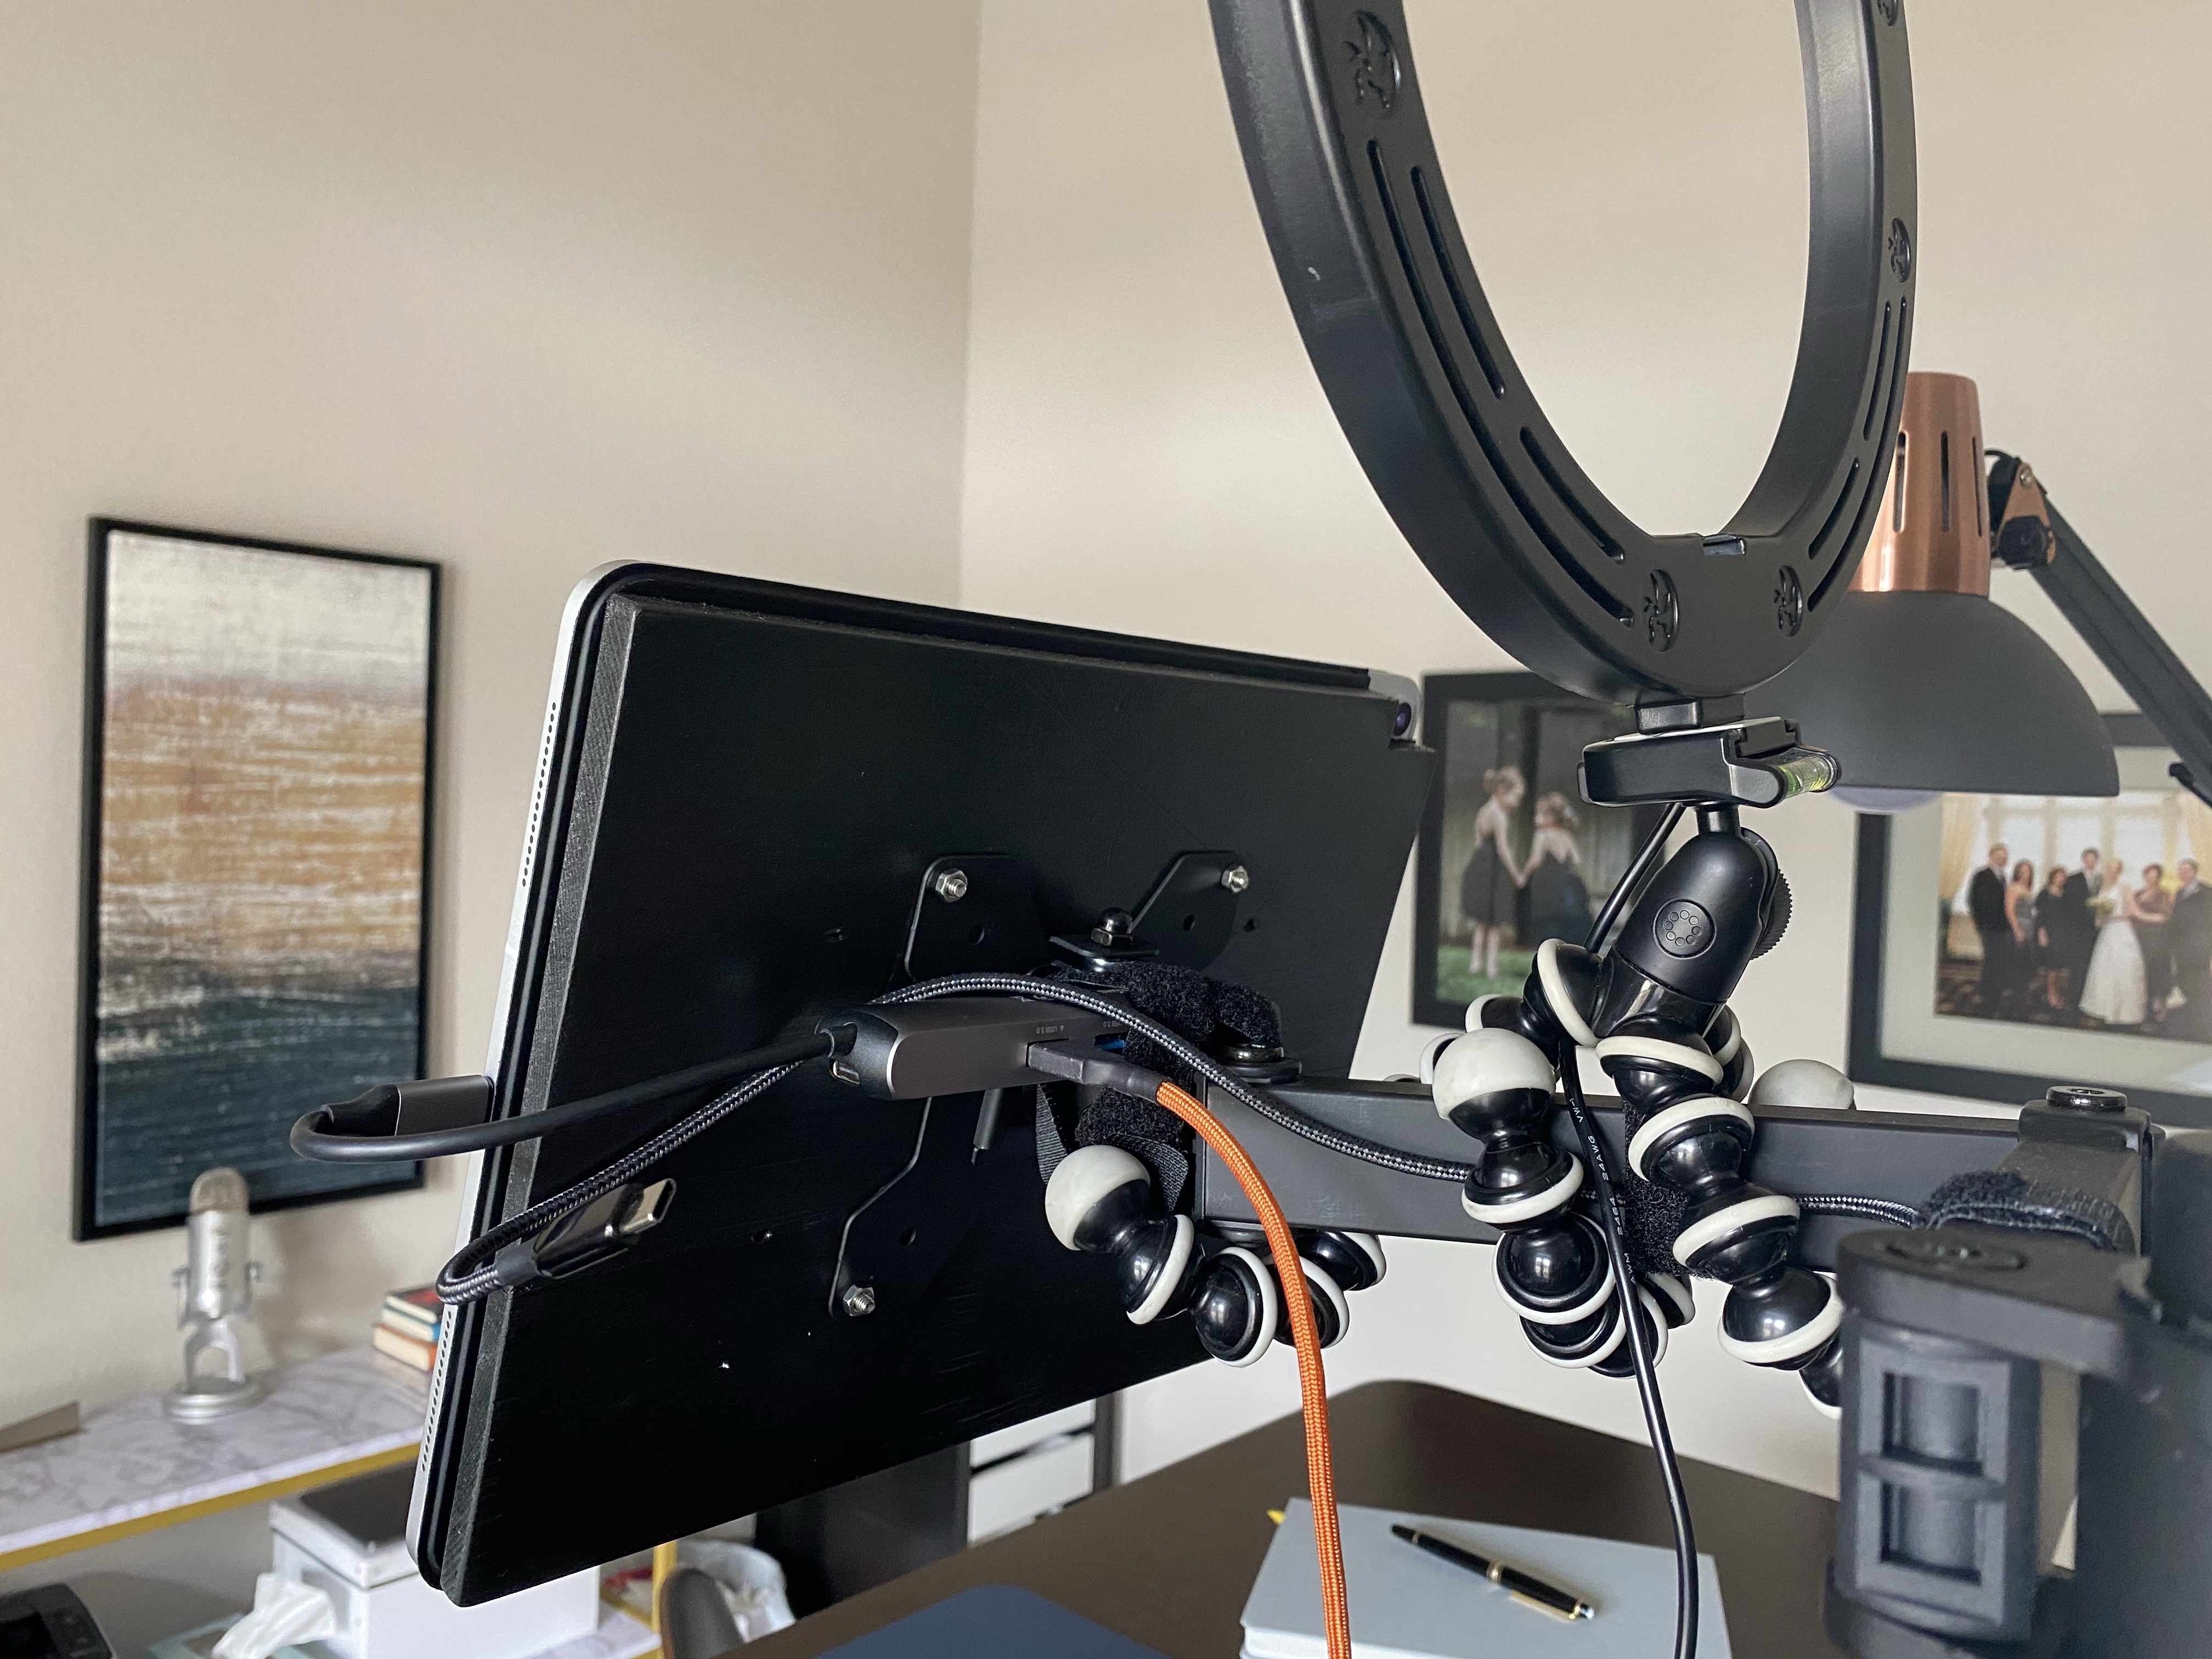
Ideal camera placement is slightly above your eye level, camera angled back down. I could do that with my iPad, but then I couldn’t use the iPad. The goal should be to get the camera as close to eye level as you can. For the same reasons selfies are often shot from above, you want your camera to be as high as you can make work for you. This is pretty easy if you have a large external monitor, but increasingly difficult if you use only a laptop or iPad for calls.
This is the only scenario where you might consider an external webcam as a good option to upgrade your calls. (Good luck finding one.) As it makes it easier to keep your monitor at a useable height while getting the camera place properly.
But that’s not all! No, because you are going to be looking at the screen when you are on the a call (to see other people’s faces) and not the camera. So if you have a laptop screen low, and a camera up high: everyone is going to feel like you are not paying attention. So you gotta keep the camera as close to the screen as possible, while still getting it up high. Which is why you should consider the large external monitor option.
Add Light
I have spent a couple weeks playing with lighting in my office to see what is best. And I have one simple bit of advice: find a good window with natural light and sit in front of it at a slight angle. That’s going to be the best light you can likely get unless you are a lighting pro.
Ok, but you come here to buy stuff, so let’s assume you have NOTHING. (And realistically no one sets up their desk at a slight angle to a window with profuse natural light. That’s just real talk. My office at home has epic French doors with amazing light, and I do not have my desk angled in front of them properly as that would look stupid.)
So you need to focus on figuring out:
(If that is like, wtf, to you then watch this video.)
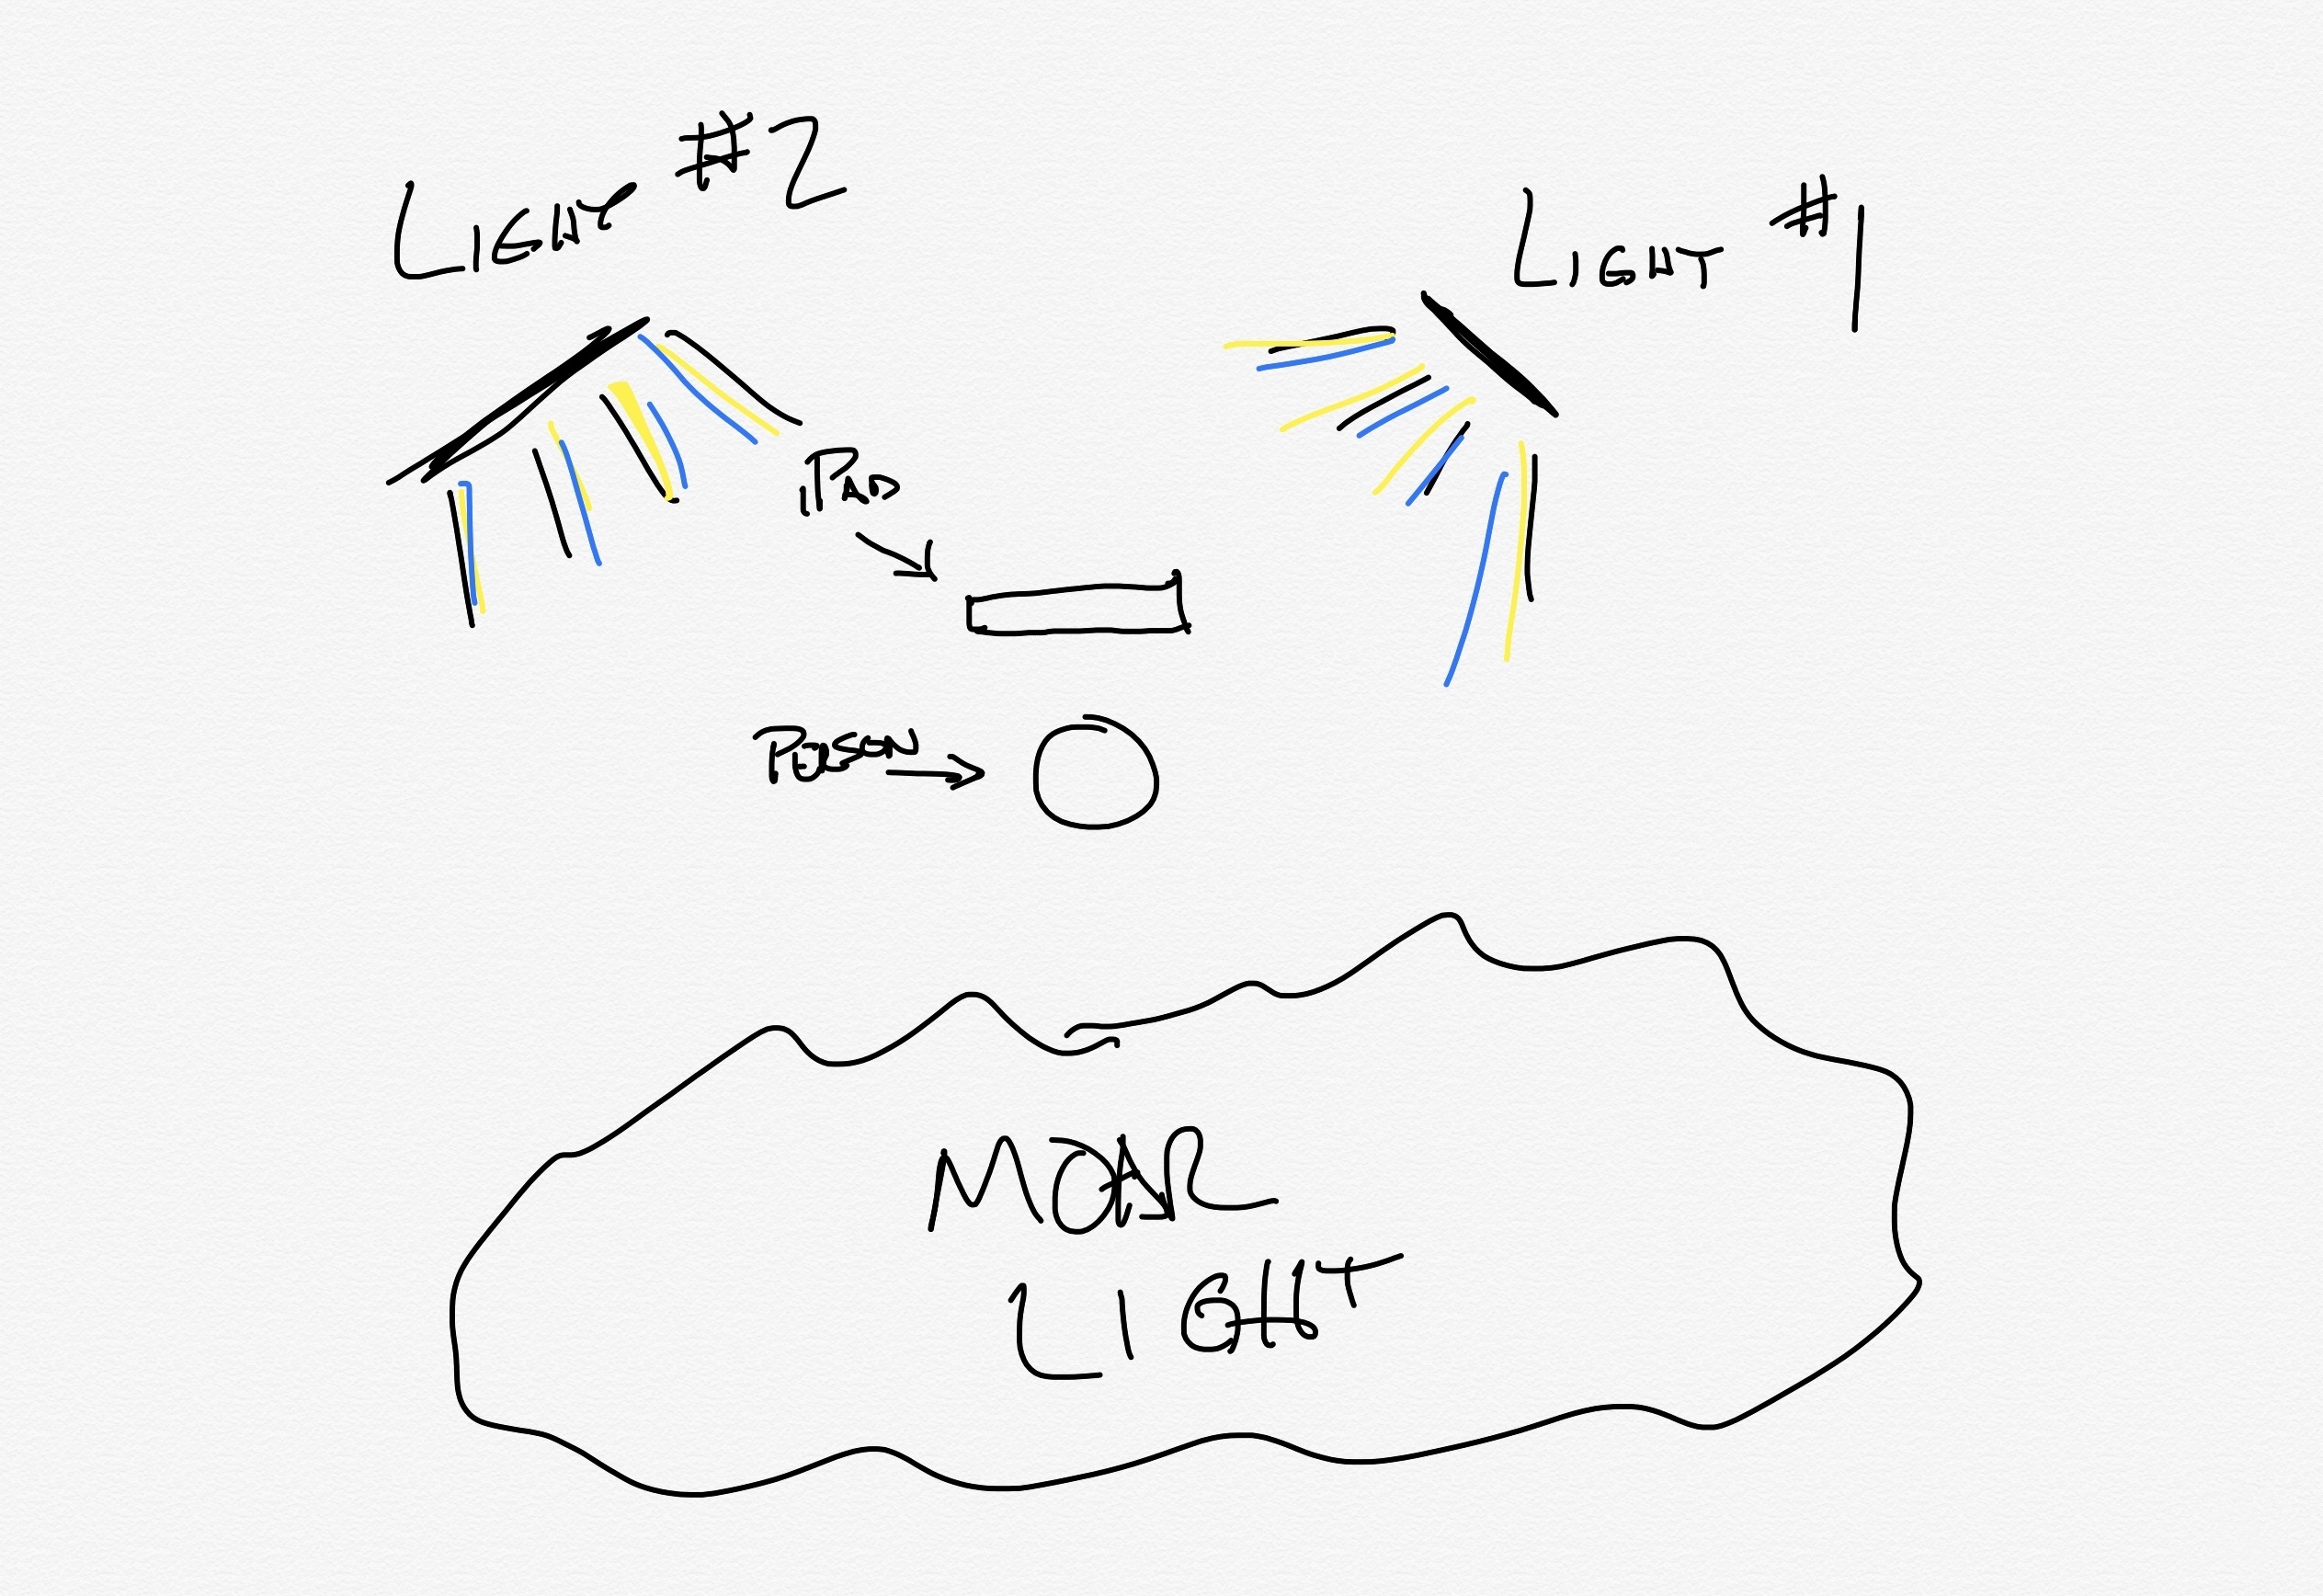
Here’s the key, you need one of the two lights hitting you to be brighter than the other (one can be a window, that’s what I do). Call it one light at 100% and the other between 40-80% of the amount of light. The bright one is your main light (there’s real terms for this, but who cares, right?) and the other is the fill light (crap I used the real term). This produces a nice shadow on your face while not making it so shadowed that you look evil (side benefit it also helps to hide the general lack of sleep visible on your face).
The ‘moar light’ area should not be overlooked. Because if you don’t light up the area behind you, it will look like you work in a cave. So light it up, I like to just put a light on the ground with a white sheet over it, shining up. This usually does the trick to nicely fill out the light. Whether you angle a light at your back, or just shine something on the wall. Do diffuse the light so that it doesn’t have hard edges, and keep it low in power so no shadows are casting around weird in the back.
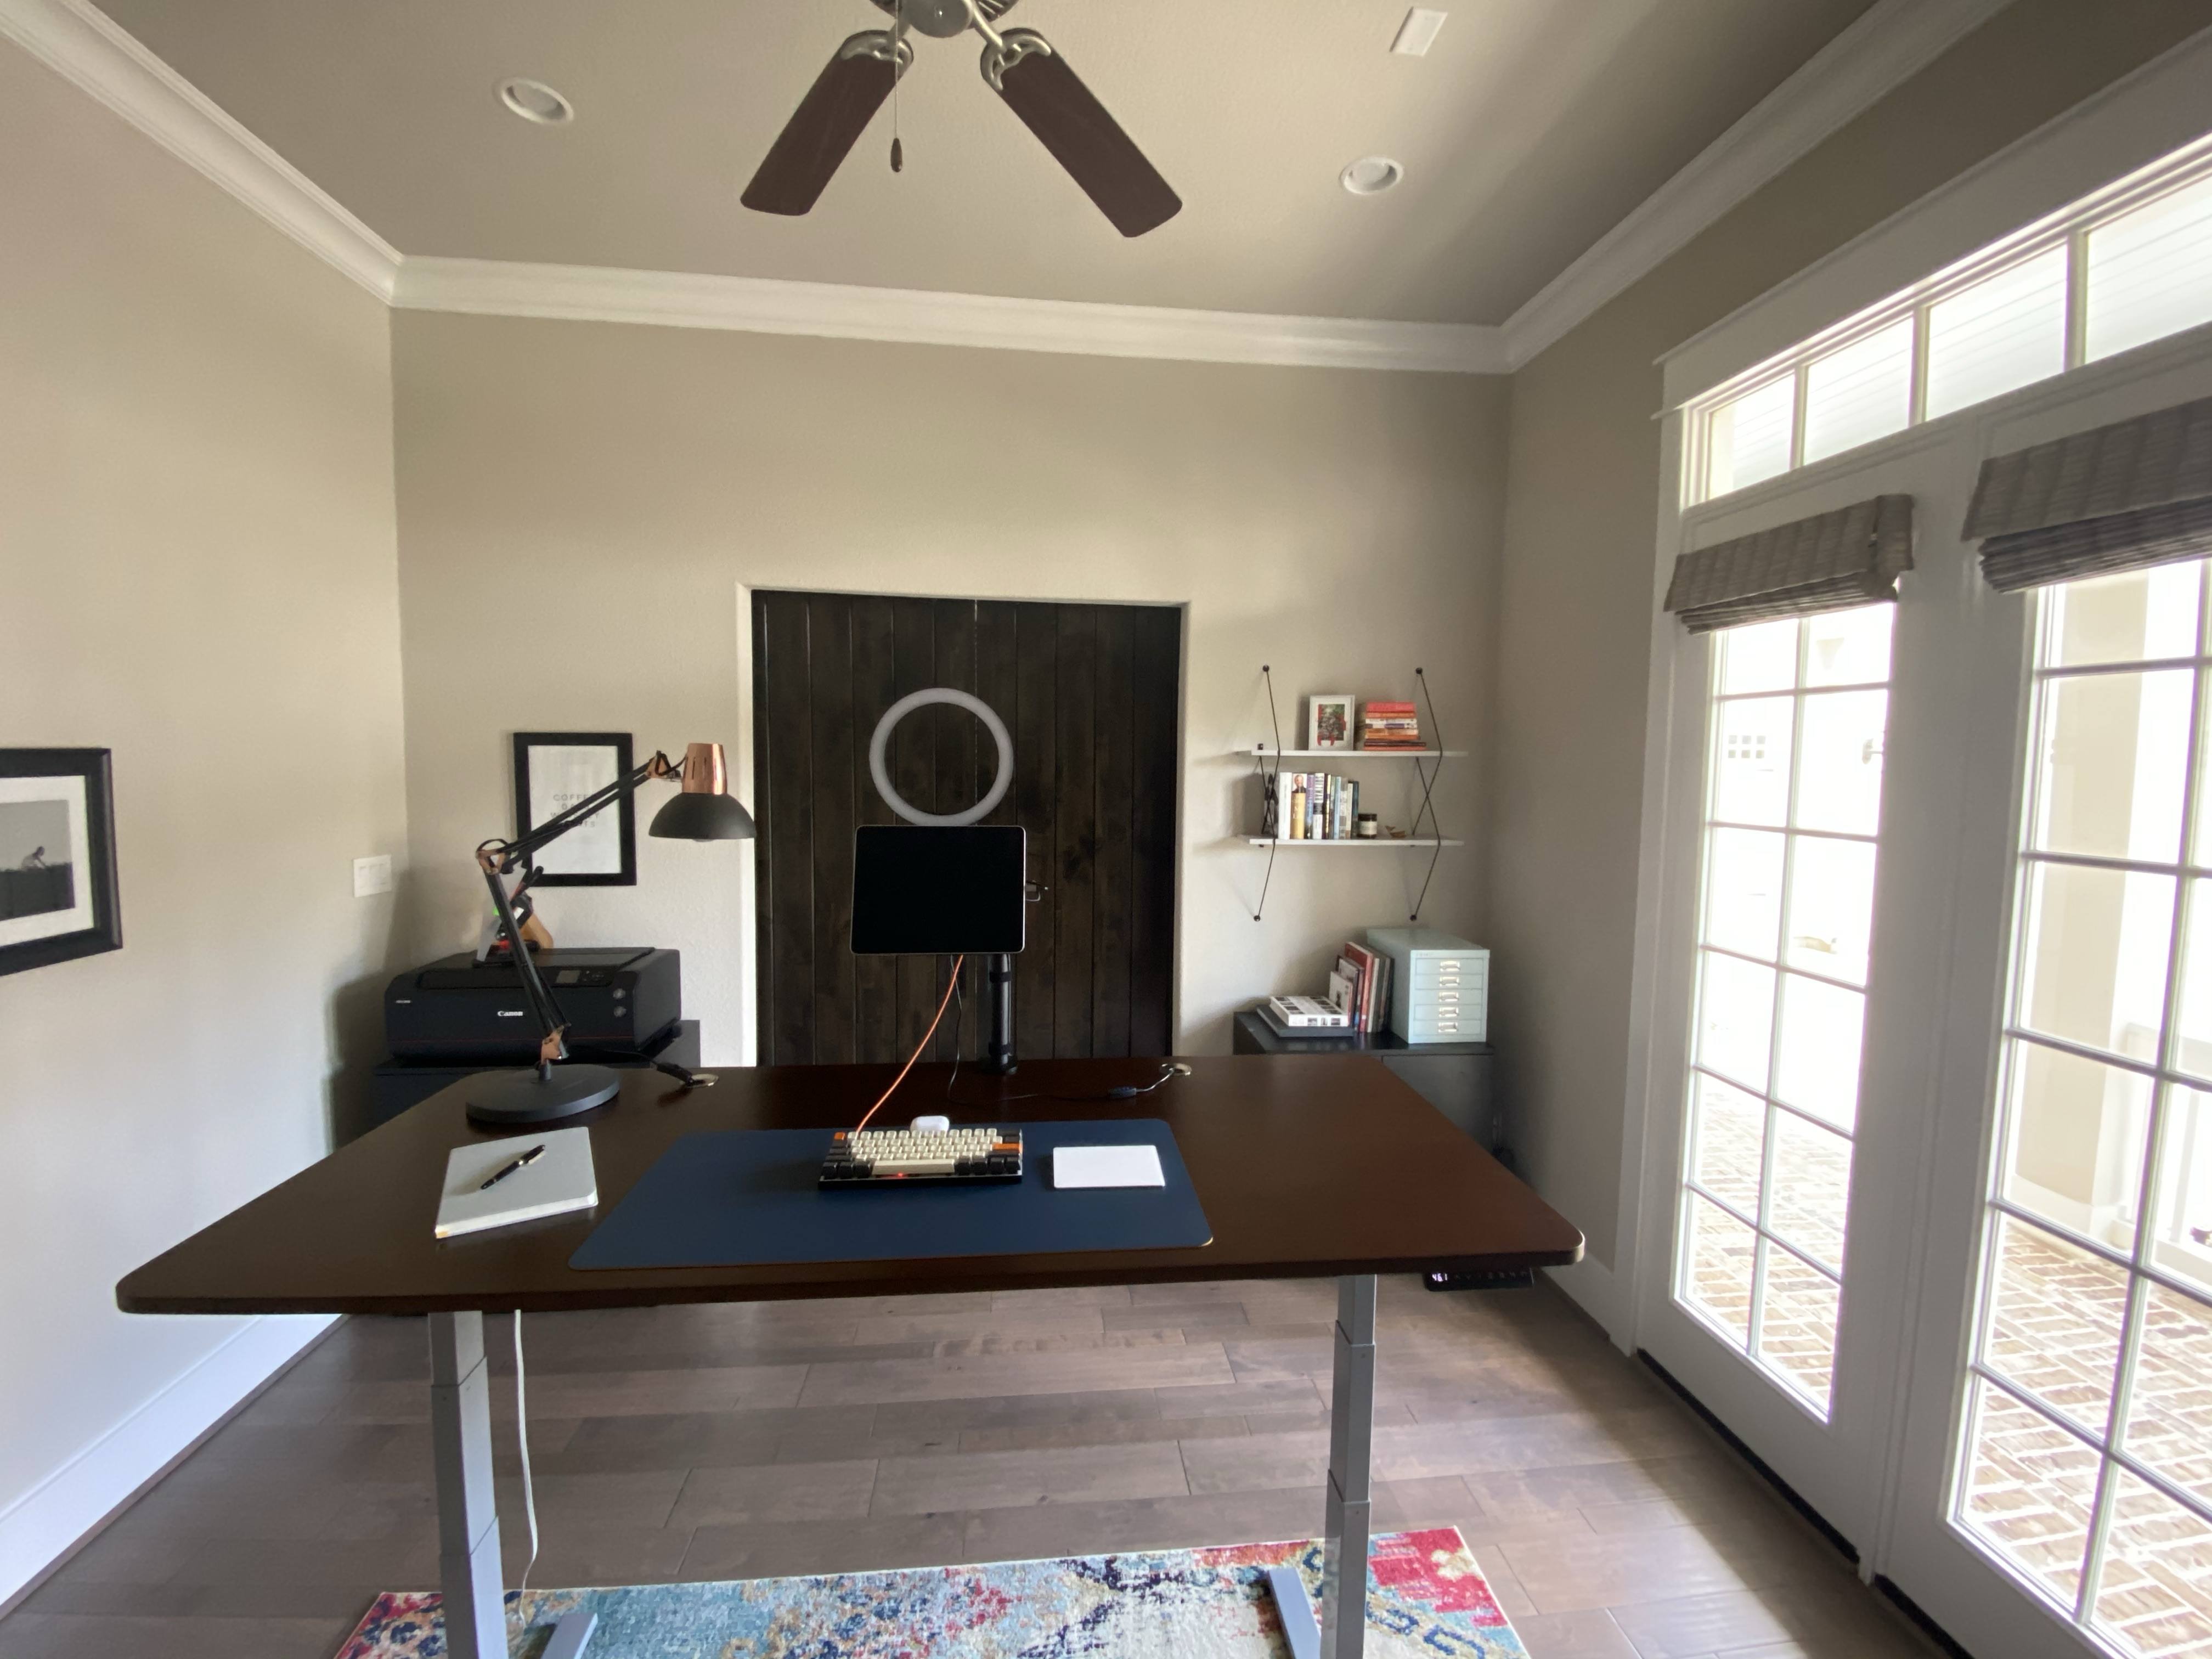
Anyways, it can be hard to figure this out in practice, so let me show you something. Here’s my office light setup, with everything off:
And with the lights kicked on as if I was to do a call:
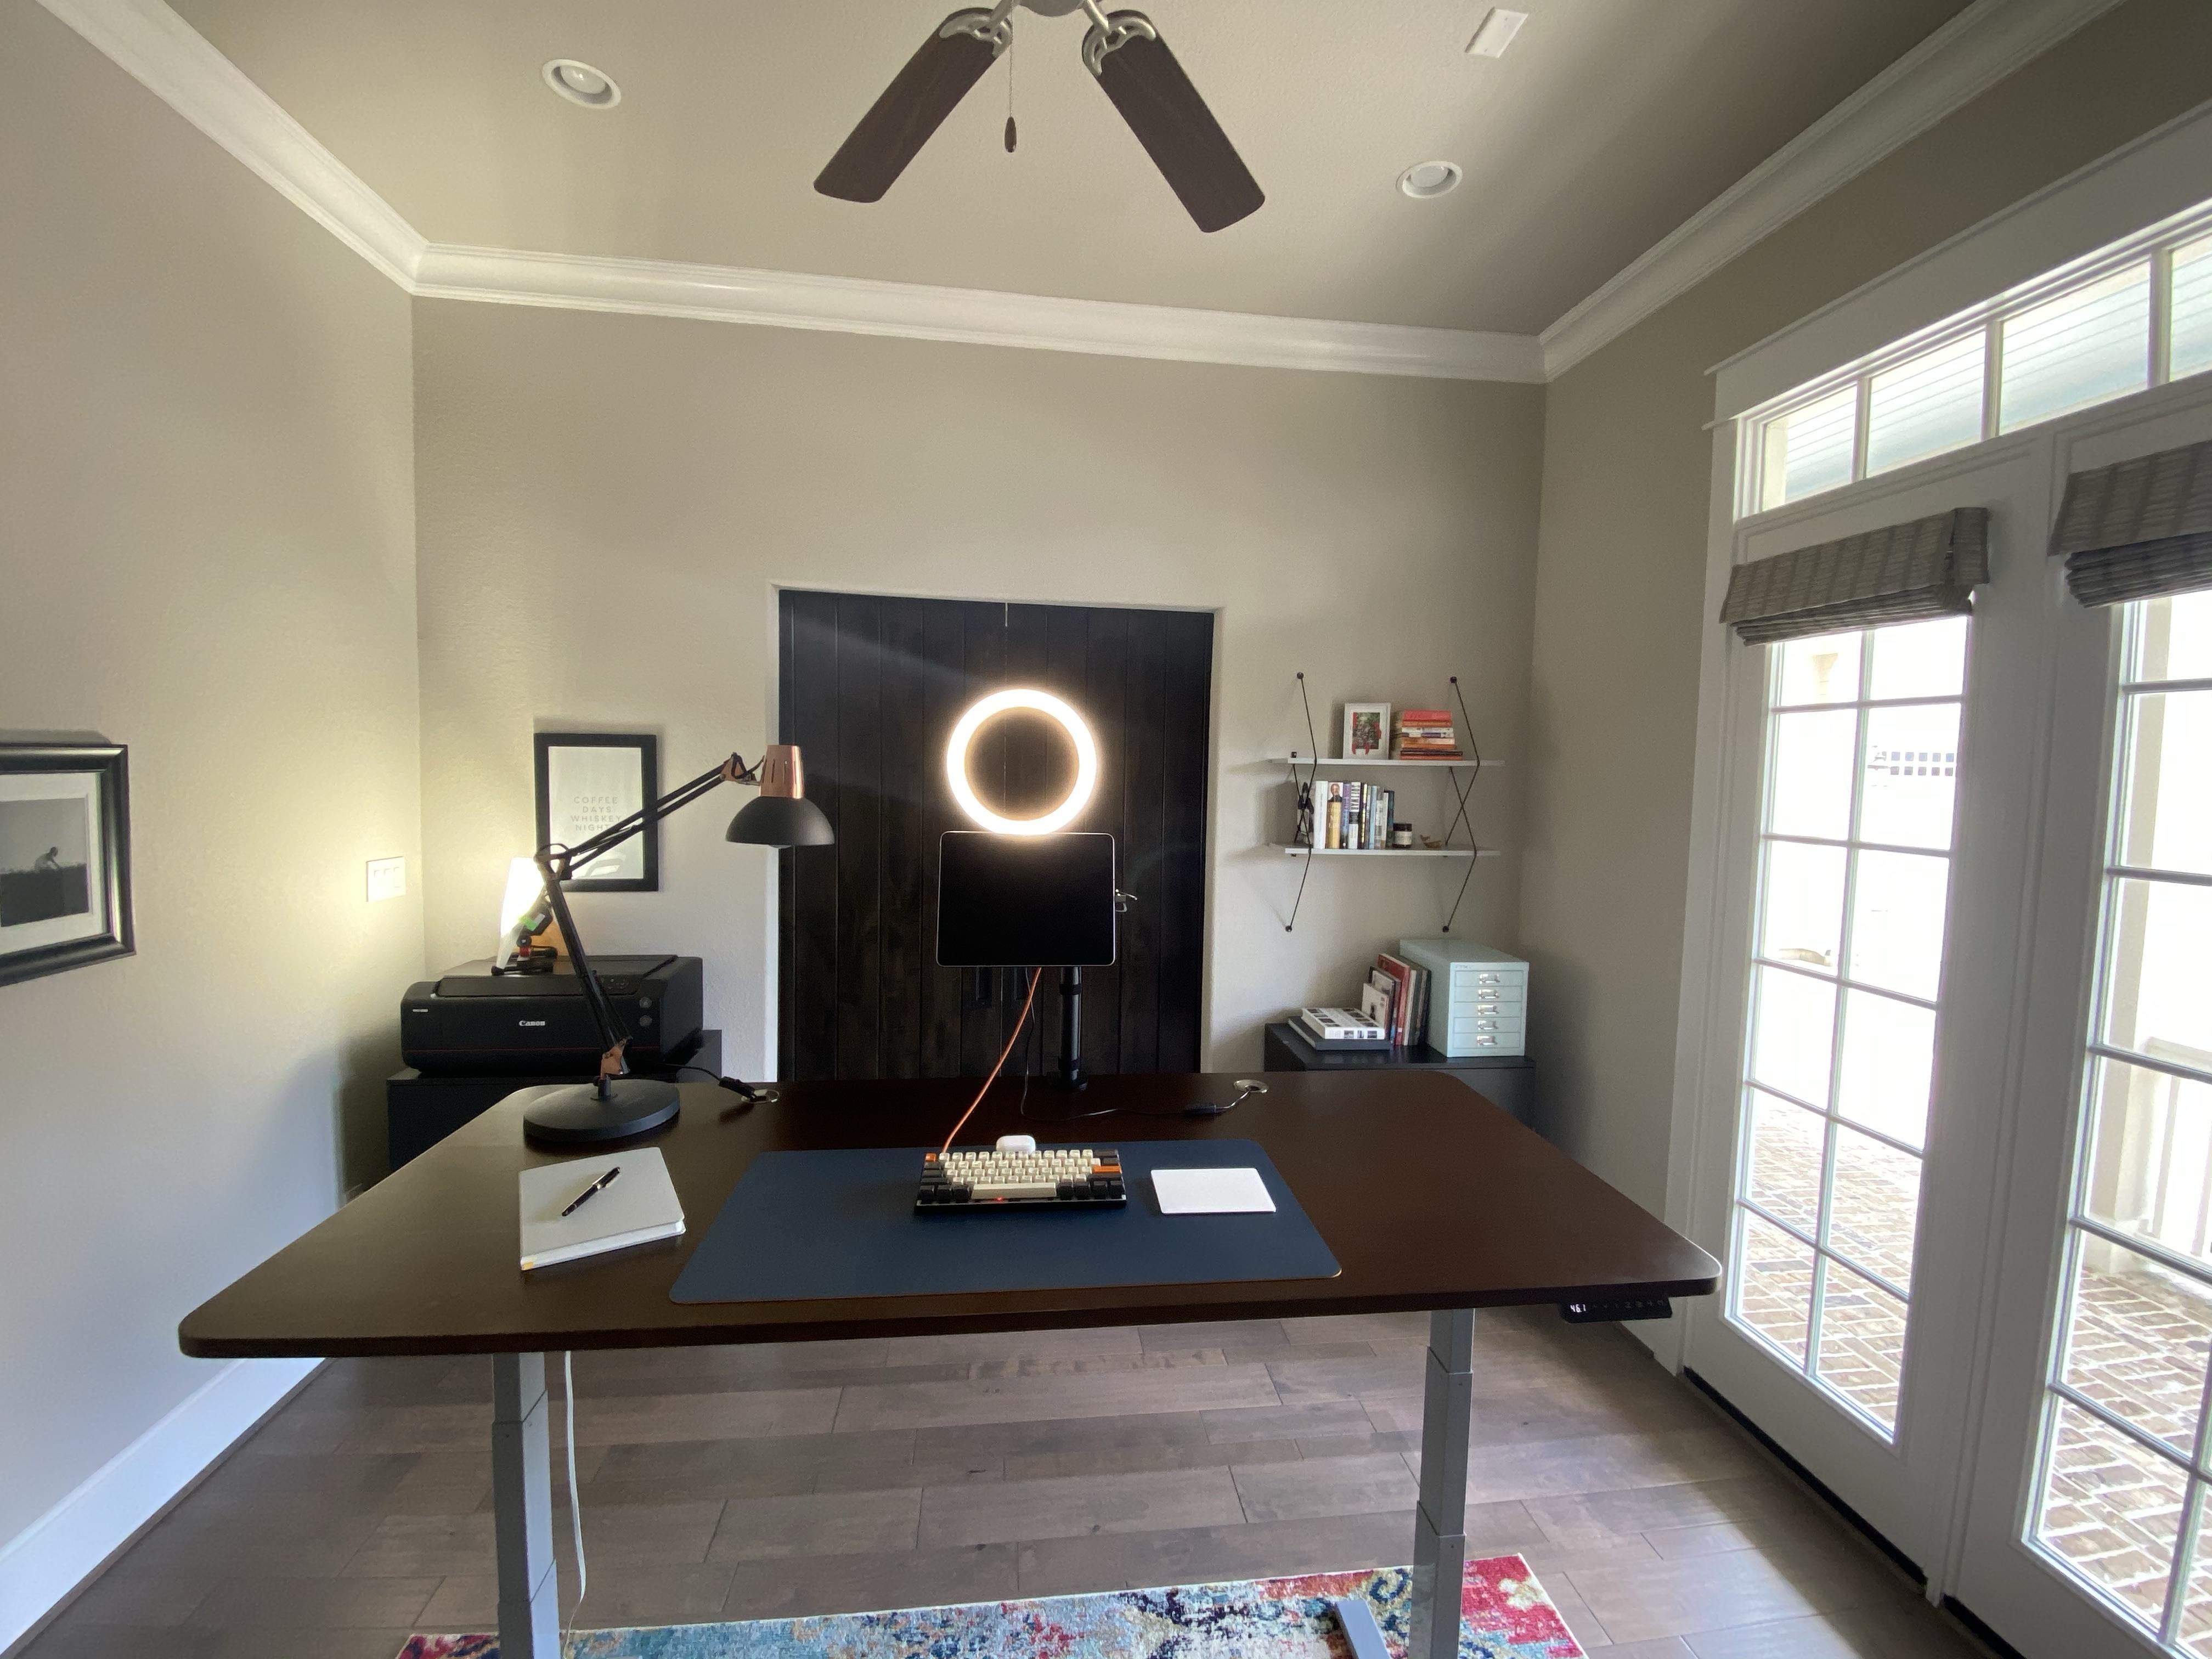
It’s pretty simple and I can control it all from my desk. The windows are always super bright during the day, but the ring light can keep my face lit up if clouds roll in. The light in the back left corner is a work light from my garage with a diffuser on it, I have a smart switch to flick that on and off from my phone.
The ring light is the unnecessary piece for me, and I really only use it if clouds have rolled in to the area. I would be far better off with an LED soft light, but more on that in a bit.
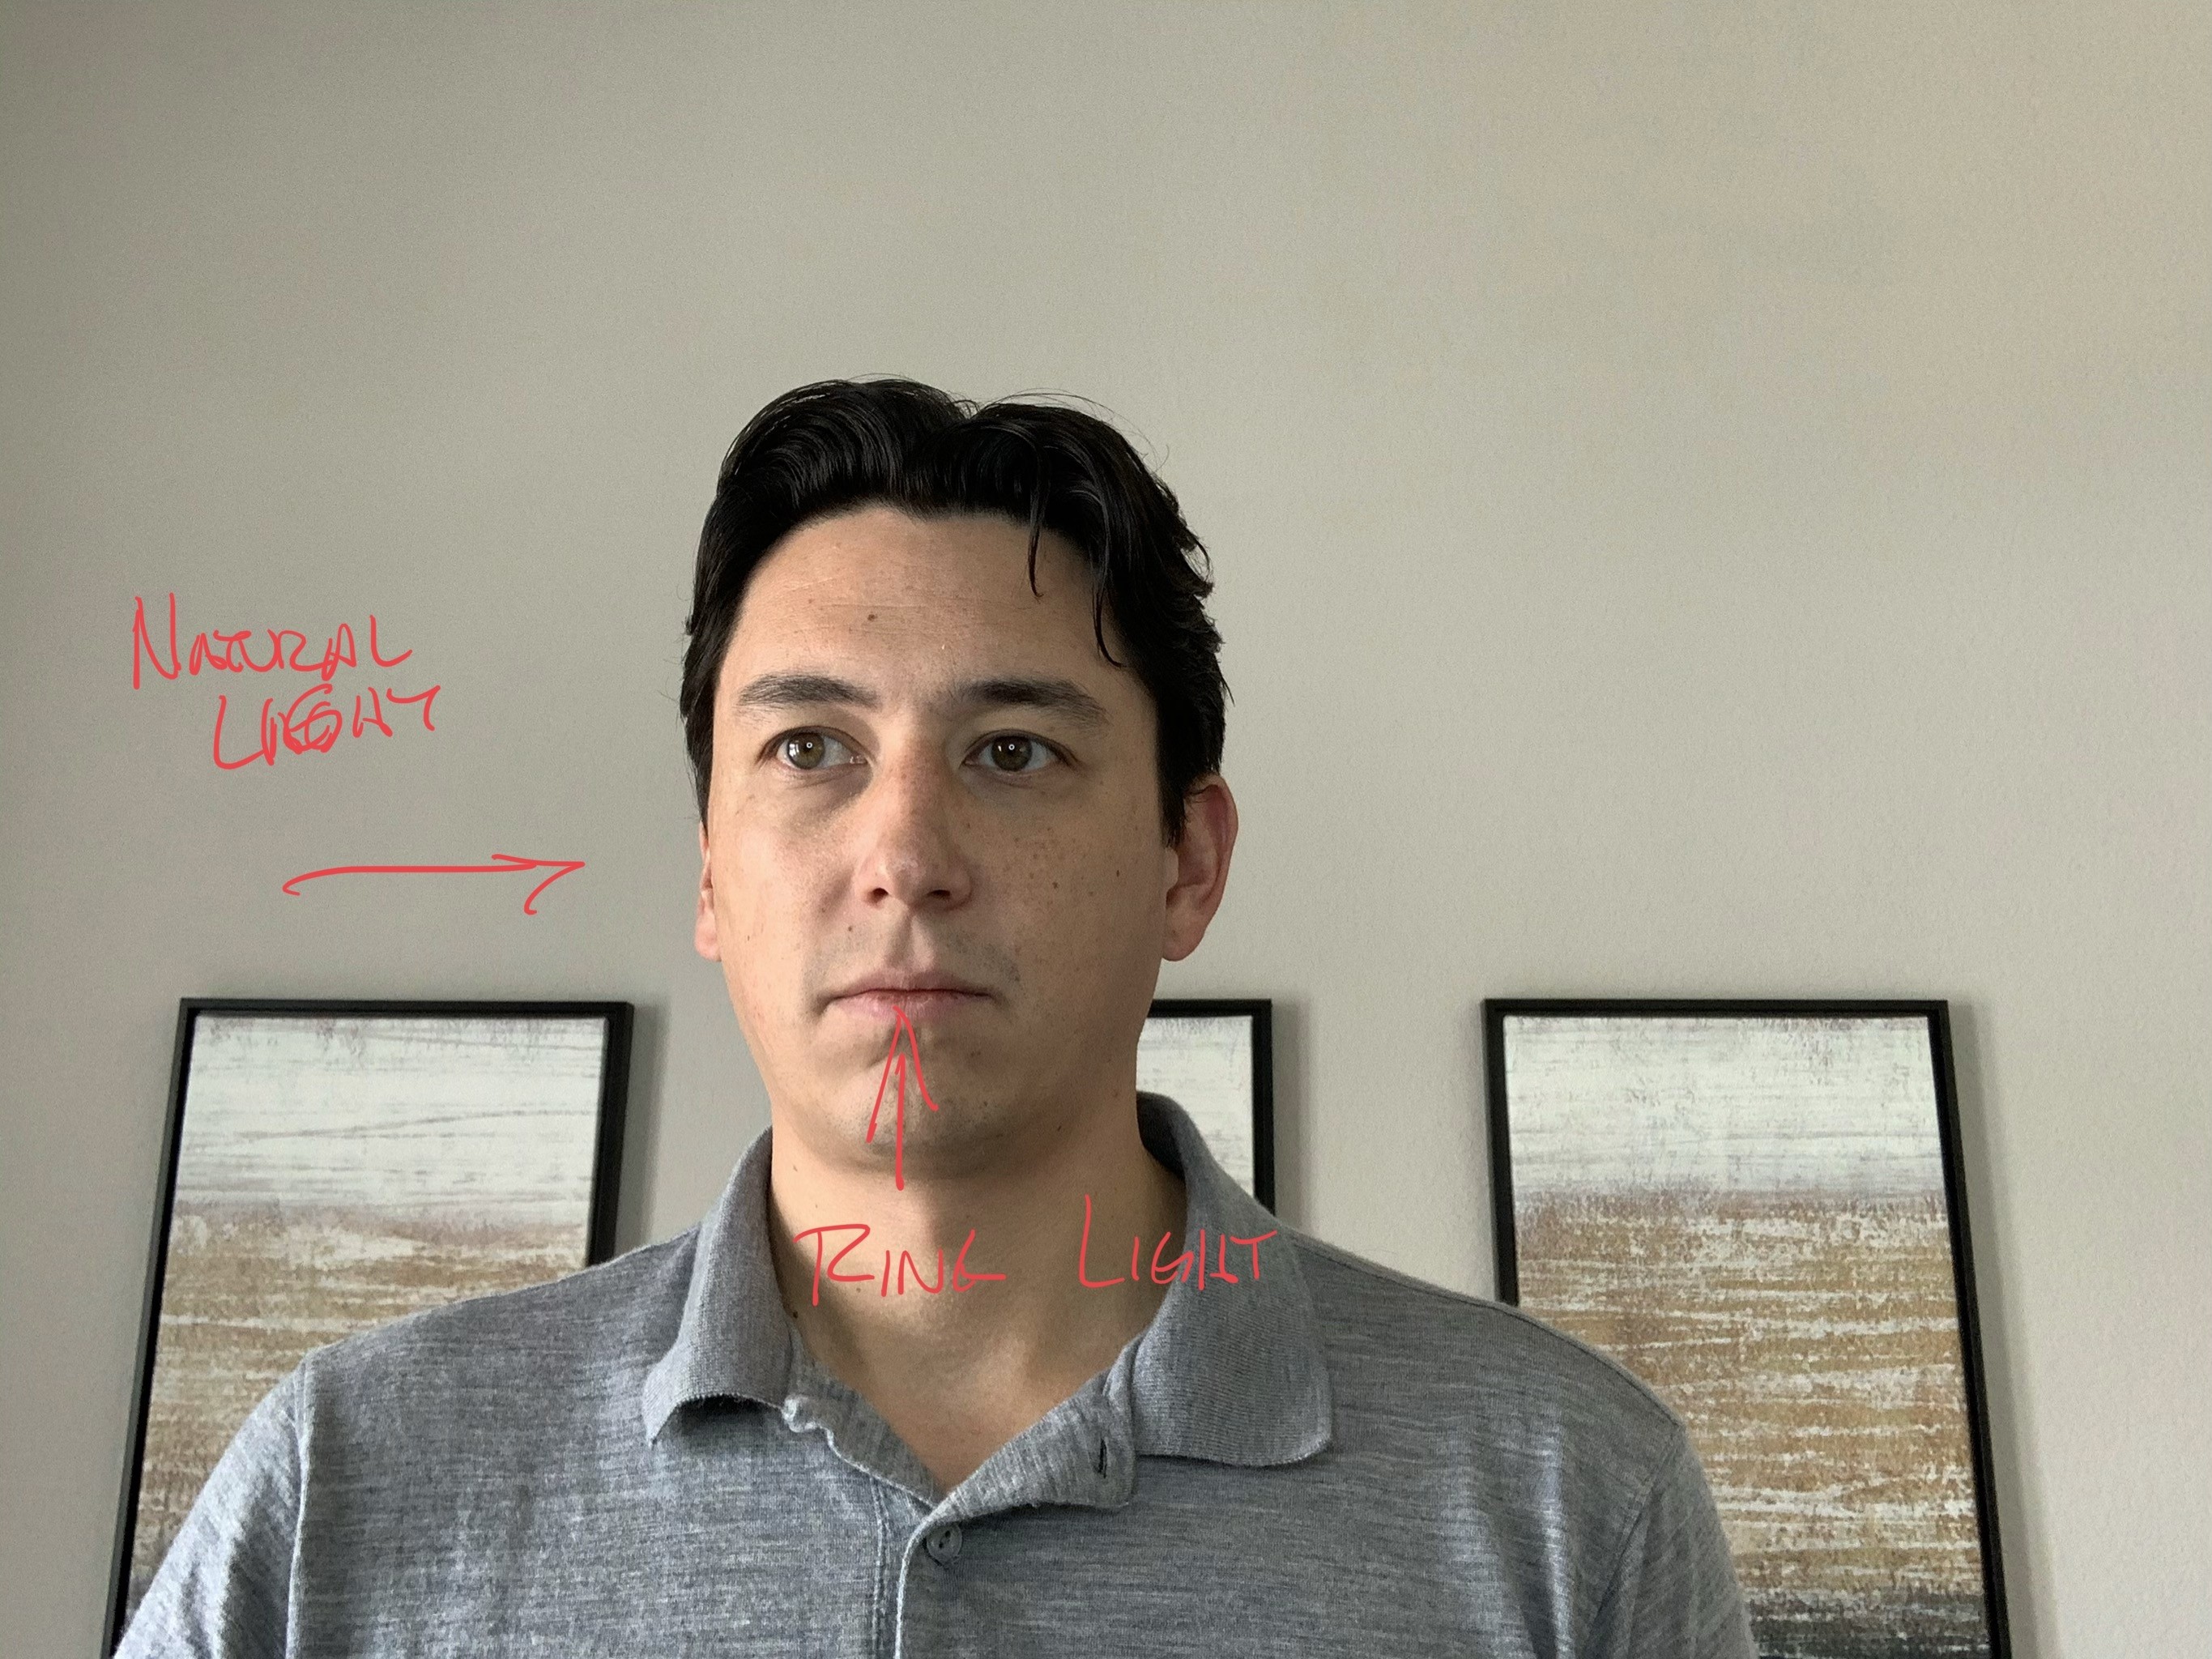
Now that you know how all this looks, here’s what different light setups look like, just using the front camera on the iPad Pro.
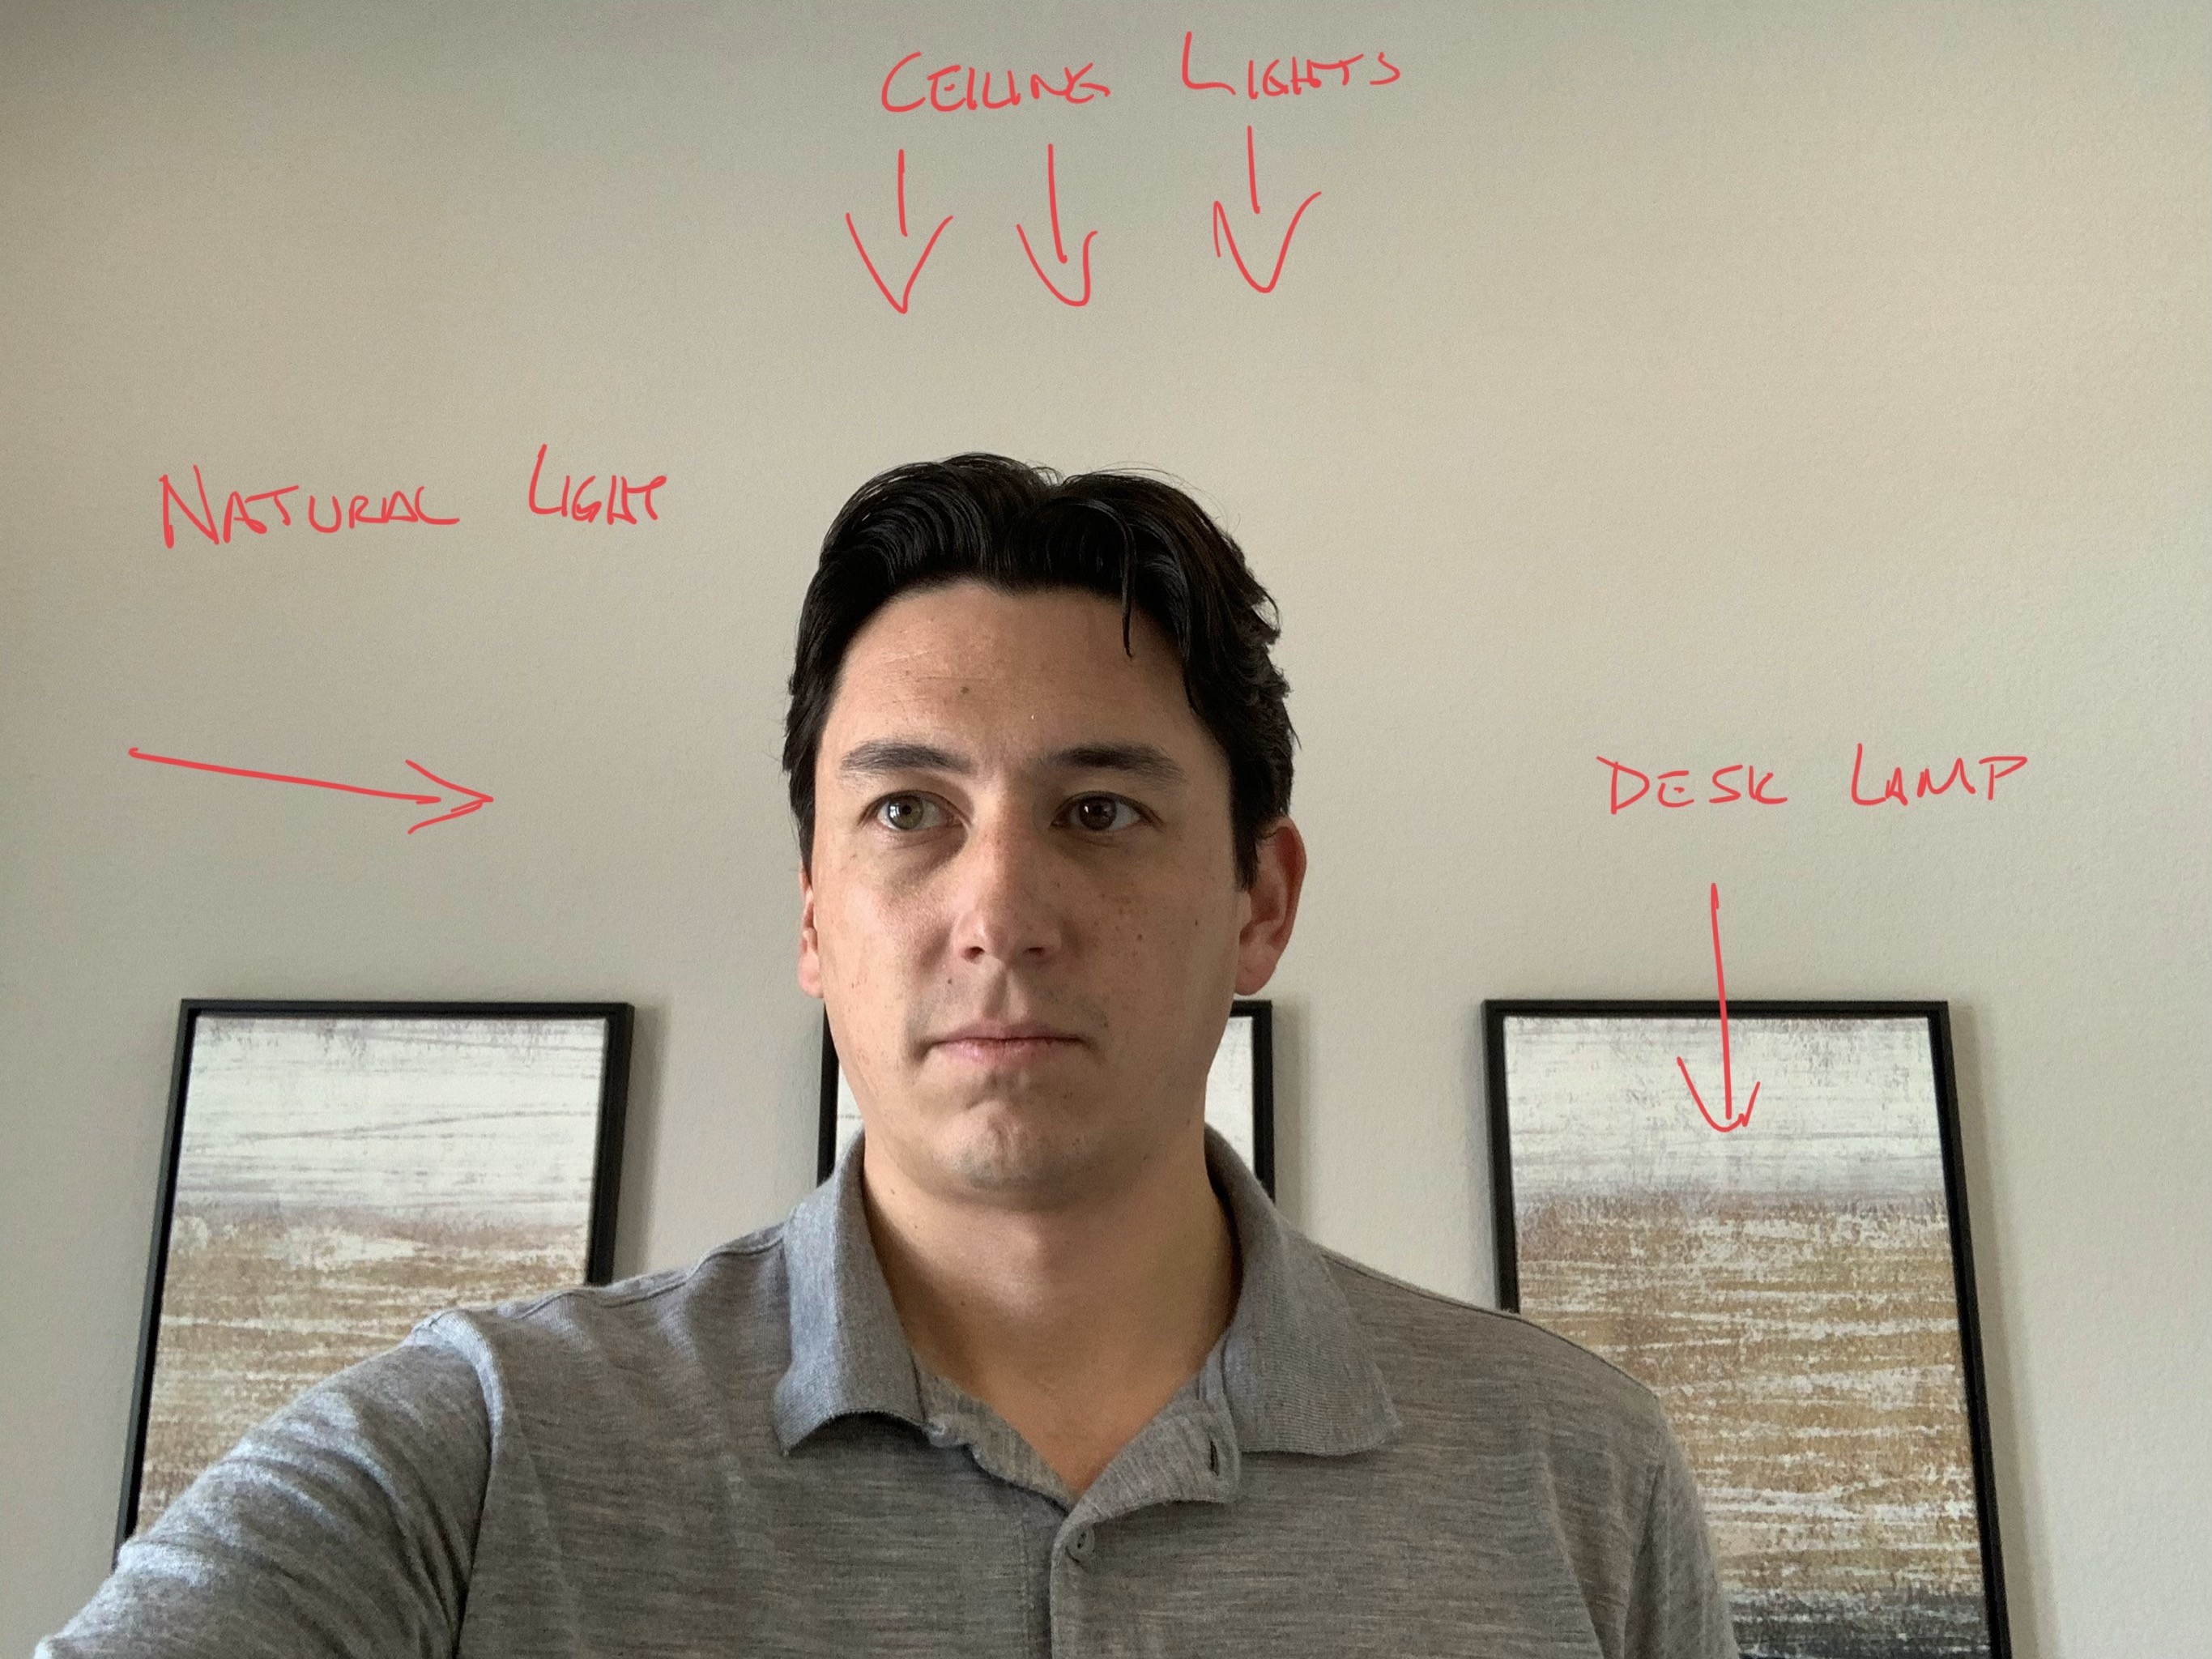
The key here is that my natural light is insane, and I have four evenly spaced recessed lights in the ceiling. So I already start out better off than most with light.
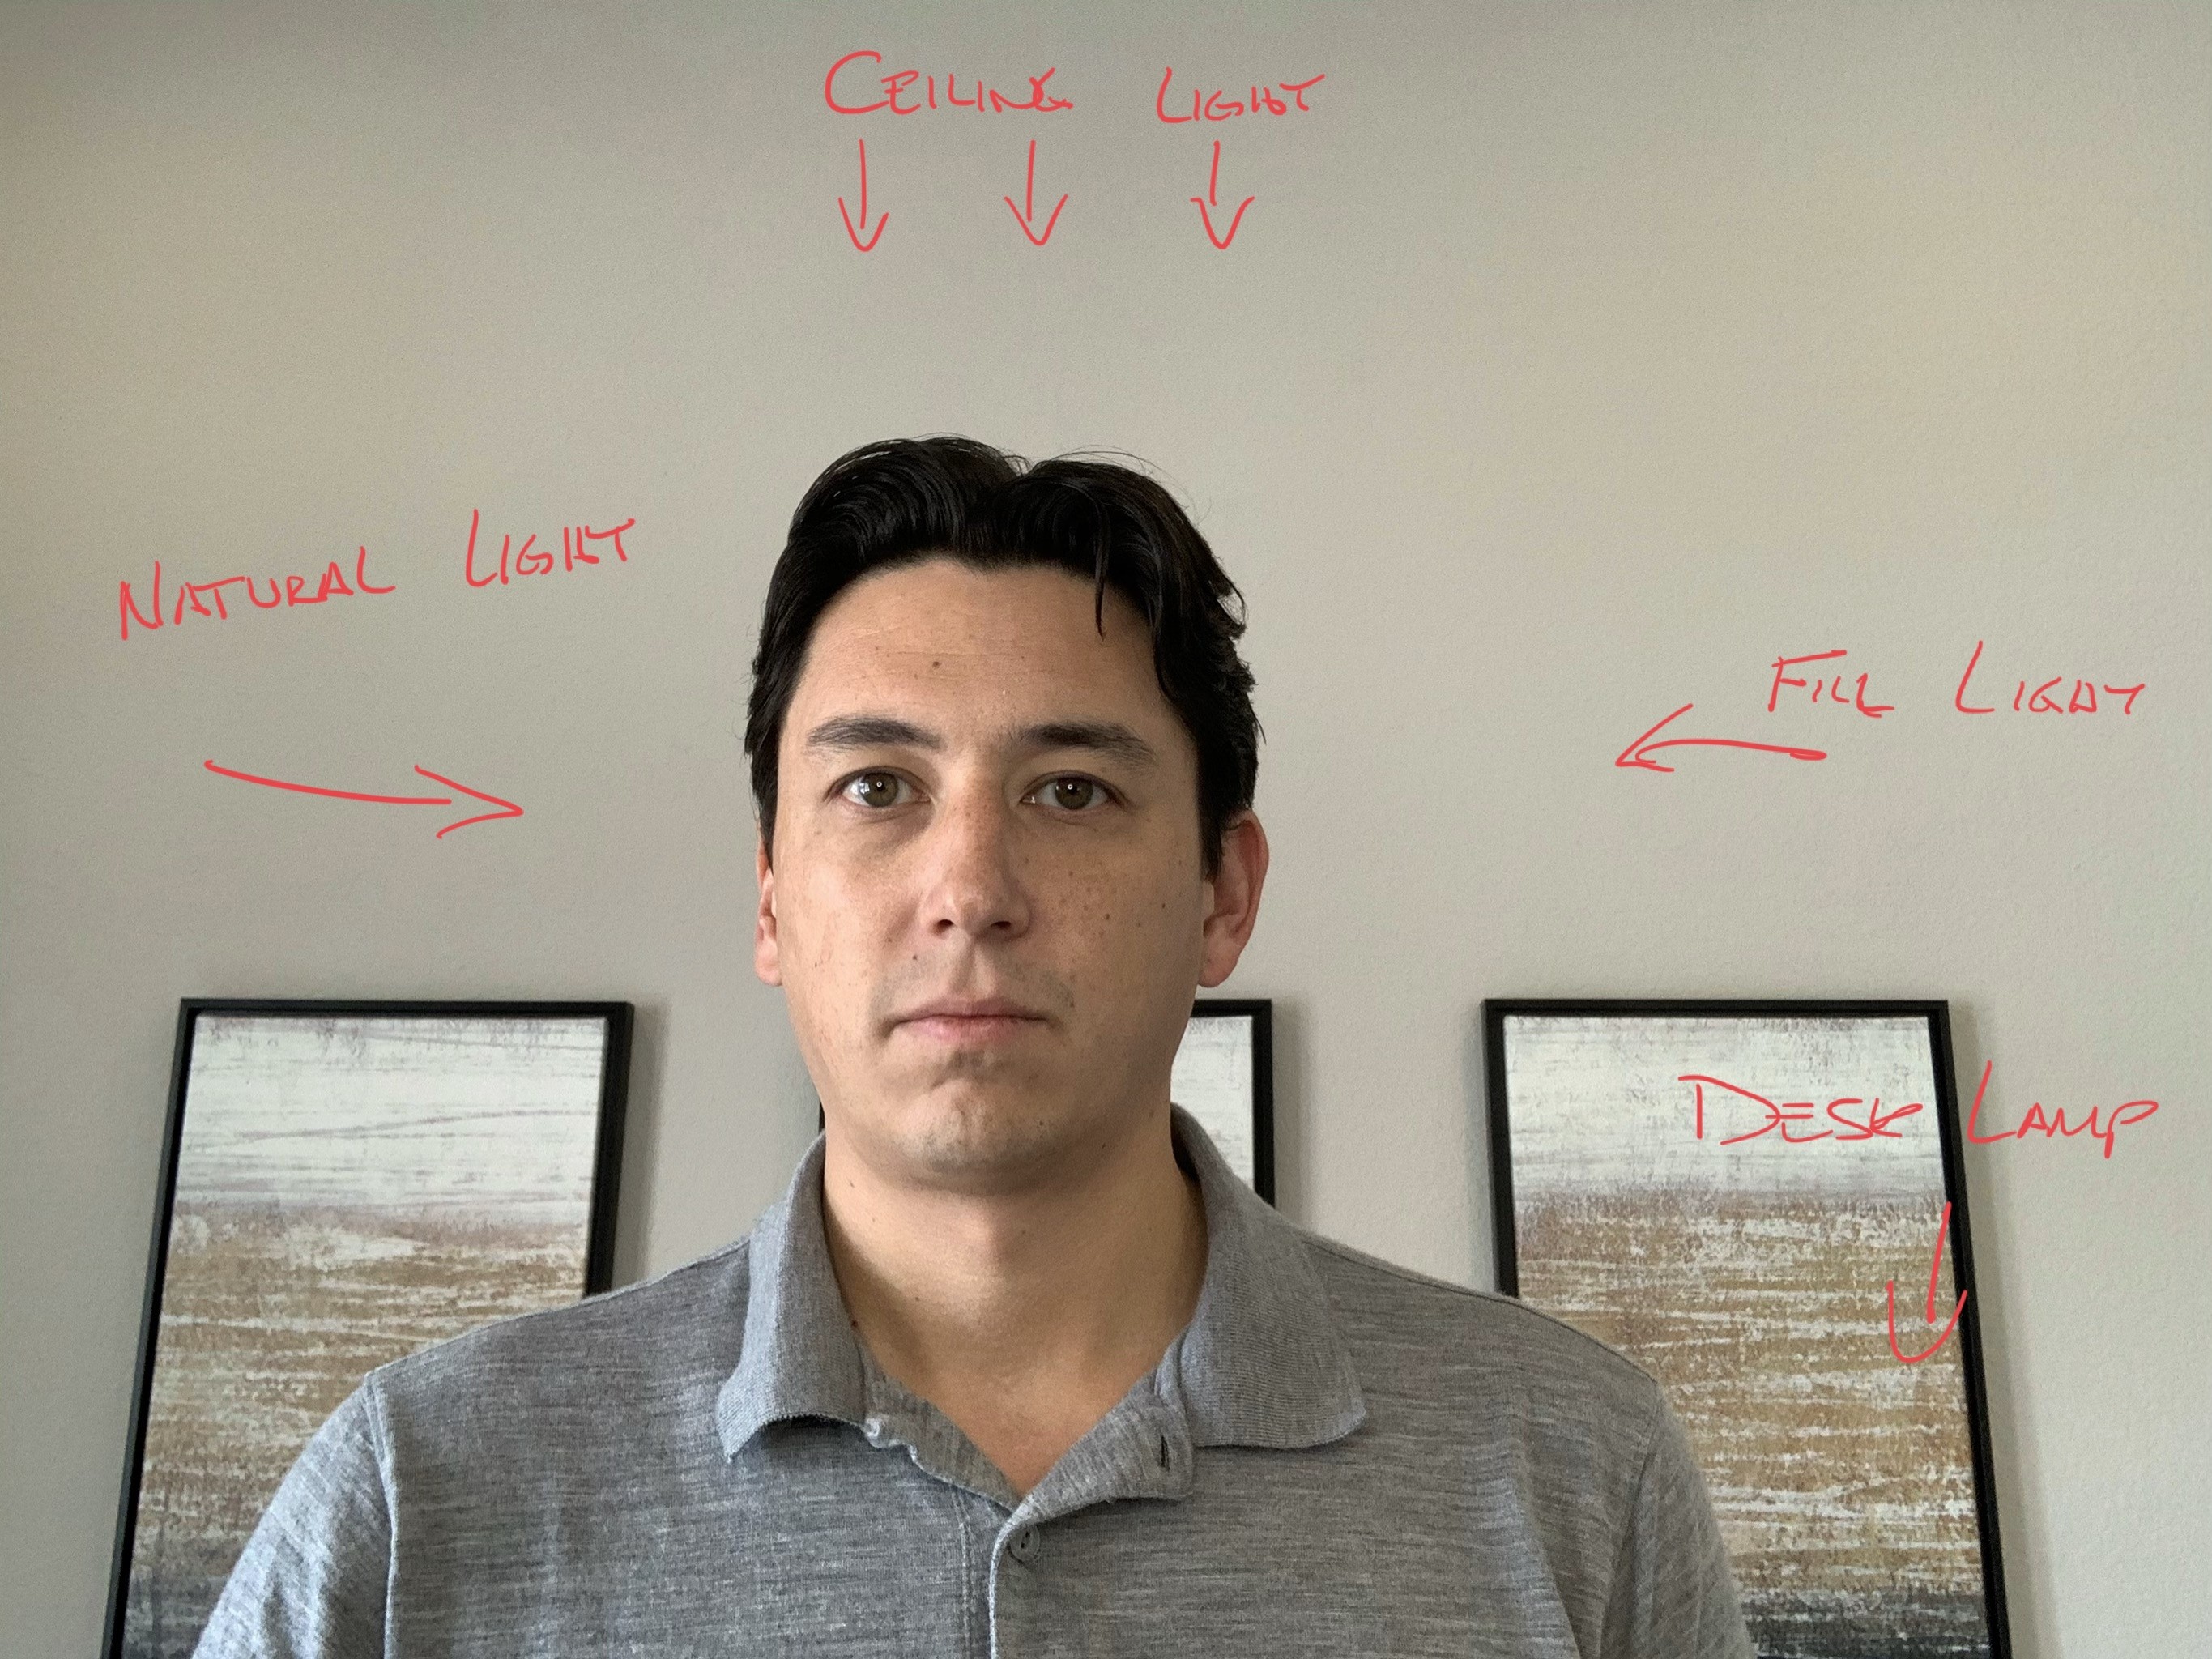
Thus, just adding in that fill light, I could be done with that alone. A little more fill would be ideal, but that’s what my light gives me.
The ring light only adds a little to my setup.
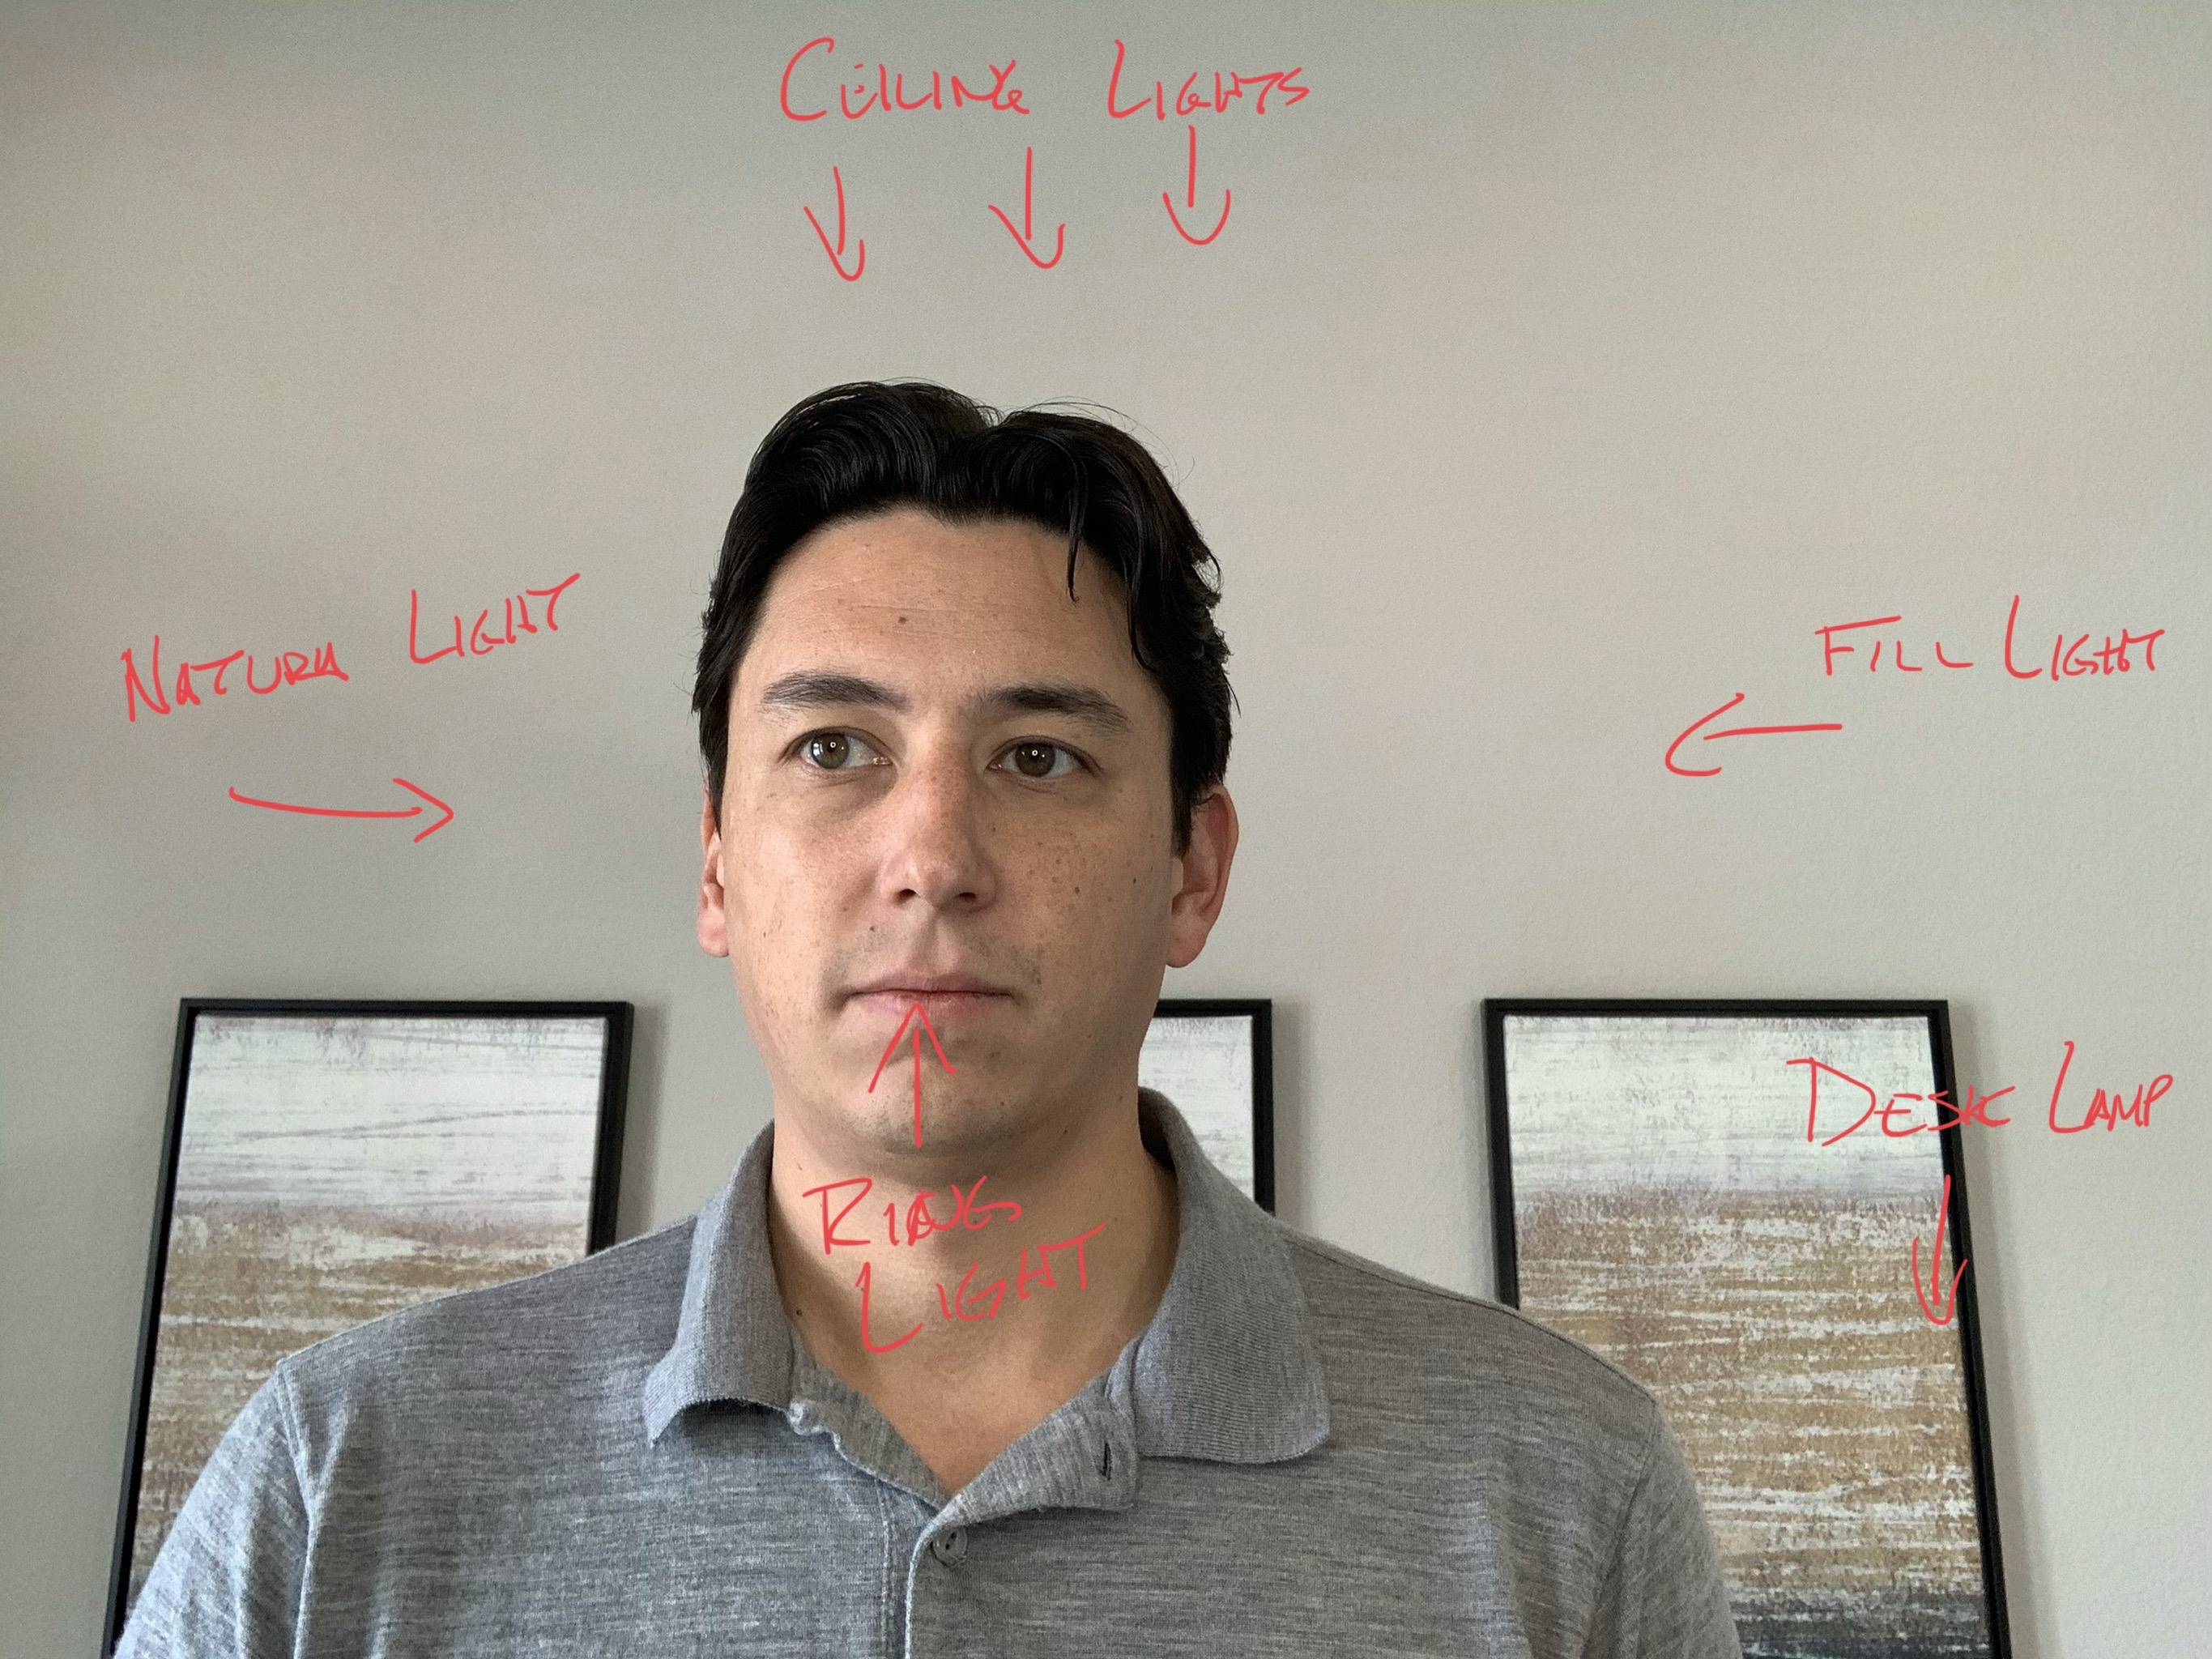
But daylight is a much different color temperature than the yellow soft white bulbs in my house, so if we do it all over with the ceiling lights and desk lamp off:
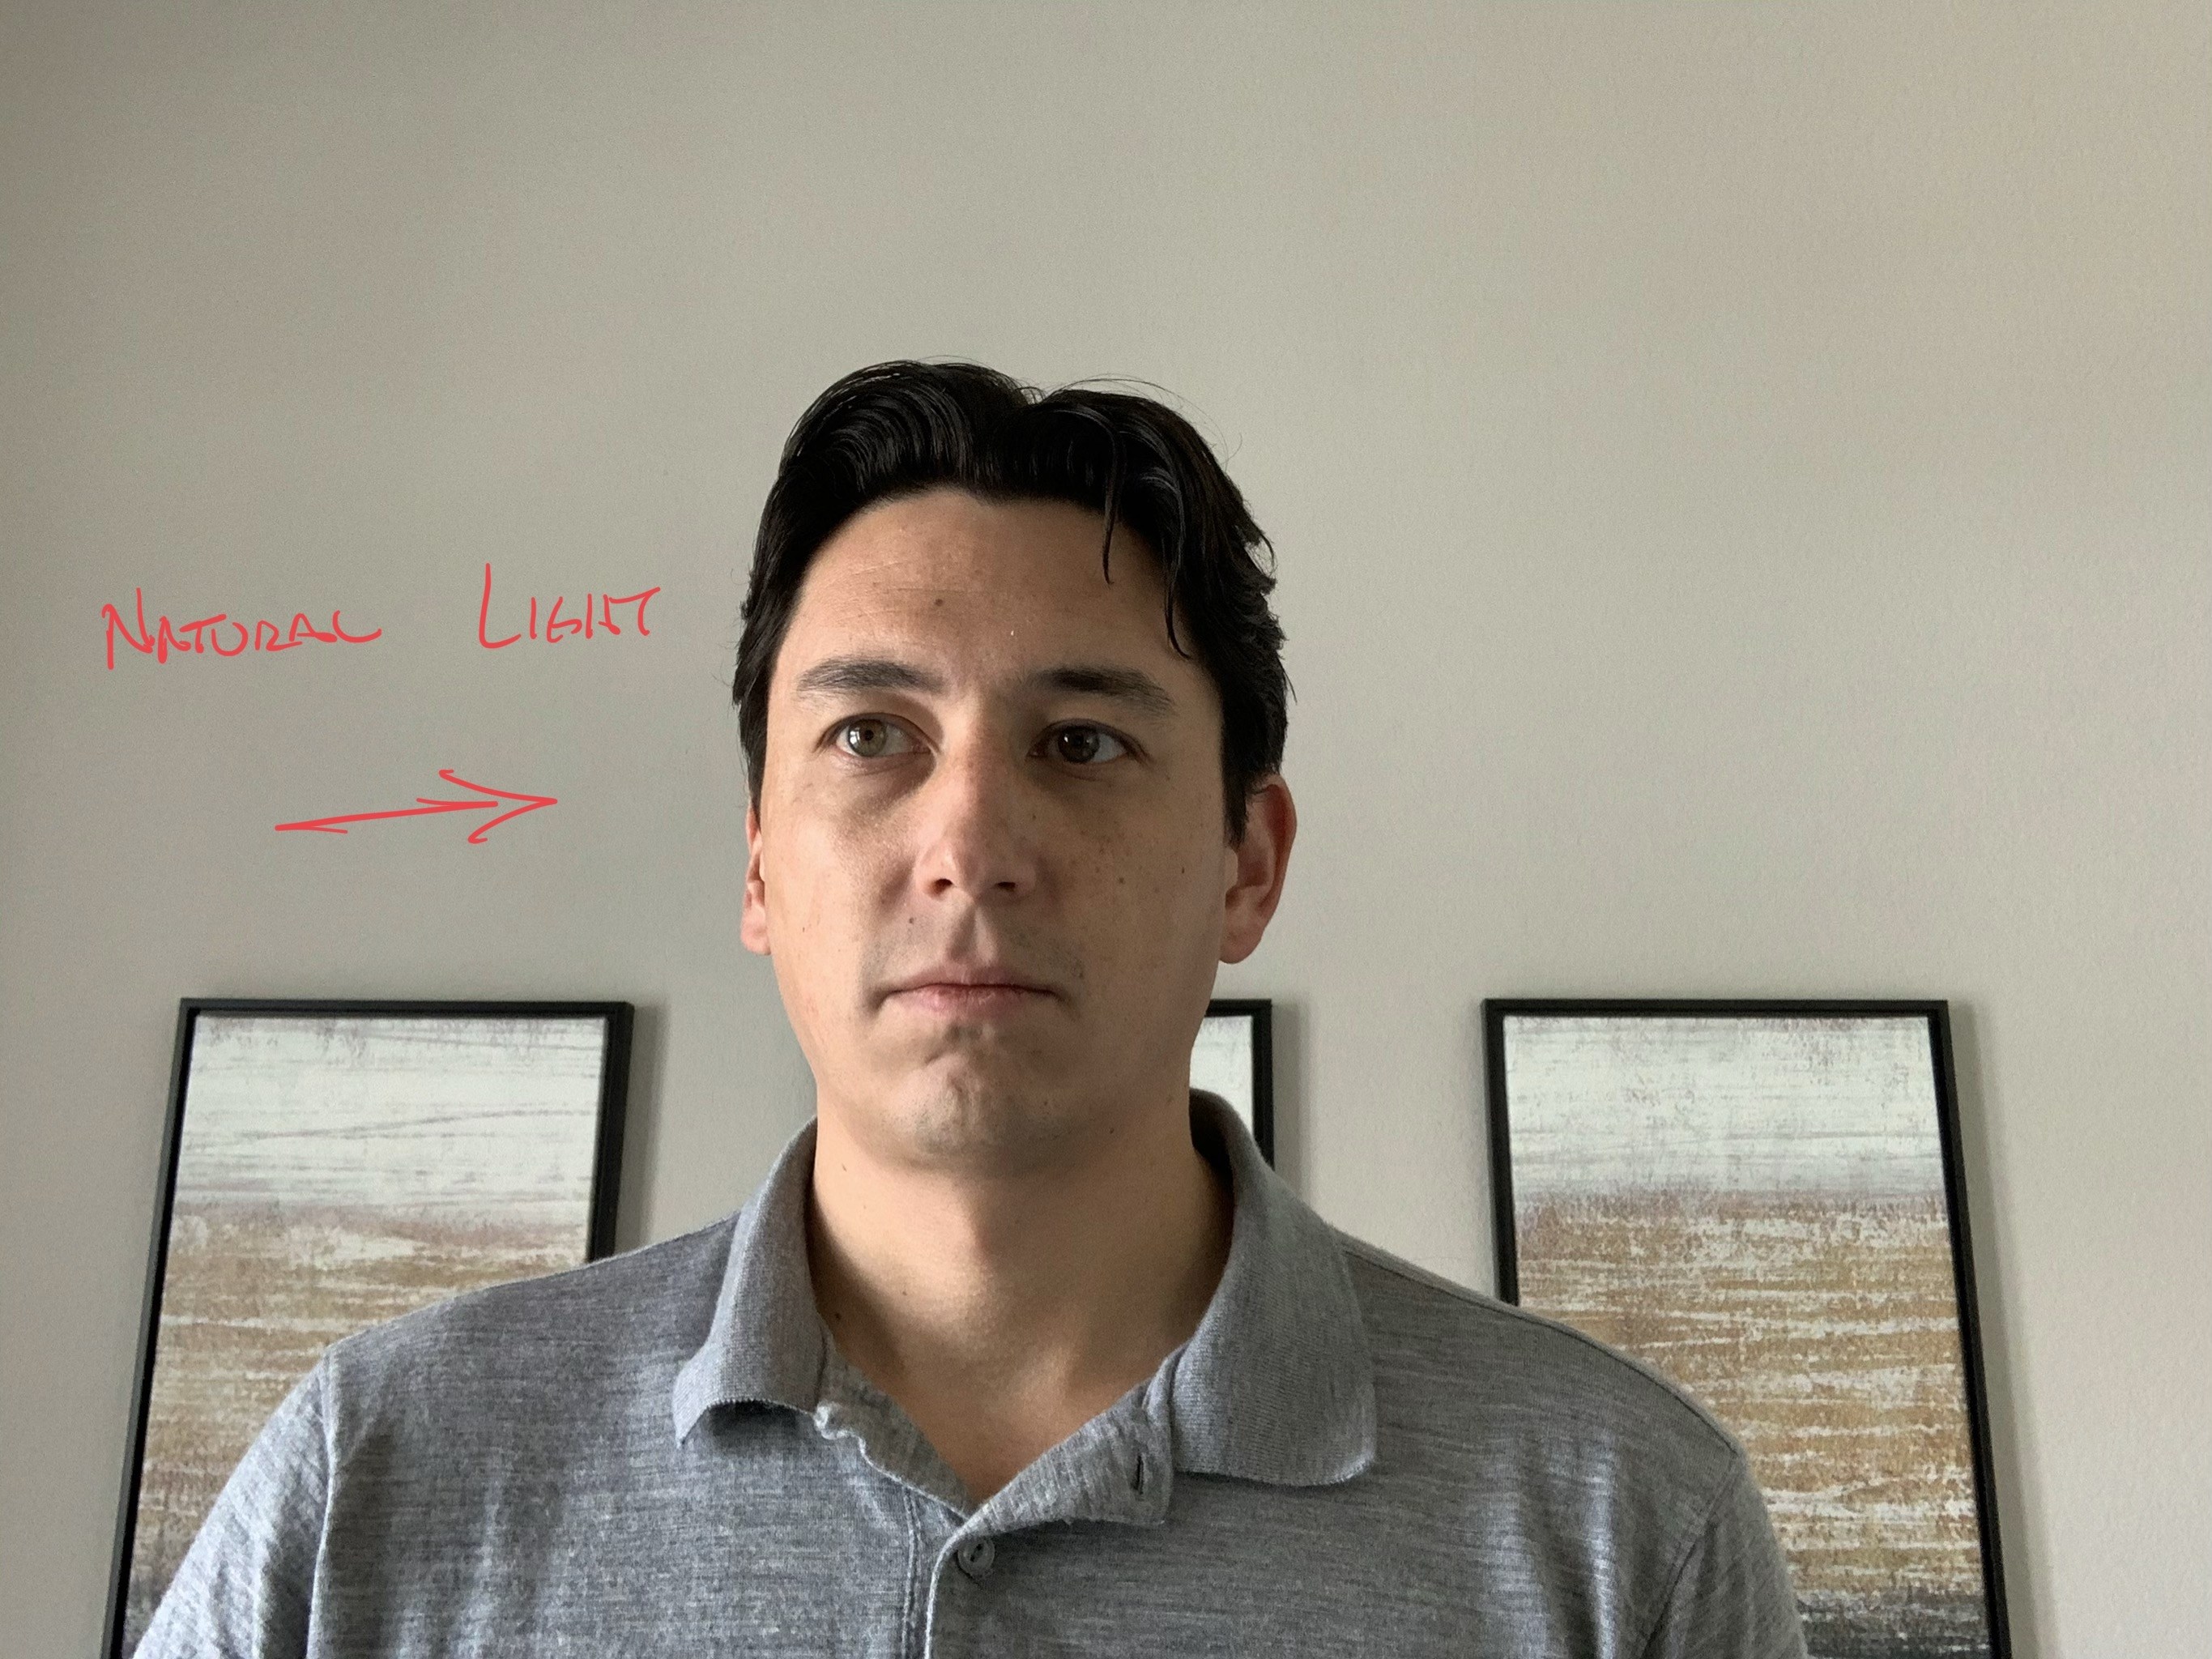
Add in just the ring light I advocate buying:
And then kick on the fill:
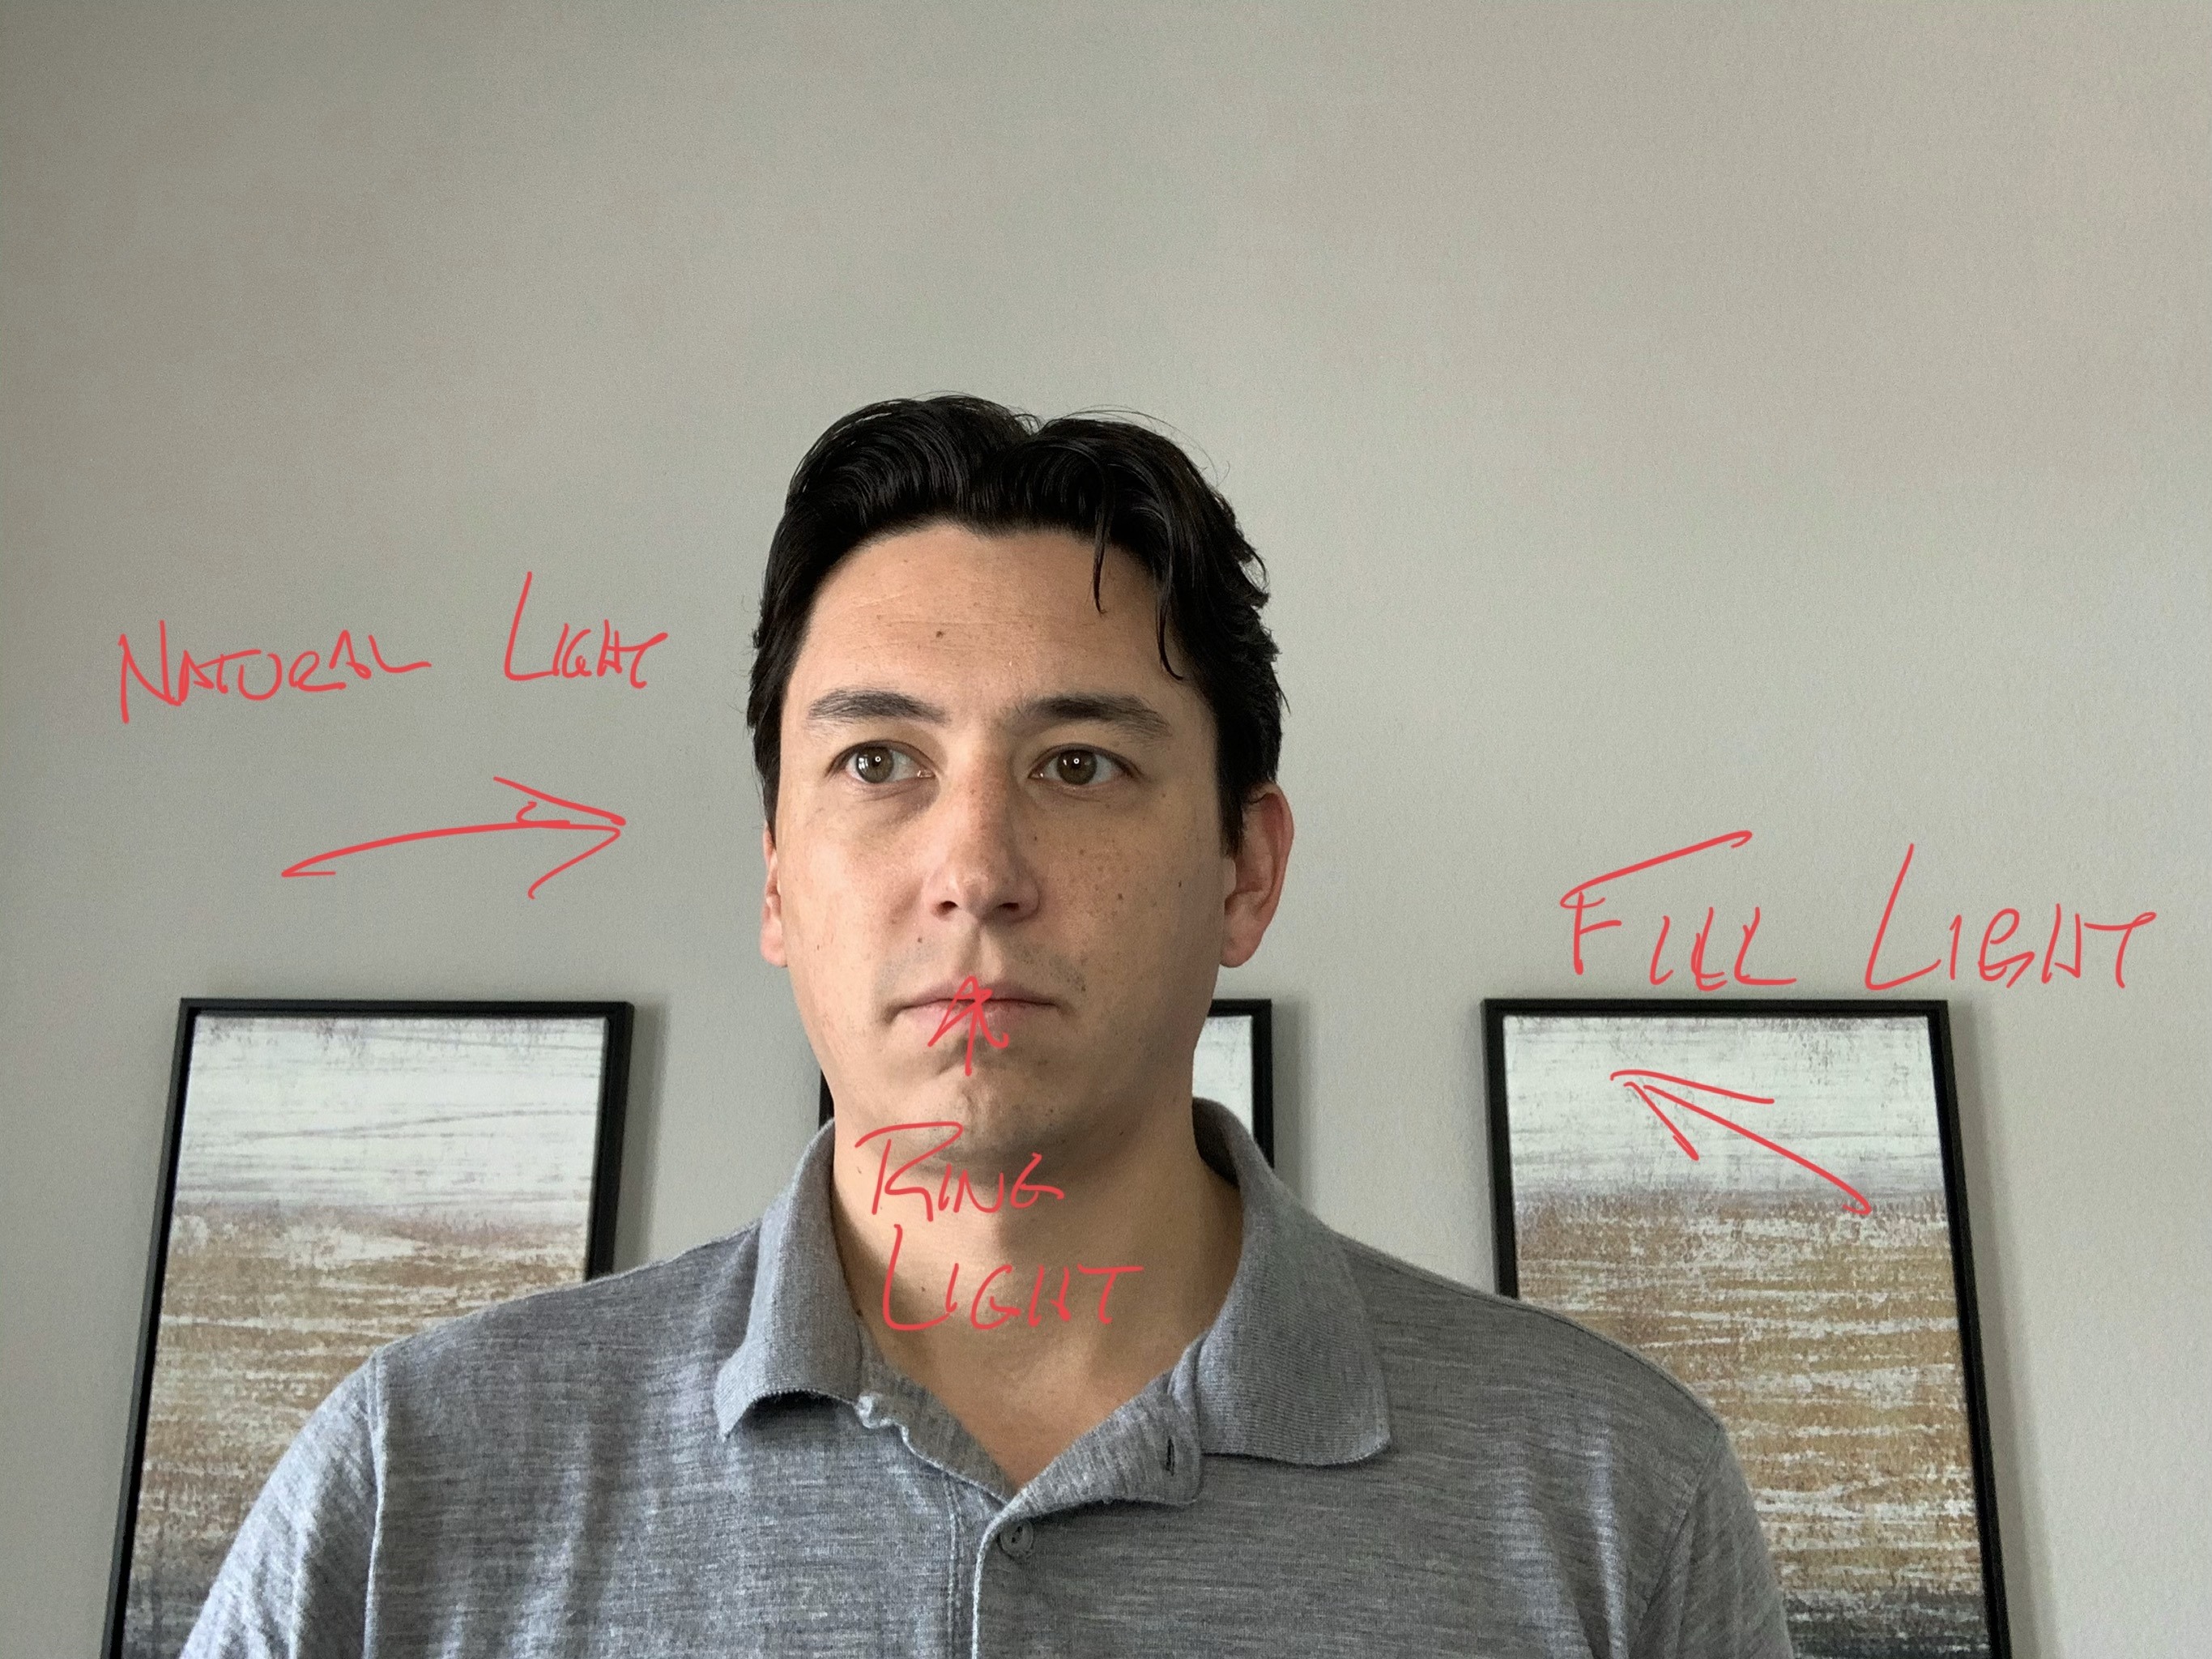
All of this leads to solid amount of light, with much better color evenness throughout. Not perfect, not amazing, but cheap, easy, and works well enough.
Ok, but you want advice, so here it is.
IF you have a good natural light source, your money (or time scrounging around your house) is best spent getting a fill light. There are two options I would personally recommend for this, the top option being this light (affiliate links for all this stuff, per FTC guidelines I am telling you now, sup FTC). I don’t have this light, but I might buy it shortly to replace the ring light.
The second being any super bright light in your house, 100w or above. As I mentioned, I use a work light from my garage. Work lights are great because they are made to be plugged in and left on for long periods of time, just make sure it is LED. Those older halogen ones are at best a burnt finger, and at worst a burnt down house. The one I am using is this one and it’s way to expensive for what you need. I would try this one for $29. (Hell I might get that, $29 for that level of output, sign me up.)
Ok now, IF you have shit for natural lighting I would consider my top ring light pick first. Dead simple, and the cheapest option. You can point it directly at you, as that is what it is designed for and you’ll look better than nothing. Super easy.
If you want to step it up, for $55 this gives you two lights and you could be done. Just position them at either corner of your desk, people will think you have some fancy job or something.
Keep in mind, a good lamp where you can articulate the light output can replace these items. The trick is to diffuse the light. Again, white sheets are really good at this if you are using LEDs so you don’t catch stuff on fire.
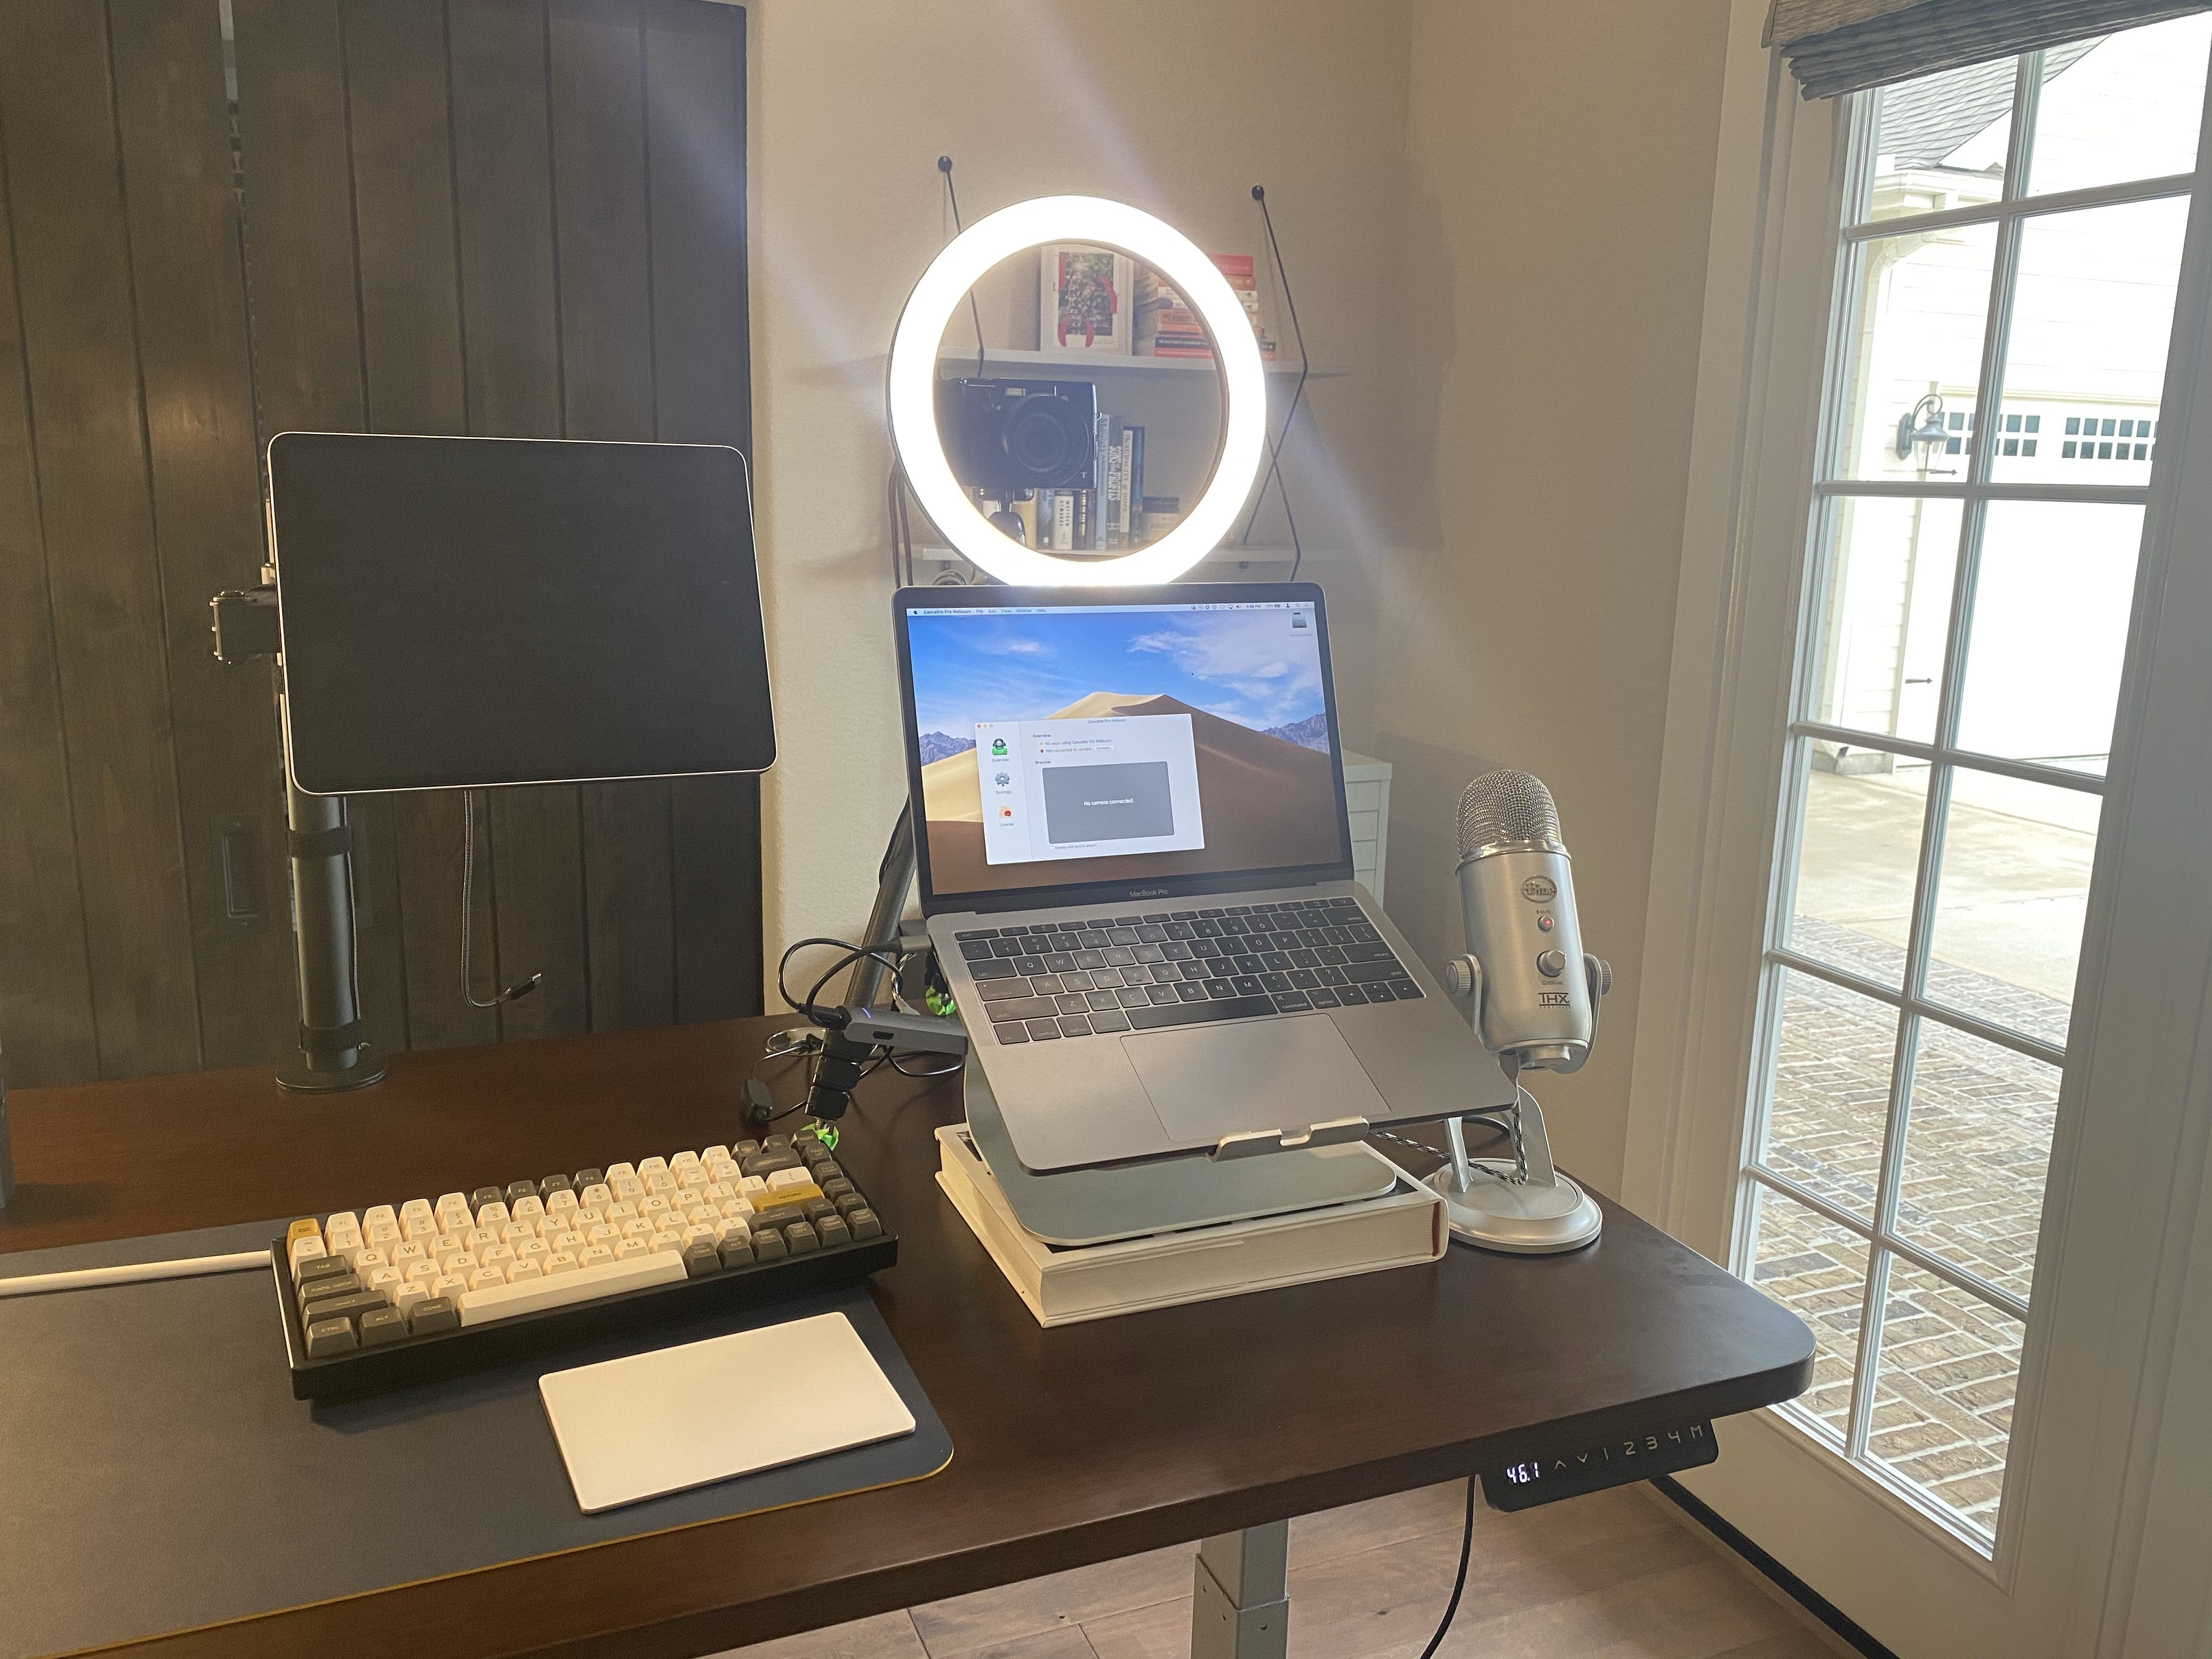
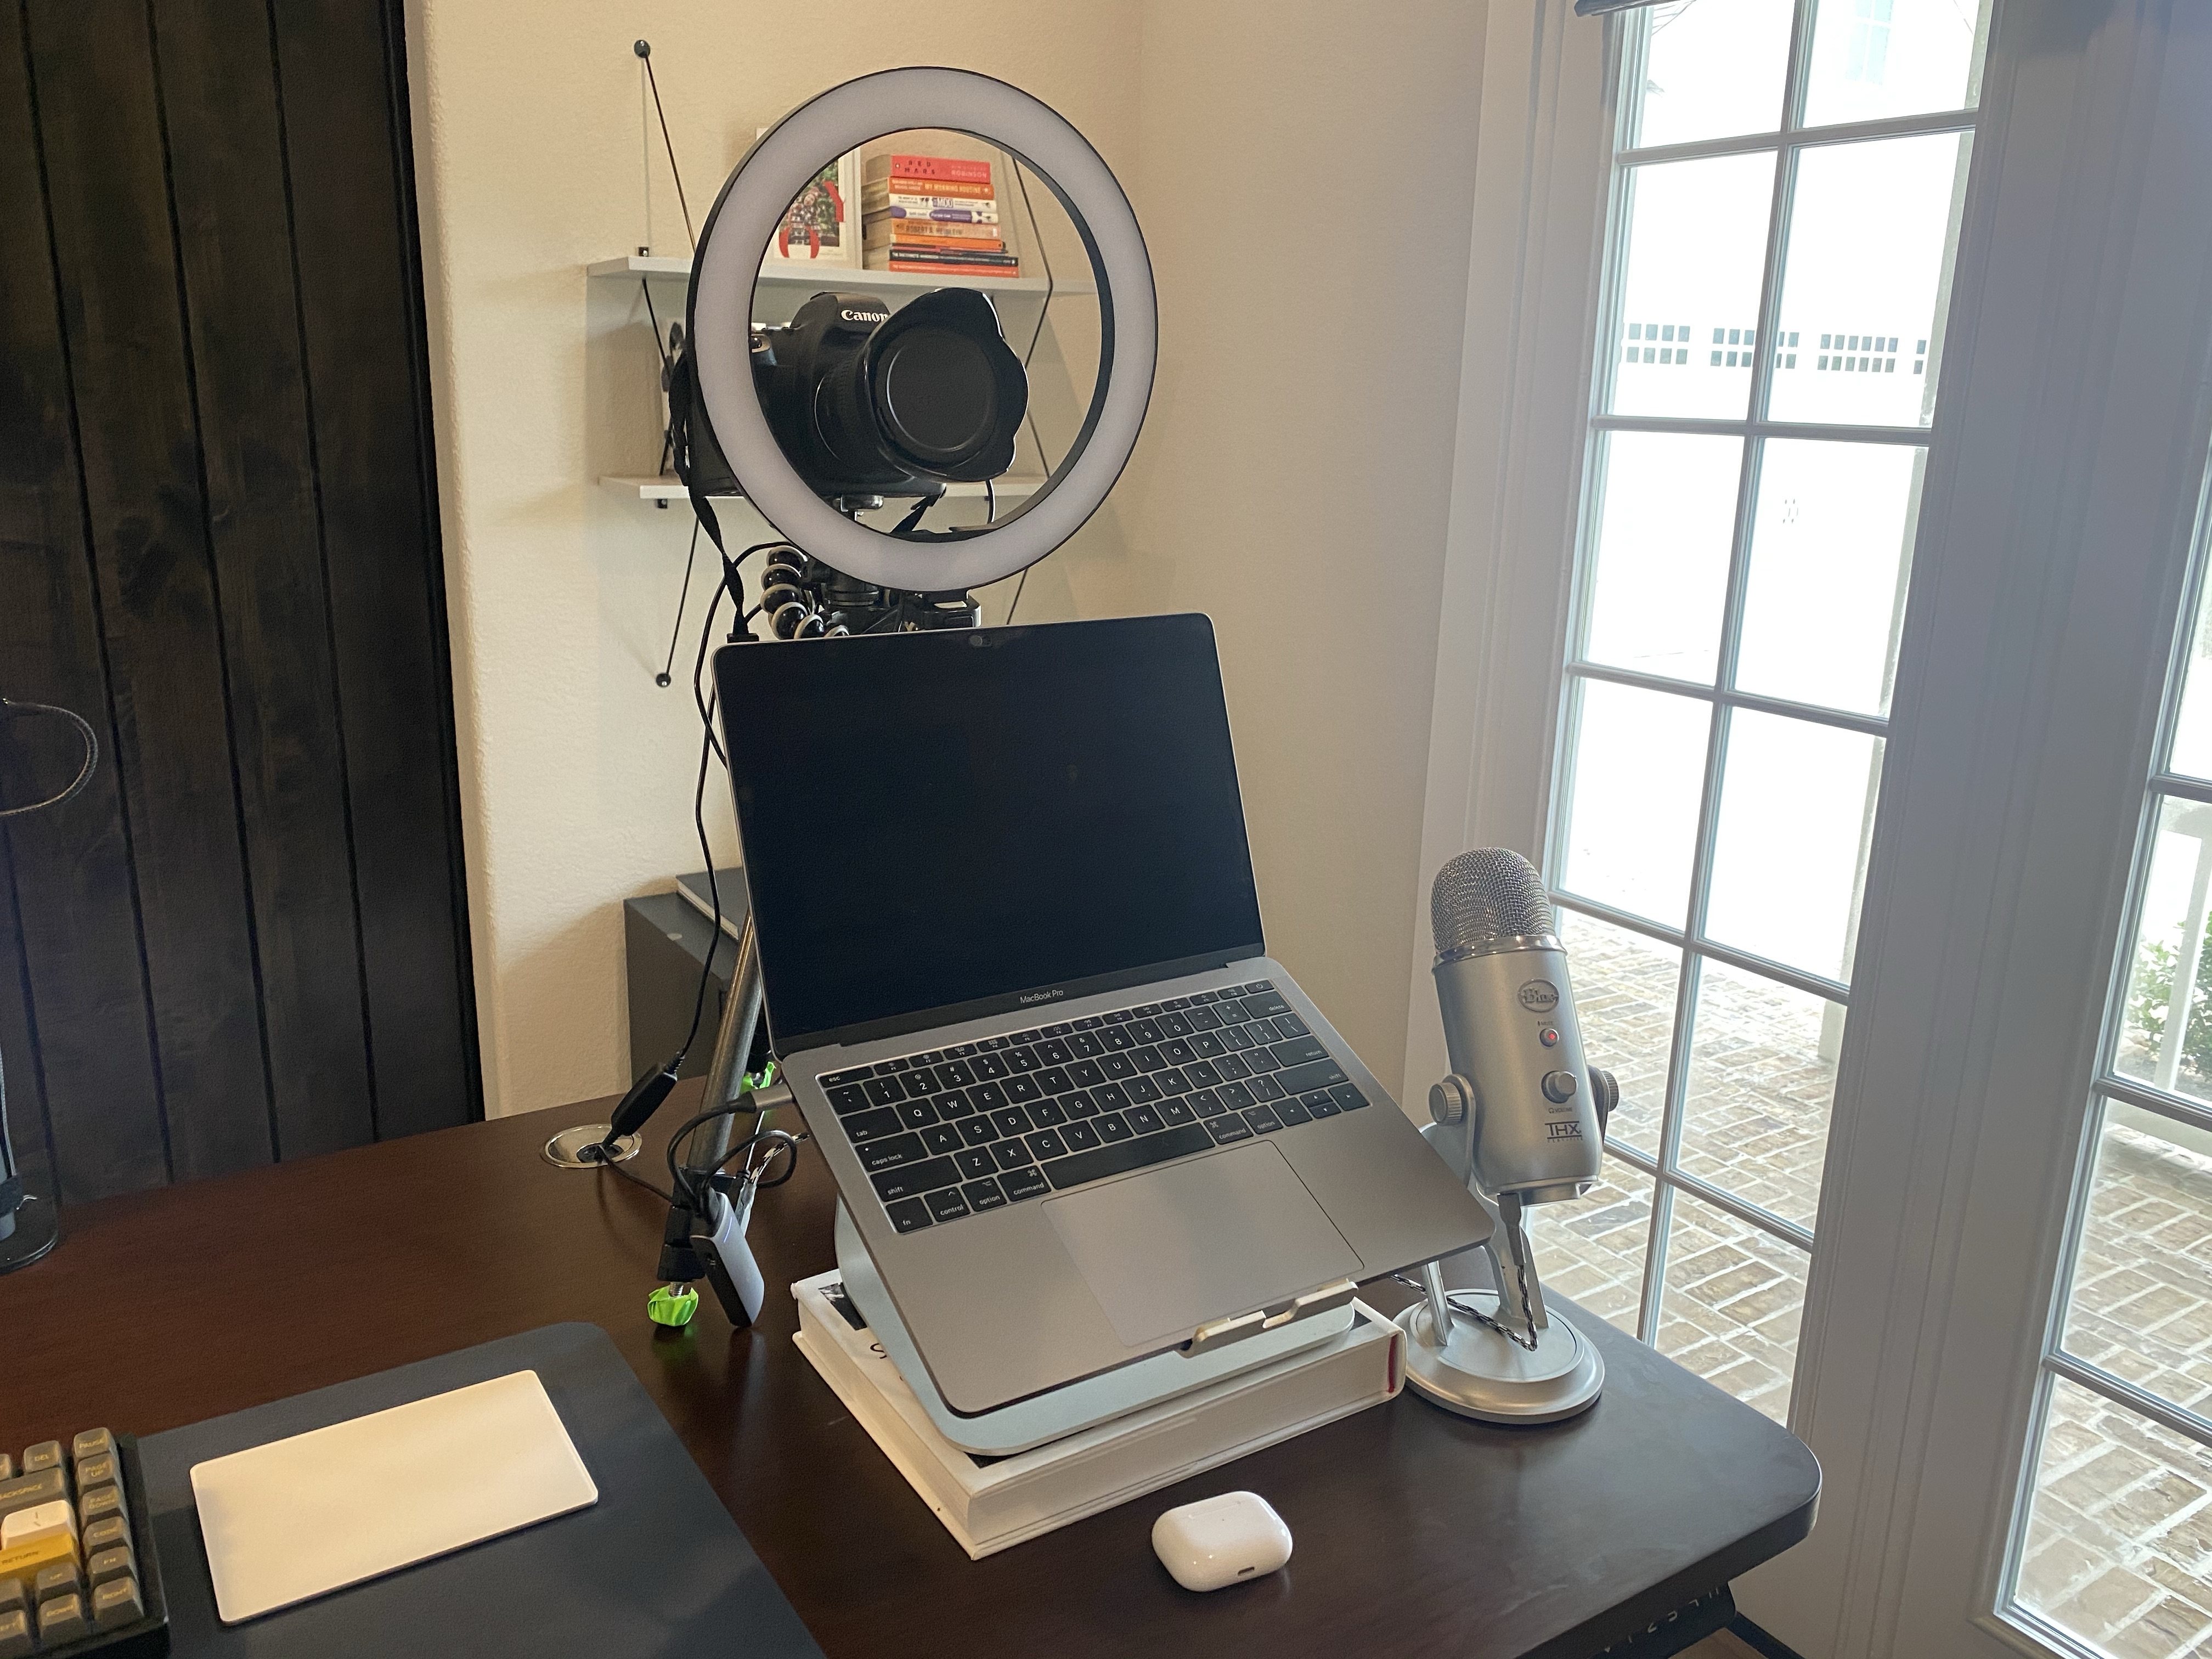
UPDATED: My Optimal Video Call Lighting Setup
Ok, I’ve done it, I’ve found the best setup for my office and the cleanest looking one too. I really like it. Here’s some pictures:
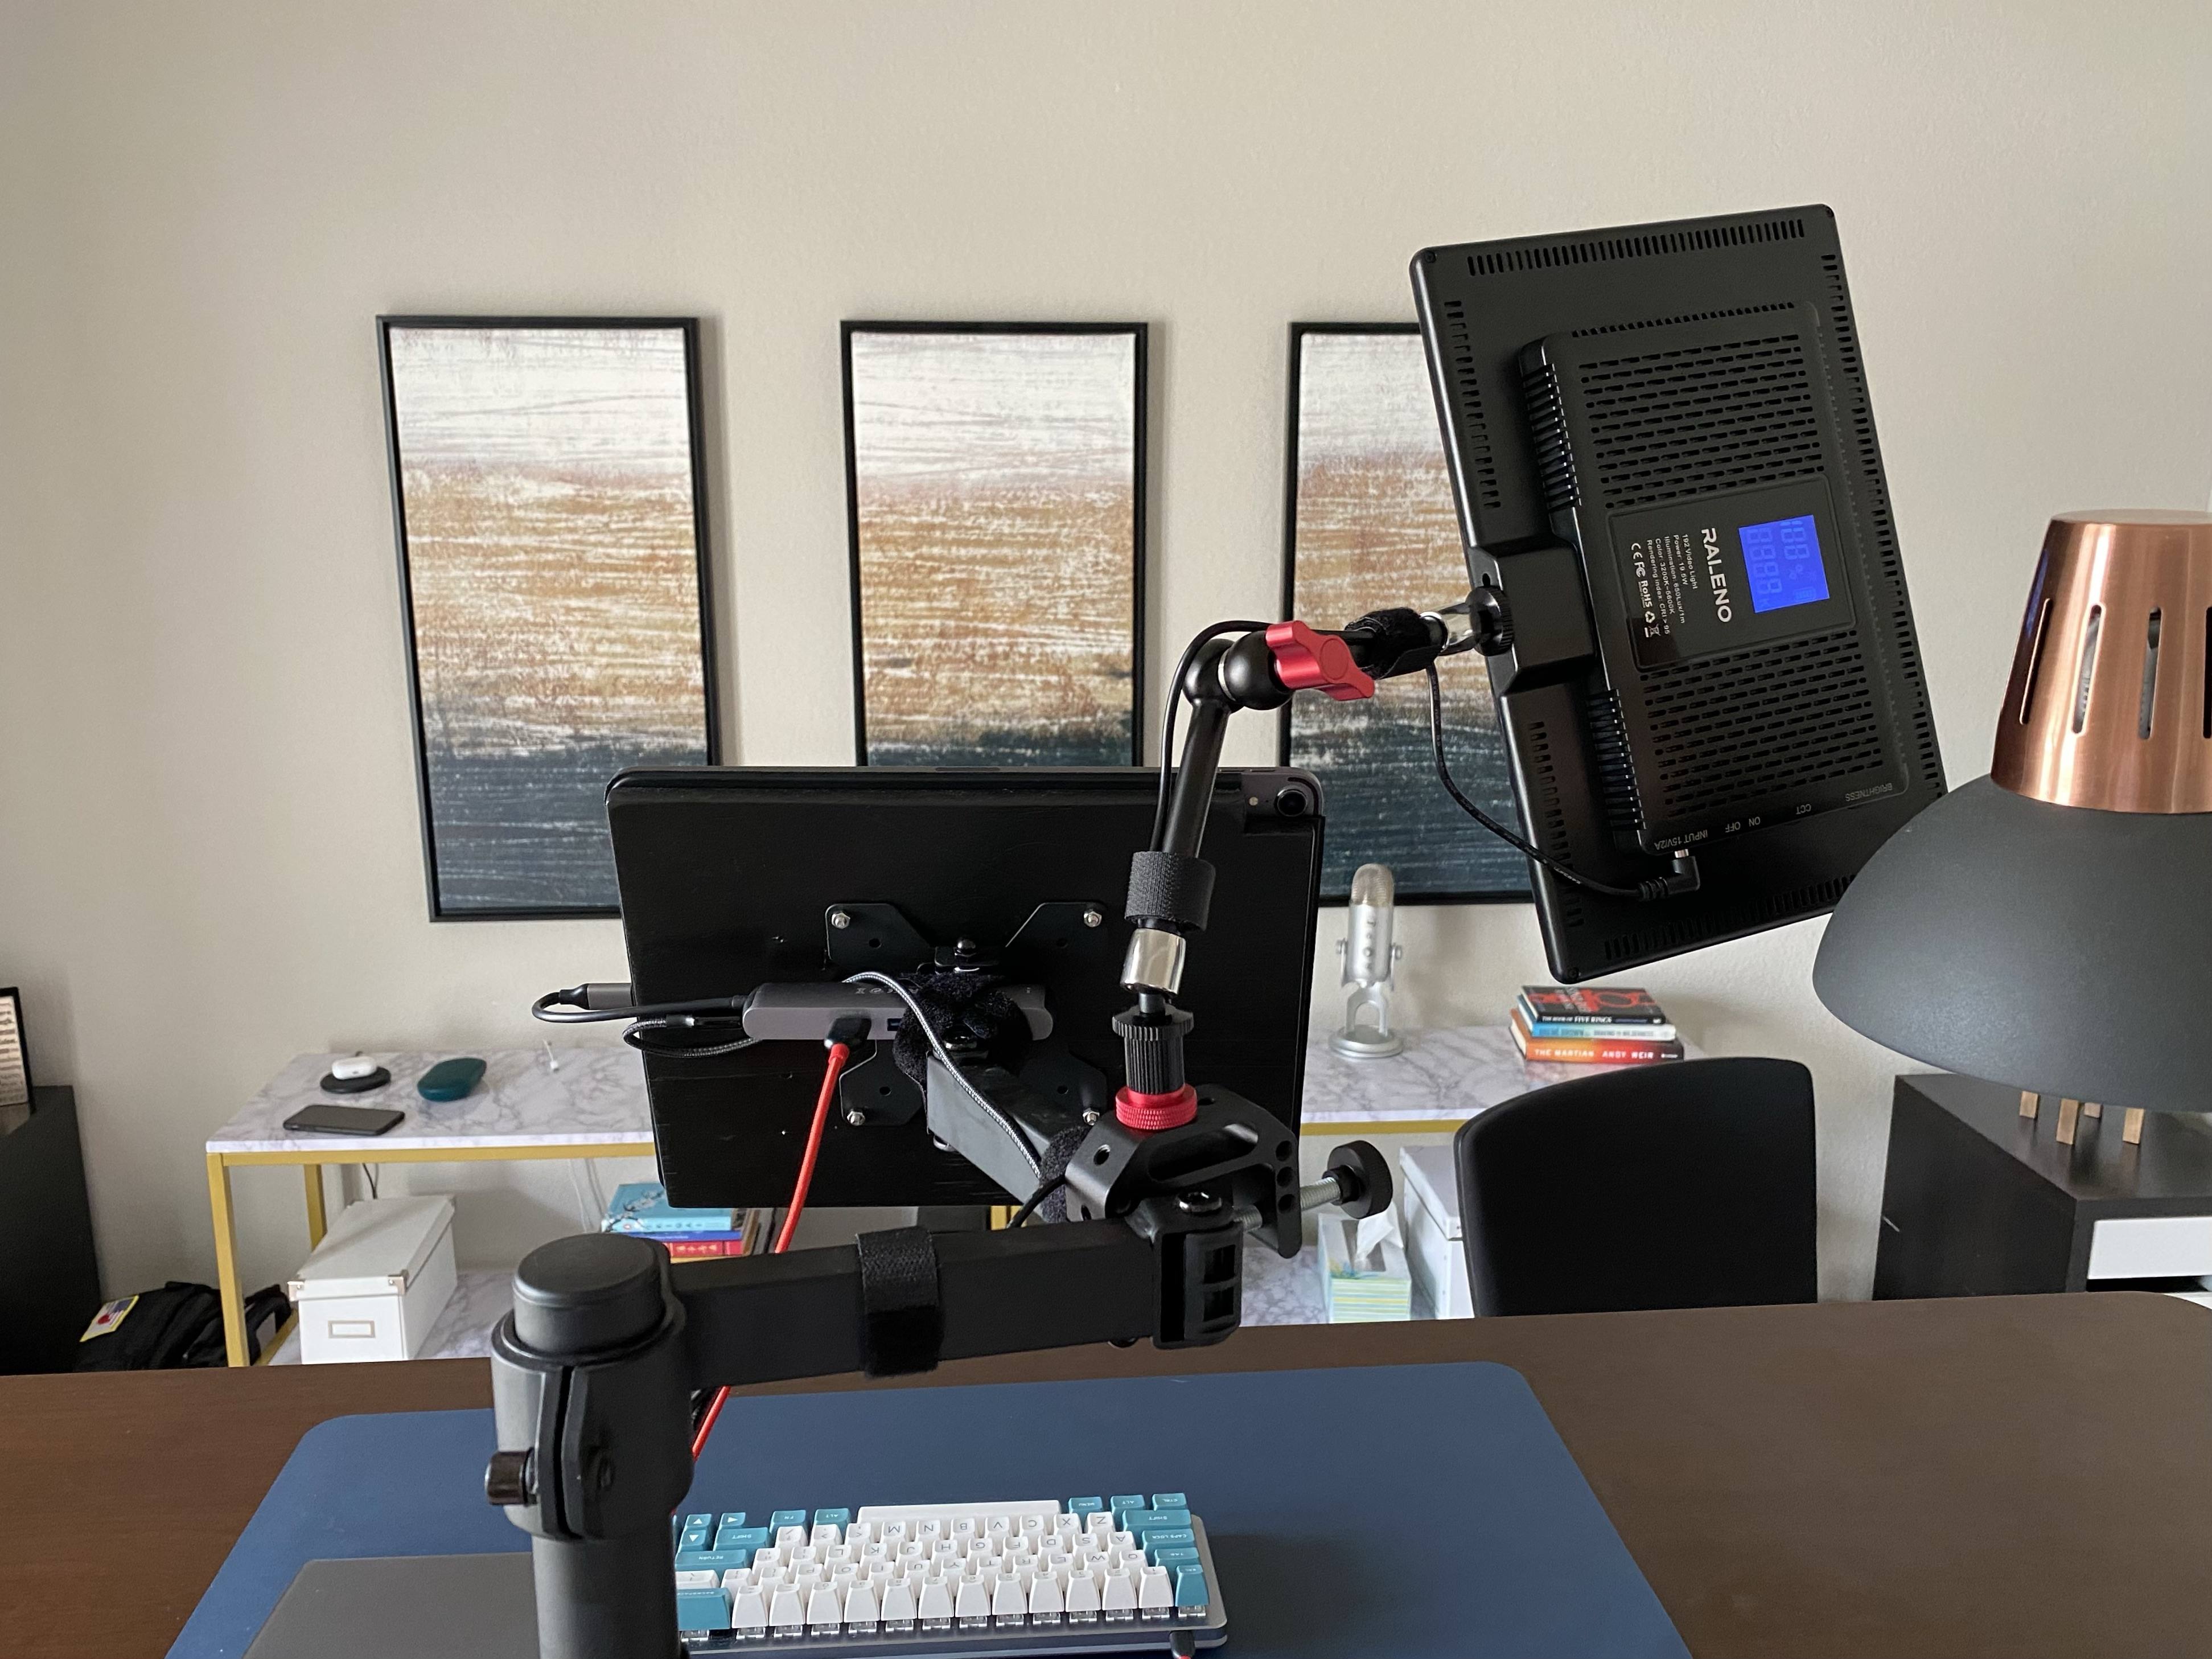
Ok, now to the gear. Here’s what I have for the gear itself:
- Raleno LED Soft Light (affiliate link)
- Camvate 11” Arm (affiliate link)
- Camvate Clamp (affiliate link)
And that’s it, super simple. But, I actually had to do a little more to get this setup to work. So first, if you recall my previous setup, I had a ring light I used for a key light, a work light to fill the far side of the office and two french doors that flood the room with sunlight all day (southern facing).
The big issue with the ring light/work light setup is that they struggled to be bright enough to contend with the afternoon sun here in Texas. And since I had to hand it over to my kids for school, I got the Raleno. It is much more powerful and does a great job by itself. But I had another issue, I had to spend the day running with my lamp and recessed lighting in the office turned off, as they threw the color balance off.
But, in using the Raleno, it has a handy color temp readout in the back, and going off of what looks best, 5000k (or daylight balanced) looks best to me. Which then sparked an idea: let’s change out all the light bulbs in the office here to daylight balanced (which is actually better to work in, but yeah). So I swapped out my overhead lights, and my desk lamp to 5000k LED bulbs, and run with everything on at the same time.
(Side note on this: if you ever work when it is not light outside, or would need the lights on in the room at night for extended time, I would not put daylight balanced bulbs in. I personally do not use my home office at night, so this works for me. If you use the space during the day and night, you might look into smart bulbs like Philips Hue so you can adjust the colors as needed.)
This is way better to work in. The additional light around the office really helps to not make it feel like a dark hole, and to balance out the look in the office itself for the video calls.
With that said, the soft light setup I have is something I highly recommend as a low fuss, and great quality lighting rig.
Some notes about all the equipment itself:
- Amazon seems to not sell small packages of 5000k bulbs, so that was “fun”.
- I mentioned there are two options for the Camvate clamp, and I have both. I ordered this one (affiliate link) first and it wasn’t the right clamp for what I needed to clamp to, which is why I got the clamp above. Get the the super clamp for clamping to round things, and the other for clamping to square things. The little red but at the bottom that you see in my pictures was taken off the super clamp.
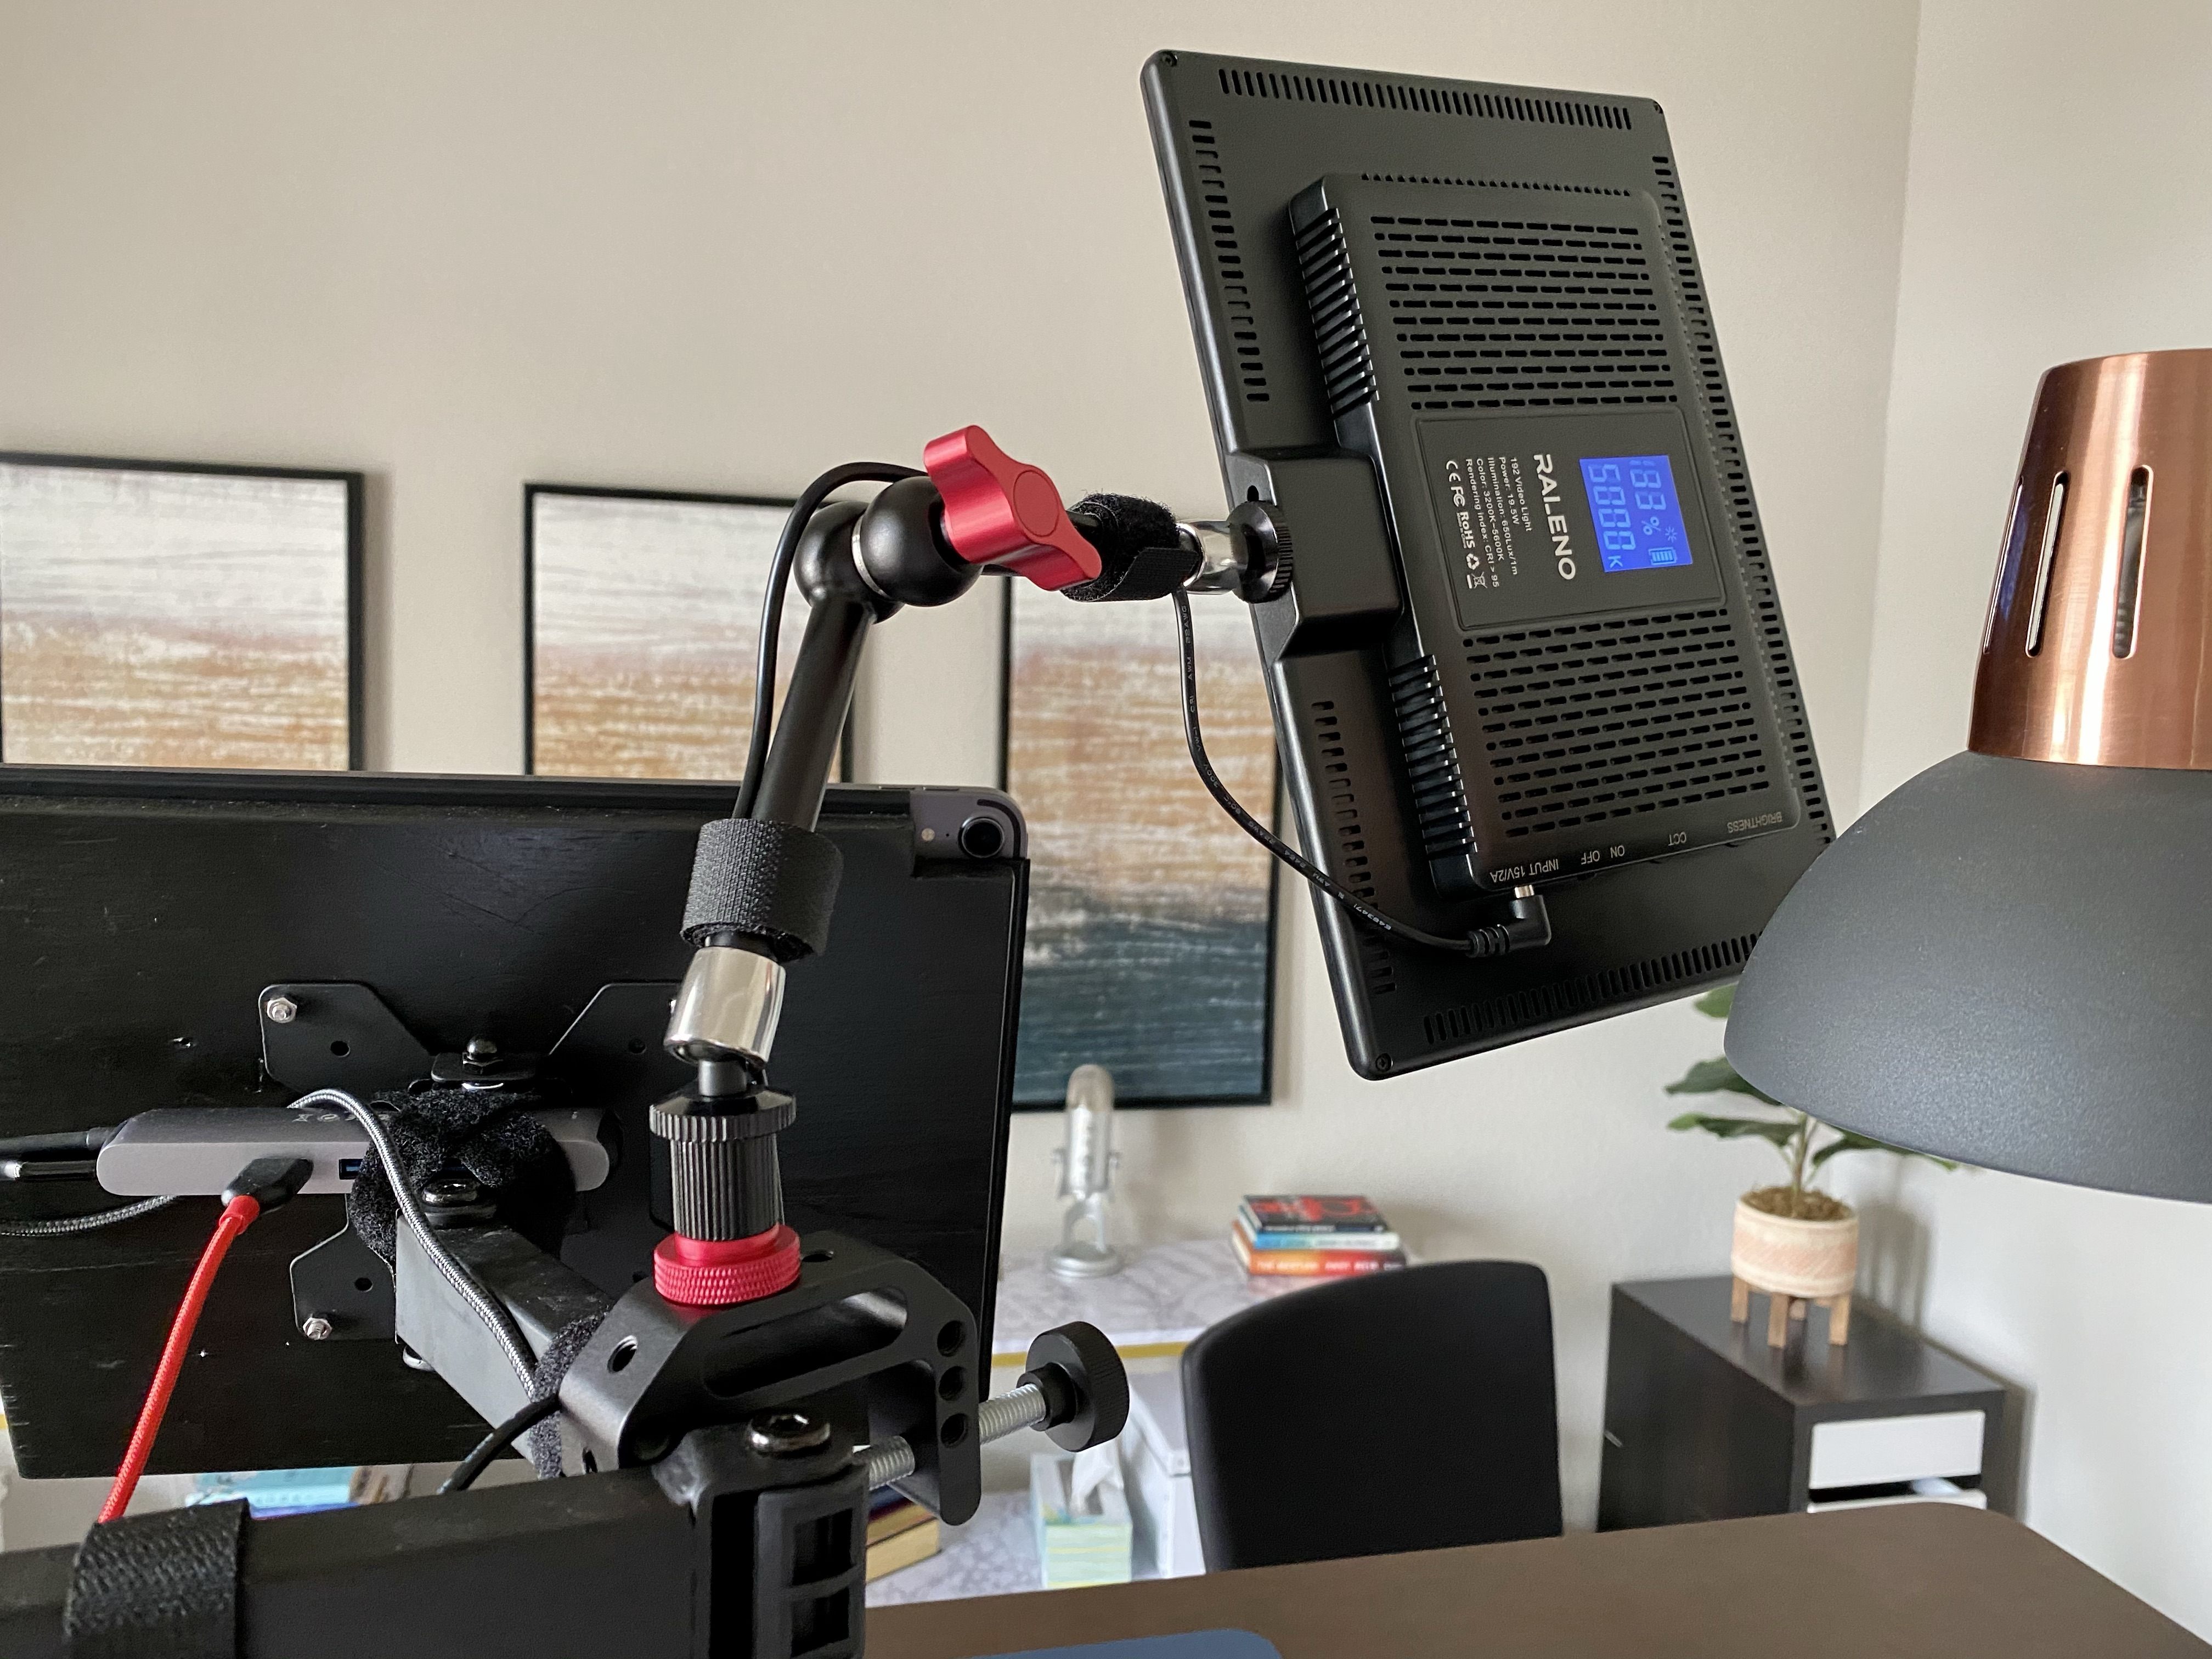
- The Camvate arm was the biggest surprise, it is super nice. That big red knob you see on it, loosens and tightens all articulating parts of the arm at once. And it is super firm, holding the light while having no bounce in the arm at all. In other words, the entire light wiggles with the desk, not independently from it. Amazing really — love this arm. Cannot recommend it enough.
- The Raleno light has a built in battery which gets me through a day of sporadic video calls turning it on and off. That’s an unnecessary feature for me, but impressive battery life for sure. What isn’t impressive is the battery life indicator which shows 90% all day until the battery just dies. If it does die, plugging in the AC cord allows you to turn it back on with no wait which is also nice.
- The color temp on the light is adjustable in 100k increments, and is super easy to use. This is a fantastic feature.
- The power is adjustable in 1% increments and I do it while on calls because I can slowly ramp up or down the output and it’s not noticeable to other people. This is great as Texas has these massive clouds which can mean in a 3 minute interval I need to drop the power from 55% to 33% and then back up to 55%. This is seamlessly done with the controls on this light.
- Also, the power output is high enough that I usually only run the light between 38-51% power, which means there’s a ton of headroom left. This is awesome.
Lastly, I was worried having this much light shining at my face might drive me nuts, but I barely notice it at all when I am on calls. The light is very diffused, and if positioned correctly it is out of your line of sight and thus never an issue.
I am a big fan of this setup. And this Raleno light is fantastic, I only wish I had bitten the bullet earlier and spent the money.
Light is kind of like wind
Think of light like wind. If you go outside in the wind, the wind seems to evelope your entire body and it feels very different than a fan blowing on you. That’s because the source of the wind is much larger than you the individual.
Now think about all these lights like a fan. You really want WIND, but you are stuck with fans. So the fans which are going to feel MOST like wind are those which are really big, and a little farther away from you. It’s not that small fans don’t produce movement of air, it’s that they don’t produce anything which feels like wind.
Which is why you should not buy something like this, or this, because that light will look shitty. Because those are like small personal fans, when you want something like wind.
Ya follow?
There are a few rules photographers generally abide by with lighting:
- Get the light away from the camera lens as much as you can (obvious exception: ring light)
- Make the light as big as you can.
- Keep the color temp of your lighting consistent.
So yeah, don’t buy that gimmicky overpriced Kickstarter shit. You are almost always better using a mirror, any mirror, and angling it to reflect light from a window so that you have a quick fill light. I am full of the tips today!
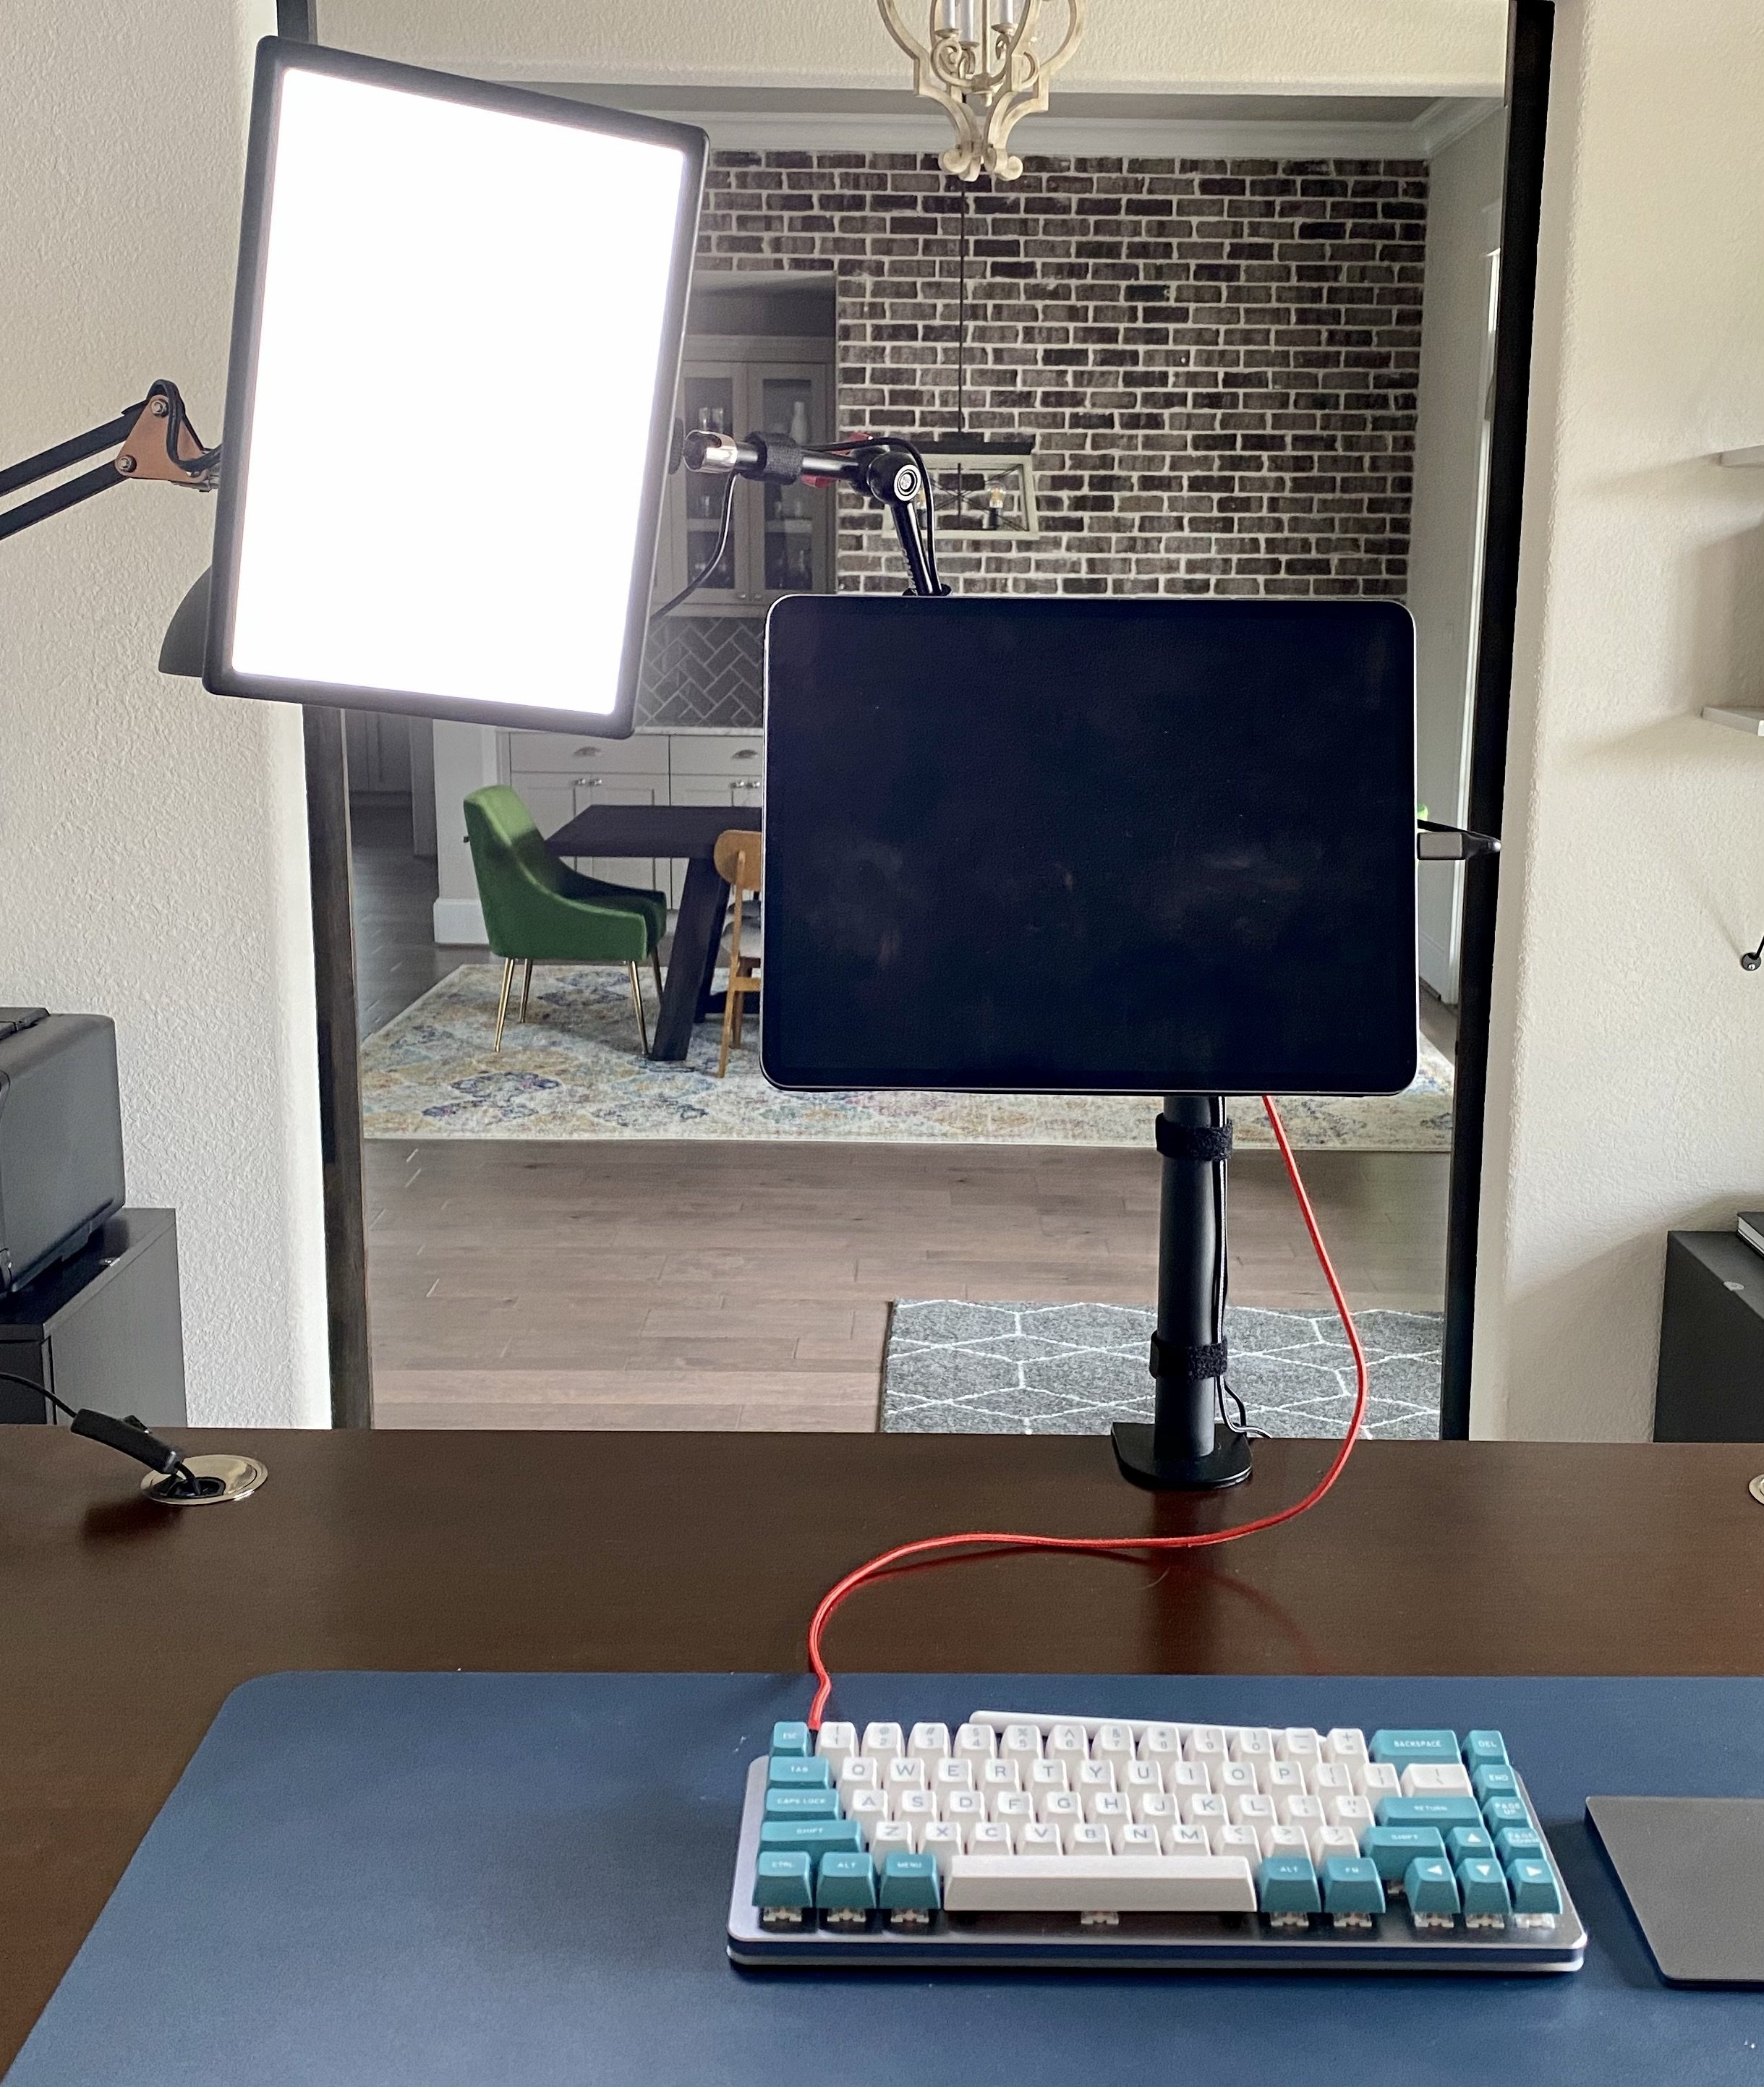
A look at some crazy setups I tried:
X100T Setup
This produced generally bad video quality because of the WiFi connection between the laptop and camera.
Canon 5D Setup
Video from this was nothing short of amazing. But the setup was incredibly cumbersome to use for casual video calls and the battery in the camera dies fast. (If you really want this, I am told there is something called dummy batteries you can look into.)
So, to Recap
Get AirPods before anything else, and find a lamp you can put on the opposite side of your face from the window. If you do that, you are already above average.
From there, I found no shortage of inexpensive options to get better quality video, which is all really based on lighting and camera position.
But you need not worry about upgrading the camera itself, the gains will not be worth it for most meeting usage. It is, certainly fun to play with though.
For me, I use the fill light on every call with my iPad Pro and AirPods Pro, and kick on the ring light if that all looks to dark. I’ll be getting that led soft light though, it looks fun to play with.