Have you ever tried to find a good flashlight app in the App Store? You might as well close your eyes and download one at random, you will either get a slow app, or a hideous app. Take your pick.
Actually, if we are honest, there really is only one aspect of a flashlight app that matters: speed.
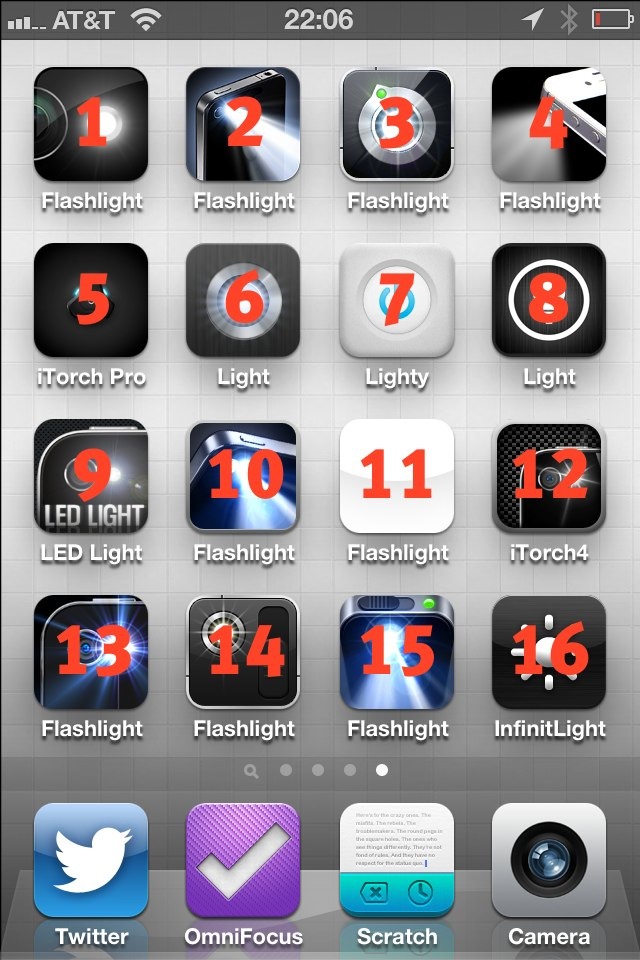
To that end I downloaded all of these:
How I spend my weekends.
I’d take the time to name them all, and link to every single one, but there’s one problem: all of them but one sucks. So instead I am just going to number them from the top corner to the bottom and tell you one thing about each: their speed.
### Side Note
Why are all flashlight apps called: `flashlight something`. Twitter developers can come up with neat names, ditto weather devs, so what’s wrong withe flashlight developers? This is another reason it’s very difficult to link to each app.
### The Speed
With a fresh reboot on my iPhone (running iOS 6b4) and no flashlight apps present in the multi-tasking tray, I launched each app and timed the speed until the LED light came on, to the best of my abilities.
Here’s the key:
The number overlay corresponds with the list below of launch times.
Here’s the results:
1. 1.6s
2. 3.3s
3. 3s
4. did not launch to an “on” LED
5. 2.1s
6. 1.6s
7. 1.1s
8. did not launch to an “on” LED
9. 2.2s
10. 2.4s
11. 2.1s
12. 1.8s
13. 1.2s
14. did not launch to an “on” LED
15. 4s
16. 2.4s
The winner is #7, also known as, Lighty. It’s a paid app (bonus points) with a decent icon and decent UI. More than that it is just the fastest of the lot. There are probably about 4,324,322 other flashlight apps, but these were the only ones I tested.
### Launch Center Pro
When I polled Twitter to see what flashlight apps they were using, I got a ton of people saying they use Launch Center Pro. I did too, but then Launch Center Pro moved off of my home screen making it a bit harder to use. My main issue with using Launch Center Pro is that it takes two taps to activate the light — I want one tap to activate the light so I can get to it as fast as I can.
### Lighty
If you are a person that uses a flashlight app on your iPhone, I have to say: of the 16 flashlight apps I tested, [Lighty](http://itunes.apple.com/us/app/lighty-flashlight-for-iphone/id391503046?mt=8) is the best.
You have got to be kidding me, 2,500 votes shy of holding the TSA responsible and the public petition is pulled. Why even bother asking for petitions if you don’t intend to honor them?
This better be a mistake, because this is bullshit.
Whether or not this “unibody” iPhone is the next iPhone or not doesn’t really matter when you dive into the design factors associated with such an iPhone the way that Don Lehman did for The Tech Block.
>Thinness is a major feature of this design. Take a look at your iPhone 4/4S from the side. Now imagine that the new design is only as thick as the metal band. That’s a big deal. From my estimates, that would make this design anywhere from 2-3mm thinner than the iPhone 4S. That sounds small, but it’s a huge difference. That’s as much as 32 percent thinner. As a point of comparison, the Retina MacBook Pro is only 25 percent thinner than the old MacBook Pro.
If we accept the fact that the new iPhone is going to be taller — whether or not that changes the physical height of the device — I think it will be doubly important for Apple to further reduce the thickness of the iPhone. Currently the 4S is a great phone, but it will *always* be too thick in your pocket.
You may disagree, you may think the iPhone fits nicely in your pocket, but that’s only because you are used to it. I don’t want any new features in an iPhone, except for it to be thinner.
That said, with a thinner phone you need to make the structure more solid — otherwise you have the potential for the device to snap in half when a user bends his leg with the phone in their pocket. That is what interests me so very much about this design.
This rumored design is 32% thinner as Lehman points out **and** much stronger than the current iPhone — that sounds like a win to me.
>Shawn and Ben talk about fax machines, open source software, the future of the digital landscape and how that affects the apps we use today, and the right and wrong ways to publish a link list-type blog.
This is news because TextMate 2 has been the Duke Nukem Forever of the Mac nerd community for so long and also because of what open sourcing the project means to users.
This likely means we will never see a final TextMate 2 build, of the quality and polish that all TextMate users have come to hope for and in that respect this comes as saddening news.
I am personally torn — I supported TextMate 2 irrationally for much longer than I should have, while I stumbled along with TextMate 1.5. The thing is: TextMate 1.5 still works, and works fine for most of what I use it for, but with the changes to Mac OS X its age is showing in many spots. The alpha builds of TextMate 2 have been nice, but buggy and mostly unusable even for a non-coder like me.
Unlike so many other people, I haven’t switched to Sublime Text 2 or Chocolat ((The latter because the name reminds me of a bad movie.)) — no I decided to jump fully into Coda 2 and Writer. I haven’t missed TextMate since making the change a while back, but I always held out hope to switch back to it.
As for TextMate 2 and its future , this presents an interesting crossroads for the app. Either it will languish in development and interest and become but a blip in Mac nerd memory, or it will be rapidly worked on with the potential to become the best open sourced text editor for the Mac.
The latter is probably not likely, but I still irrationally hold out hope that the latter is what occurs.
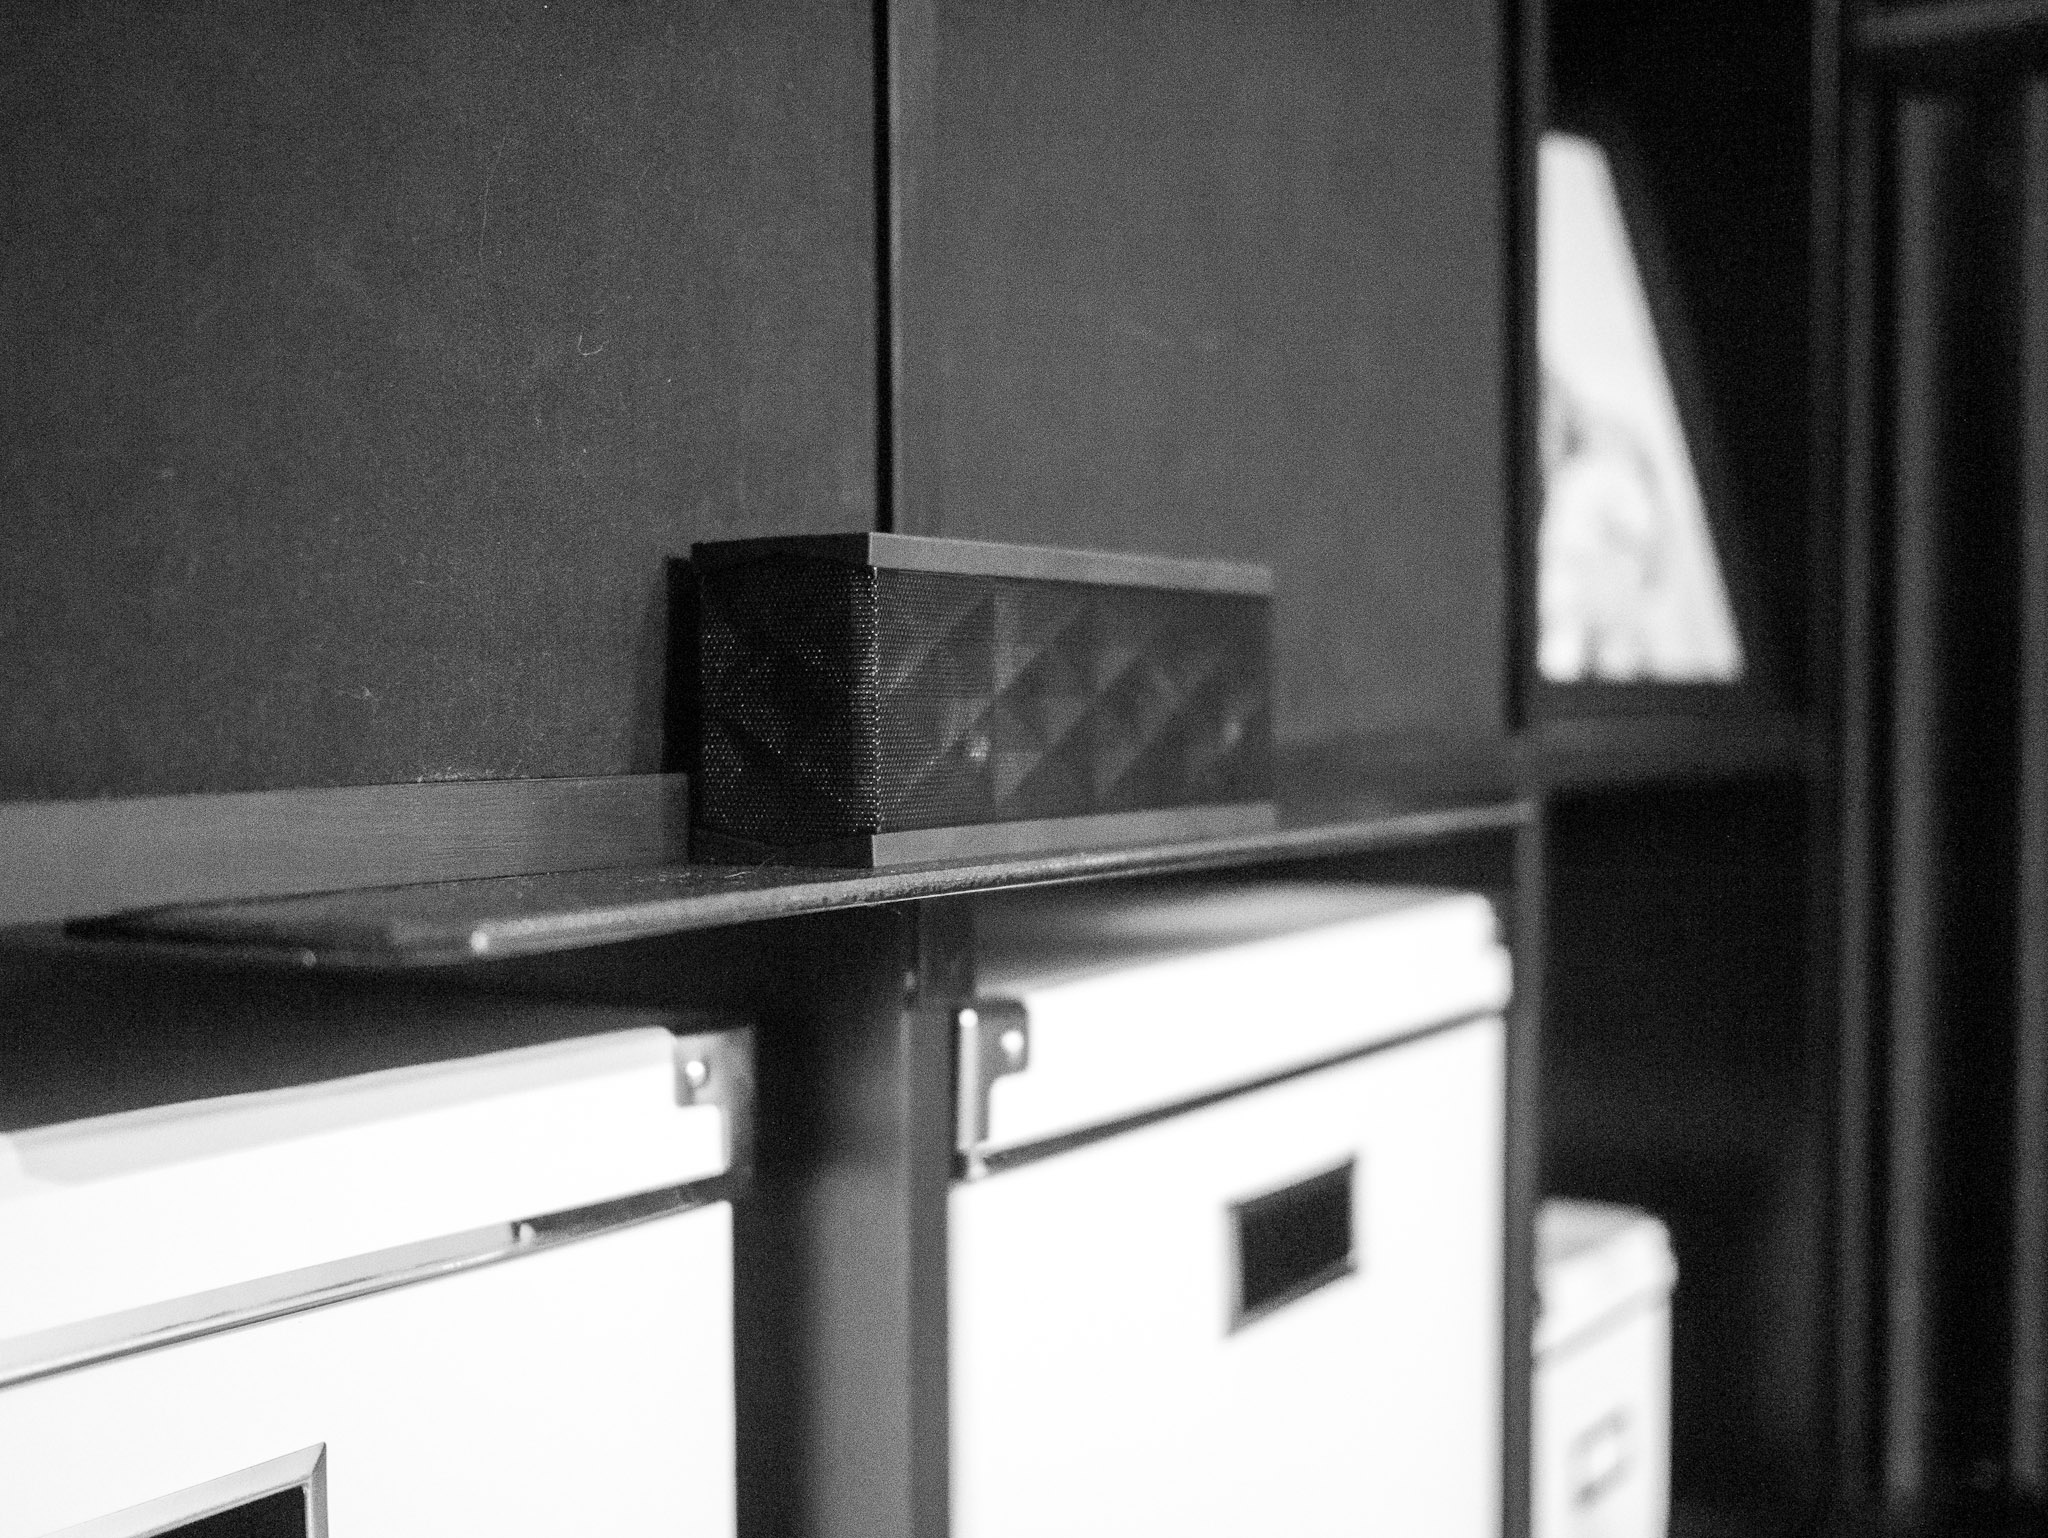
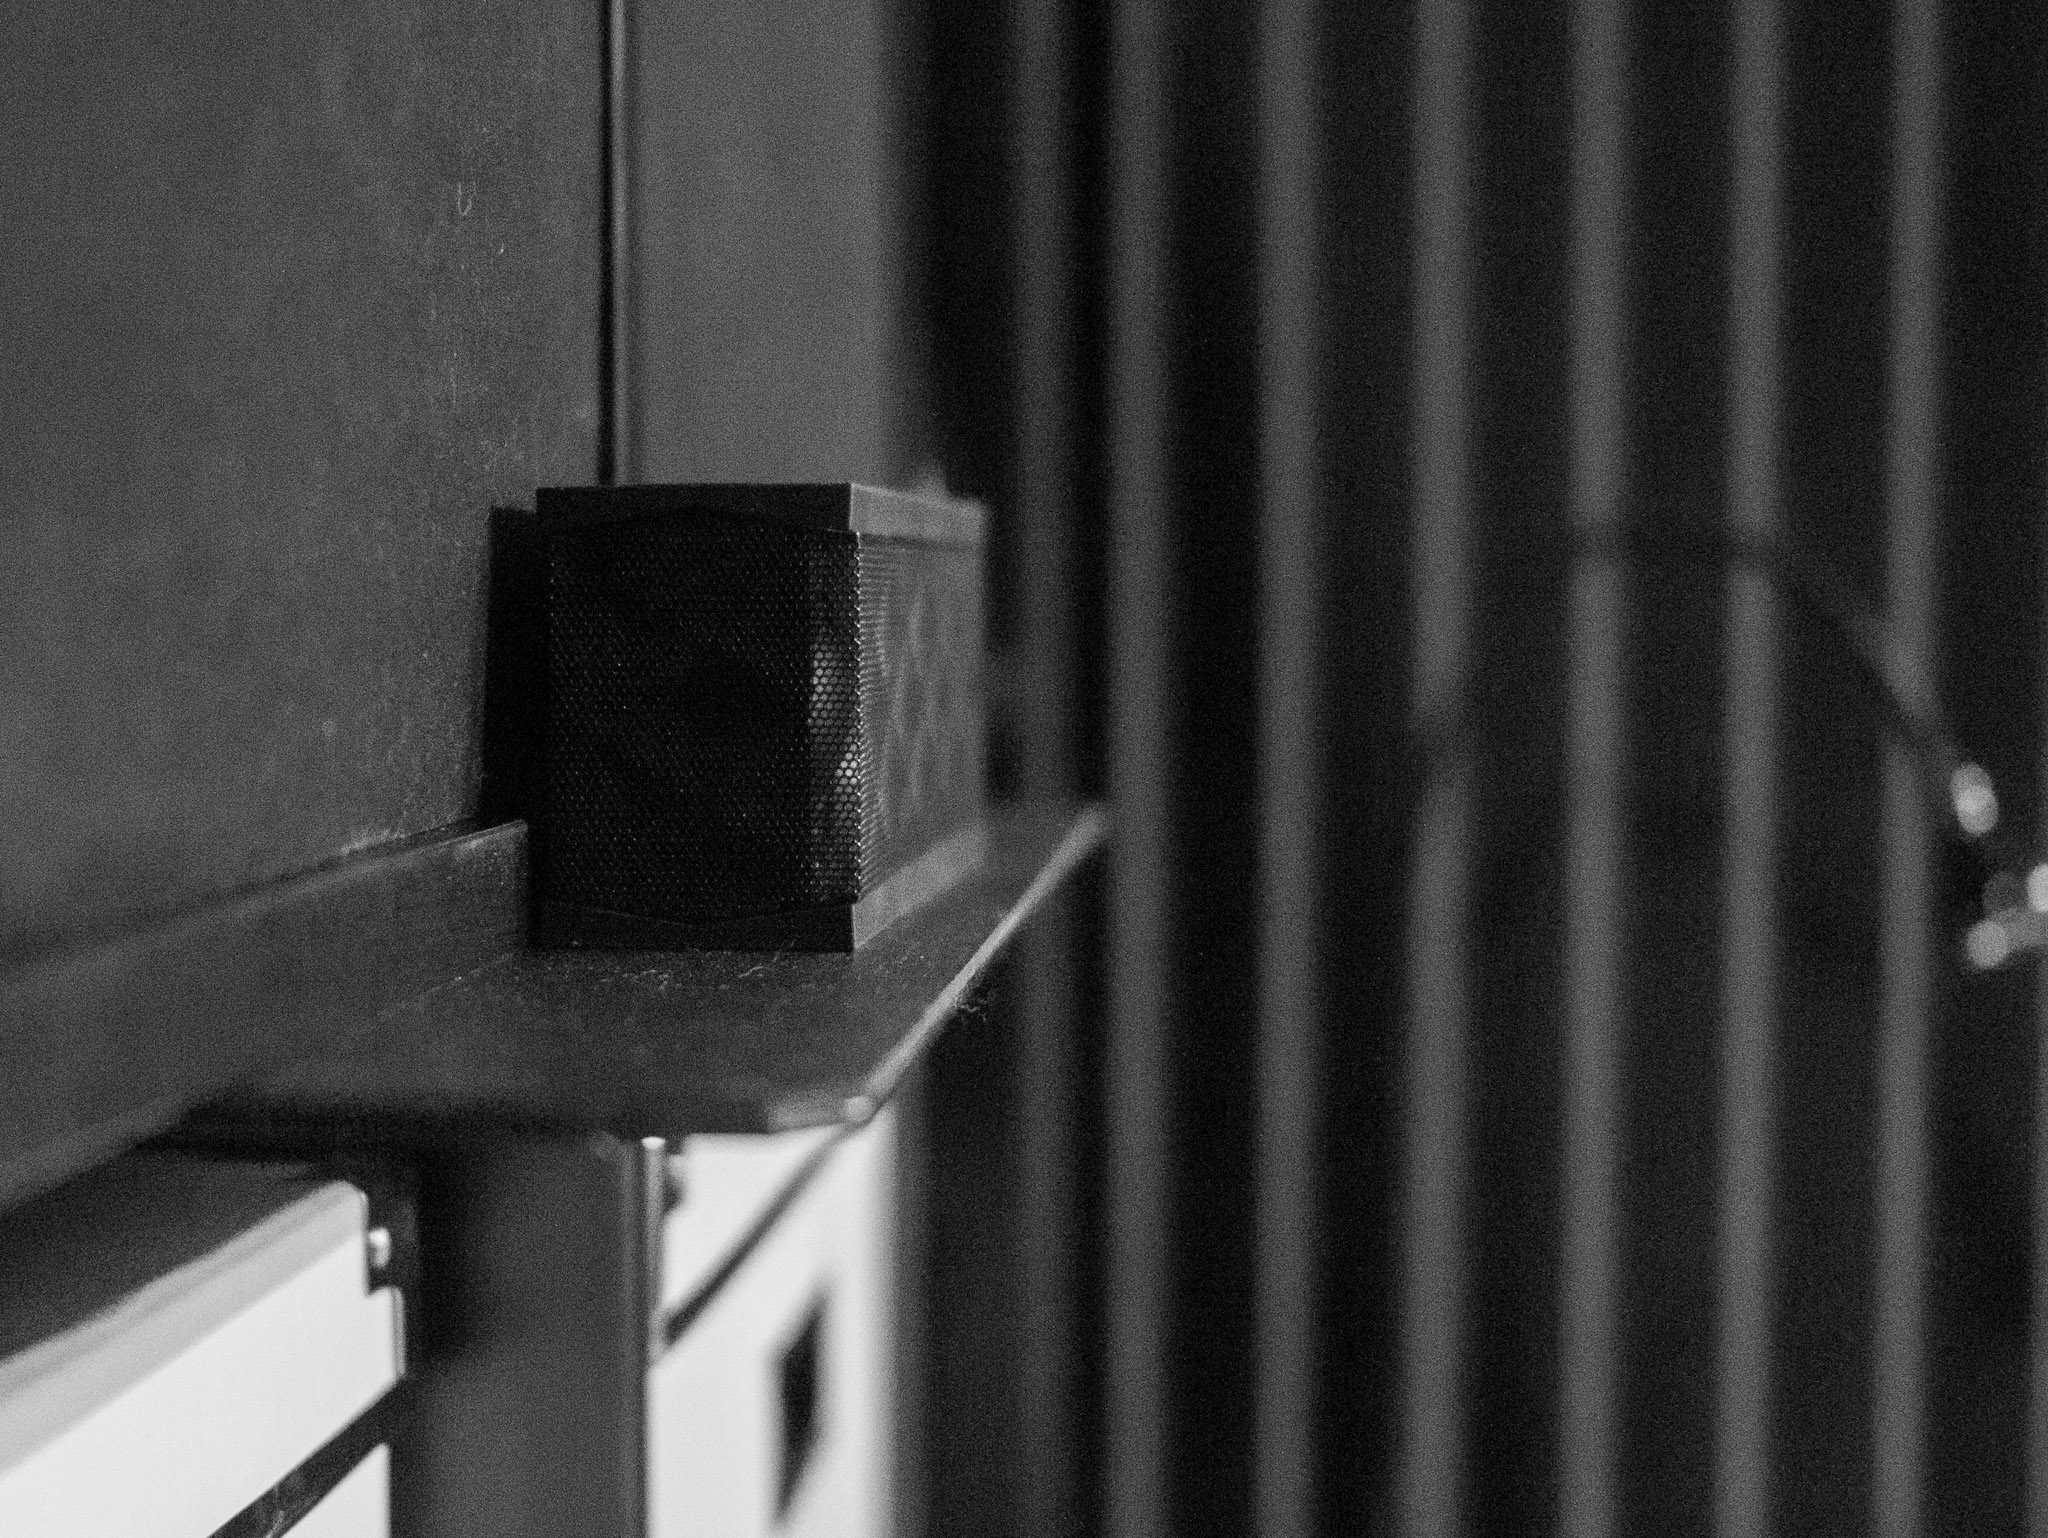
I recently moved my desk so that instead of being against a wall, the back side of the desk is against a large [Ikea bookshelf](http://www.amazon.com/exec/obidos/ASIN/B0050PEC2W/ref=nosim&tag=brooksreview-20). Since I have had this particular desk I haven’t found a truly good spot for my [Jambox](http://www.amazon.com/exec/obidos/ASIN/B004E10KI8/ref=nosim&tag=brooksreview-20) — a spot the centers the device with my head so that I can get decent sound out of it.
This, was bugging me.
In looking at how my desk centered on the shelf and the height of the shelf unit, I thought it would be great to build a little shelf that the Jambox could sit on that stuck out from the Ikea shelf.
So I did just that, and the end result is one of the thinnest and strongest shelves I have built — so I thought I would share.
I basically notched a piece of steel, painted it, covered it with foam, and screwed it in place. That’s the simple explanation, but for those of you that don’t know what I just said I will go through step by step.
Here’s what we want to end up with:
To get there you need to buy, or have, the following supplies:
– [Hacksaw](http://www.amazon.com/exec/obidos/ASIN/B00002X227/ref=nosim&tag=brooksreview-20), with [saw blades](http://www.amazon.com/exec/obidos/ASIN/B002KHNCQ0/ref=nosim&tag=brooksreview-20).
– [Metal File](http://www.amazon.com/exec/obidos/ASIN/B001R1QCE4/ref=nosim&tag=brooksreview-20)
– [Simpson Strong-Tie](http://www.amazon.com/exec/obidos/ASIN/B003YHEEDU/ref=nosim&tag=brooksreview-20) (this is the shelf)
– Some sort of liner to put on top, I used something like [this](http://www.amazon.com/exec/obidos/ASIN/B002AS9NGC/ref=nosim&tag=brooksreview-20).
– [Some black spray paint](http://www.amazon.com/exec/obidos/ASIN/B002BWOS6C/ref=nosim&tag=brooksreview-20).
– Spray glue, [I used this](http://www.amazon.com/exec/obidos/ASIN/B0002BBV2S/ref=nosim&tag=brooksreview-20), but this [low strength stuff](http://www.amazon.com/exec/obidos/ASIN/B0000AZ735/ref=nosim&tag=brooksreview-20) should be fine.
– Screws (sorry, no Amazon link for these)
– A [screwdriver](http://www.amazon.com/exec/obidos/ASIN/B0015SBILG/ref=nosim&tag=brooksreview-20) or a [screw gun](http://www.amazon.com/exec/obidos/ASIN/B0046RE72K/ref=nosim&tag=brooksreview-20) of some sort.
– [Some pliers](http://www.amazon.com/exec/obidos/ASIN/B00004SBCU/ref=nosim&tag=brooksreview-20).
### Step 1
Now that you have all the goods, time to get started. Remember we want this:
Since my shelf spans over the vertical divider on the shelving unit I had to notch the shelf (you can skip this, and buying a hacksaw and blades, if you don’t need to span over a vertical support). Just measure the width of the shelf you need to span so you know how wide your notch needs to be. Make two marks centered on the metal where your cuts need to be and how far down. Saw down about an inch, or enough to get the holes to be safely inside the edge of whatever material you will be screwing the shelf into.
Once you have two cuts made, you just bend down the ‘tongue’ that you created with your pliers. This will also act as additional support, but mostly saves you all the trouble of having to cut off that flange in a clean manner.
Now that this is done your metal cutting is over — short lived as it was.
### Step 2
Now grab your file. The goal here is to file every rough edge, or corner, on the metal so that it is smooth. Focus on the parts that will be exposed — also if your cut was crooked or wavy, you can smooth it a bit with the file. Take long smooth strokes with the file pushing it away from you and not pulling it back (lift it off the surface). Pay attention to the corners that are beveled already.
Once you are happy with how smooth the metal edges are, you can move on — but this is your only chance to smooth them.
### Step 3
Now it’s time to paint. All you want to do is coat the entire piece of metal with the paint color of your choice.
#### Some Tips
1. Don’t try to coat everything on one pass. Slowly build the paint to avoid runs in the paint.
2. Clean the surface thoroughly before painting.
3. Don’t do this indoors.
4. Let the paint fully cure overnight so that you can work with the shelf without getting finger prints embedded in the paint.
5. Don’t be afraid to re-coat if you need to, read the side of the paint can for directions on how long to wait before re-coating.
6. Spray past the ends of the metal for complete coverage.
7. Be sure to paint the edges of the metal as they will show.
### Step 4
Once the paint is dry, it is now time to affix the liner to the shelf. Roll out your liner on a workbench and put the top of the shelf down on the liner. Cut a rough shape out of the liner using a knife or scissors, leaving enough overhang on each side. (This makes the fine tuning step easier.)
Once cut out, you will need to place the liner and the shelf on some cardboard. Place the liner face down and the shelf face up (the side you want to be up on the shelf, should be up).
Now spray both the liner and the shelf with the spray glue you purchased — don’t go crazy, just one pass will do.
**Make sure to get from edge to edge — that is most important.**
Now spray glue is messy, but it is effective. Wait about 15 minutes or so and pick up the liner — carefully.
You will now place it on the shelf, glue-side to glue-side. Be sure to leave overhang on each edge.
#### Tip
I tend to start from the center and smooth outward with spray glue to avoid all bubbles.
### Step 5
Now that the liner is on the shelf, and you have given it 20 minutes or so to setup, we can trim the edges. I just took the shelf and placed it liner side down on a workbench I didn’t mind cutting into and took a box knife to trim the edges of the liner off. For the tongue I took and cut the notches in the liner and rolled it down onto the tongue so that it too was covered.
### Step 6
Your shelf is done, now it is time to install it. If you laid out the shelf correctly there should be pre-drilled holes in the metal that you can feed the screw through. If not you can drill a couple of holes.
Two screws should be good on either end to hold most items — I put four in for symmetry.
Ted Burnham reports, for NPR, on a study that shows defects in the manufacturing process of most all compact fluorescent lightbulbs; a defect which can allow UV rays through. UV rays are both damaging to skin and art alike.
That’s CFLs, but smart people stay away from them because they have a pretty bad quality of light and prefer “standard” bulbs or high quality LED bulbs.
But CFLs are cheap and are being pushed heavily by energy companies in the U.S., with many of those companies offering trade-ins for standard bulbs.
Burnham also looked at LED lightbulbs and found that even if the same coating is damaged (the one that allows UV rays to leak through CFLs) in LEDs, the light becomes blue *and* stays out of the UV spectrum — in other words there is no harm. This is fascinating and I wonder what the potential liability is for CFL manufacturers will be in the coming years.
All the more reason to buy [my favorite LED lightbulb](https://brooksreview.net/2012/04/amazon-led-bulb/), or you could [buy Marco’s favorite](http://www.marco.org/2012/07/31/two-new-led-bulbs).
Austin Seraphin writing about the official Mac Twitter app, from the perspective of a blind user:
>And now we come to the point of this article. The official Twitter app for the Mac has zero accessibility. I don’t mean a little, or enough to get by, I mean nothing. VoiceOver shows a close button, a minimize button, and a zoom button. And nothing else.
I was actually just talking to Marco Arment about accessibility and how so many apps get it wrong. I am not blind so I don’t rely on on such features, but as we know the iPhone is a very helpful tool for the blind, so I was saddened to hear from Marco of how poorly so many apps fare in accessibility testing.
Voice over, and general accessibility, features probably aren’t important to many people in the grand scheme of the App Store, but for those that it is important to, such features become critically important.
If you want to see just what I mean go to: Settings > General > Accessibility > Triple-click Home > VoiceOver. Exit settings and triple click your home button, now launch any third party app you rely on and try to use it with your eyes closed. The iPhone will speak what you are touching, unless the app isn’t properly coded: which is likely the case.
Finding this out actually bummed me out. I am thinking that I will start to include notes about Voice Over support in my reviews of apps — and look into anything I can do to this site to improve accessibility.